Sending an email in web application is very common. Laravel provides the predefined Mail class used to send mail. We only need to use & configure it. The content of this article is very useful to understand the things that we need to send a email using SMTP.
Inside this article we will see the concept of Laravel 9 How To Send Automatic Email Using Gmail SMTP Server Tutorial. We will use Gmail and it’s SMTP details. Article contains classified information about the concept of sending email in laravel 9.
To get the complete concept of this article you need SMTP details. In this article we will create a Cron which sends birthday wishes to emails of company’s employees on their birthday date.
Learn More –
- Laravel 9 How to Get Last Executed Query Tutorial
- Laravel 9 How To Get Last Record of Database Table
- Laravel 9 How To Install Tailwind CSS in Application
- Laravel 9 How To Generate Dynamic Sitemap Tutorial
Let’s get started.
Laravel Installation
Open terminal and run this command to create a laravel project.
composer create-project laravel/laravel myblogIt will create a project folder with name myblog inside your local system.
To start the development server of laravel –
php artisan serveURL: http://127.0.0.1:8000
Assuming laravel already installed inside your system.
SMTP Configuration
To configure SMTP details, open up the file .env from application root.
We will pass mail driver as gmail server, mail host, mail port, mail username, mail password.
//..

MAIL_MAILER=smtp
MAIL_HOST=smtp.gmail.com
MAIL_PORT=465
MAIL_USERNAME="xxxyyyzzz@gmail.com"
MAIL_PASSWORD="your_password"
MAIL_ENCRYPTION=null
MAIL_FROM_ADDRESS="xxxyyyzzz@gmail.com"
MAIL_FROM_NAME="Online Web Tutor"

//...
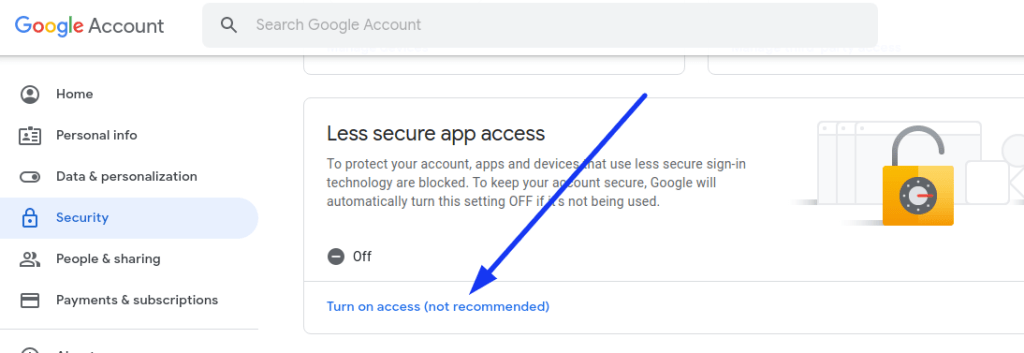
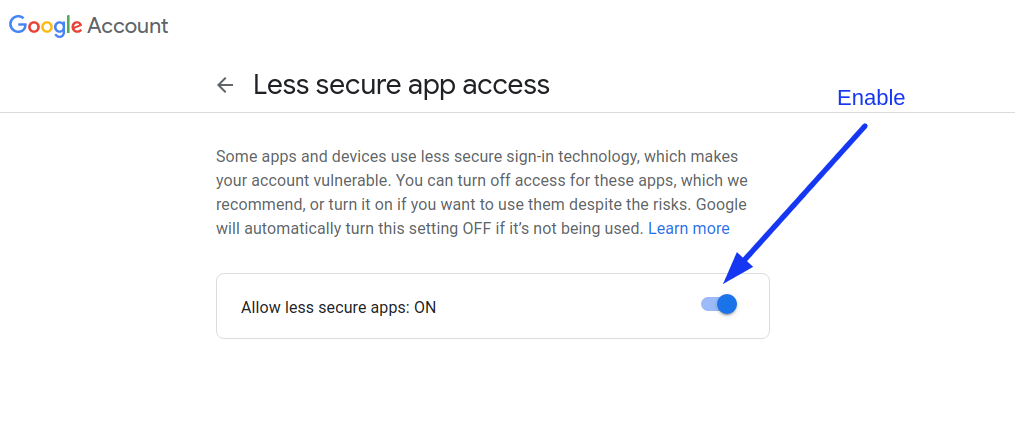
Make sure you have enabled google security setting form your gmail. go to Google account and click on “Account”. Once you are on the “Account” page, click on “Security“. Scroll down to the bottom and you will find “Less secure app access” settings. Set as ON.
Have a look into these images.
Create Migration – Update Users Table
Open project into terminal and run this artisan command.
$ php artisan make:migration add_birthdate_columnIt will create a file 2022_06_07_151002_add_birthdate_column.php inside /database/migrations folder.
Open file and write this code into it.
<?php

use Illuminate\Database\Migrations\Migration;
use Illuminate\Database\Schema\Blueprint;
use Illuminate\Support\Facades\Schema;

return new class extends Migration
{
    /**
     * Run the migrations.
     *
     * @return void
     */
    public function up()
    {
        Schema::table('users', function (Blueprint $table) {
            $table->date('birthdate')->nullable();
        });
    }

    /**
     * Reverse the migrations.
     *
     * @return void
     */
    public function down()
    {
        //
    }
};
Run Migration
Back to project terminal and run this command to migrate migrations.
$ php artisan migrateIt will run all migrations and create their respective tables.
Update User Model
Open User.php file from /app/Models folder. Add birthdate column into $fillable array.
<?php
namespace App\Models;
use Illuminate\Contracts\Auth\MustVerifyEmail;
use Illuminate\Database\Eloquent\Factories\HasFactory;
use Illuminate\Foundation\Auth\User as Authenticatable;
use Illuminate\Notifications\Notifiable;
use Laravel\Sanctum\HasApiTokens;
class User extends Authenticatable
{
use HasApiTokens, HasFactory, Notifiable;
/**
* The attributes that are mass assignable.
*
* @var array
*/
protected $fillable = [
'name',
'email',
'password',
'birthdate'
];
/**
* The attributes that should be hidden for serialization.
*
* @var array
*/
protected $hidden = [
'password',
'remember_token',
];
/**
* The attributes that should be cast.
*
* @var array
*/
protected $casts = [
'email_verified_at' => 'datetime',
];
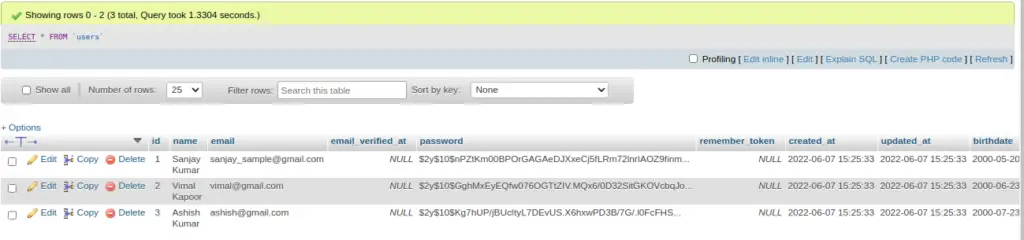
}Create Test Users
We will use the concept of data seeder for this application.
Back to terminal and run this command.
$ php artisan make:seeder UserSeederIt will create a file UserSeeder.php file inside /database/seeders folder.
Open UserSeeder.php and write this code into it.
<?php

namespace Database\Seeders;

use Illuminate\Database\Console\Seeds\WithoutModelEvents;
use Illuminate\Database\Seeder;
use App\Models\User;

class UserSeeder extends Seeder
{
    /**
     * Run the database seeds.
     *
     * @return void
     */
    public function run()
    {
        $users = [
            [
                "name" => "Sanjay Kumar",
                "email" => "sanjay_sample@gmail.com",
                "password" => bcrypt("123456"),
                "birthdate" => "2000-05-20"
            ],
            [
                "name" => "Vimal Kapoor",
                "email" => "vimal@gmail.com",
                "password" => bcrypt("123456"),
                "birthdate" => "2000-06-23"
            ],
            [
                "name" => "Ashish Kumar",
                "email" => "ashish@gmail.com",
                "password" => bcrypt("123456"),
                "birthdate" => "2000-07-23"
            ]
        ];

        foreach ($users as $key => $value) {
            User::create($value);
        }
    }
}
Run Data Seeder
Back to terminal and run this command. This command will execute the only this specific seeder file.
$ php artisan db:seed --class=UserSeederIt will insert test user rows into users table.
Create Mail Class
Next,
Create mail class via artisan command which will be responsible for sending emails.
$ php artisan make:mail BirthDayWishIt will create a folder with the name of Mail inside /app folder. You should see a file BirthDayWish.php inside /app/Mail folder.
Open file BirthDayWish.php and write this code into it.
<?php

namespace App\Mail;

use Illuminate\Bus\Queueable;
use Illuminate\Contracts\Queue\ShouldQueue;
use Illuminate\Mail\Mailable;
use Illuminate\Queue\SerializesModels;

class BirthDayWish extends Mailable
{
    use Queueable, SerializesModels;

    public $user;

    /**
     * Create a new message instance.
     *
     * @return void
     */
    public function __construct($user)
    {
        $this->user = $user;
    }

    /**
     * Build the message.
     *
     * @return $this
     */
    public function build()
    {
        return $this->subject('Wishing you Happy Birthday ' . $this->user->name)
            ->view('emails.birthdayWish');
    }
}
Create Mail Template
Let’s create a folder emails inside /resources/views folder. Inside this folder we will create a simple blade template file with basic content.
Create a fie birthdayWish.blade.php inside /resources/views/emails folder.
Open file and write this code into it.
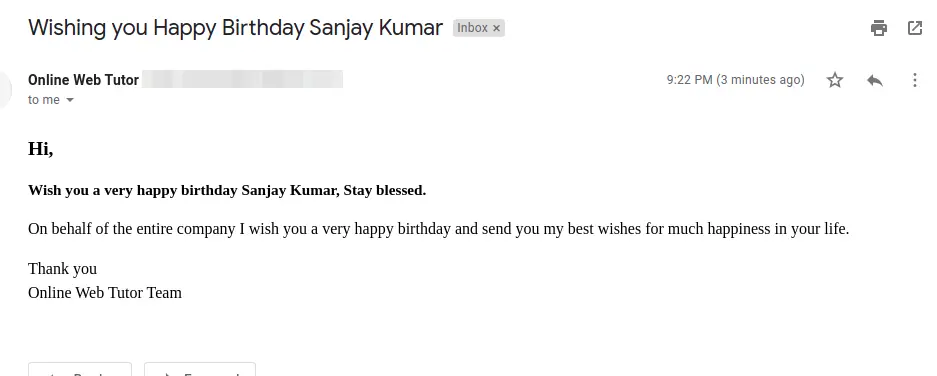
<h2>Hi, </h2>
<h3>Wish you a very happy birthday {{ $user->name }}, Stay blessed.</h3>

<p>On behalf of the entire company I wish you a very happy birthday and send you my best wishes for much happiness in your life.</p>

Thank you <br/>
Online Web Tutor Team
Create Command
Back to project terminal and run this command to create a command file.
$ php artisan make:command AutoBirthDayWishIt will create a file AutoBirthDayWish.php inside /app/Console/Commands folder.
Open file and write this code into it.
<?php

namespace App\Console\Commands;

use Illuminate\Console\Command;
use App\Models\User;
use Illuminate\Support\Facades\Mail;
Use App\Mail\BirthDayWish;

class AutoBirthDayWish extends Command
{
    /**
     * The name and signature of the console command.
     *
     * @var string
     */
    protected $signature = 'auto:wishbirthday';

    /**
     * The console command description.
     *
     * @var string
     */
    protected $description = 'This command is a birthday wisher cron for company employees.';

    /**
     * Execute the console command.
     *
     * @return int
     */
    public function handle()
    {
        $users = User::whereMonth('birthdate', date('m'))
            ->whereDay('birthdate', date('d'))
            ->get();

        if ($users->count() > 0) {
            foreach ($users as $user) {
                Mail::to($user)->send(new BirthDayWish($user));
            }
        }

        return 0;
    }
}
This will create a command inside artisan’s list i.e auto:wishbirthday
Next, we need to scheduled this command daily.
Schedule Cron Command
So let’s do it in Kernel.php file from /app/Console folder.
Add this command link into it to execute command on daily basis.
<?php

namespace App\Console;

use Illuminate\Console\Scheduling\Schedule;
use Illuminate\Foundation\Console\Kernel as ConsoleKernel;

class Kernel extends ConsoleKernel
{
    /**
     * Define the application's command schedule.
     *
     * @param  \Illuminate\Console\Scheduling\Schedule  $schedule
     * @return void
     */
    protected function schedule(Schedule $schedule)
    {
        $schedule->command('auto:wishbirthday')->daily();
    }

    /**
     * Register the commands for the application.
     *
     * @return void
     */
    protected function commands()
    {
        $this->load(__DIR__ . '/Commands');

        require base_path('routes/console.php');
    }
}
Cron Job Setup on Server
Open terminal and type the command
$ crontab -lThis command will list all crons that you have added.
Now, To add new cron tasks, again back to terminal and type the command
$ crontab -eIt will open an interface to your terminal to register or add new tasks. So let’s add
* * * * * cd /path-to-your-project && php artisan schedule:run >> /dev/null 2>&1
- * * * * * Trigger Time, It indicates our task will run every minute
- /path-to-your-project This is path of laravel application project
- php artisan schedule:run Command to run.
Application Testing
Run this command into project terminal to start development server,
php artisan serveNow, you can check on server as well.
Now, you will get email birthday wish on match. you will receive email as like below:

We hope this article helped you to learn about Laravel 9 How to Send Automatic Email Tutorial in a very detailed way.
If you liked this article, then please subscribe to our YouTube Channel for PHP & it’s framework, WordPress, Node Js video tutorials. You can also find us on Twitter and Facebook.
Read more