Inside this article we will see the concept i.e Laravel 9 How to generate dynamic sitemap tutorial. This article contains classified information about generating a sitemap.xml for a laravel application.
A sitemap lists a website’s most important pages, thus, making sure search engines can find and crawl them. Sitemaps also help in understanding your website structure, making it easier to navigate your website.
If you are wondering to find a solution to generate dynamic sitemap for laravel 9 application.
Learn More –
- Laravel 9 View Logs Using LogViewer Package Tutorial
- Laravel 9 How To Work with Ajax Post Request
- Laravel 9 How to Work with Telescope Tutorial
- Laravel 9 HTTP cURL DELETE Request Tutorial
Let’s get started.
Laravel Installation
Open terminal and run this command to create a laravel project.
composer create-project laravel/laravel myblogIt will create a project folder with name myblog inside your local system.
To start the development server of laravel –
php artisan serveURL: http://127.0.0.1:8000
Assuming laravel already installed inside your system.
Create Database & Connect
To create a database, either we can create via Manual tool of PhpMyadmin or by means of a mysql command.
CREATE DATABASE laravel_app;
To connect database with application, Open .env file from application root. Search for DB_ and update your details.
DB_CONNECTION=mysql
DB_HOST=127.0.0.1
DB_PORT=3306
DB_DATABASE=laravel_app
DB_USERNAME=root
DB_PASSWORD=root
Create Model & Migration
Open project into terminal and run this command.
$ php artisan make:model Post -mThis command will create two files.
- A model file Post.php inside /app/Models folder.
- A migration file 2022_04_26_013730_create_posts_table.php inside /database/migrations folder.
Open xxx_create_posts_table.php migration file and write this code into it. This will create posts table into database.
<?php
use Illuminate\Database\Migrations\Migration;
use Illuminate\Database\Schema\Blueprint;
use Illuminate\Support\Facades\Schema;
return new class extends Migration
{
/**
* Run the migrations.
*
* @return void
*/
public function up()
{
Schema::create('posts', function (Blueprint $table) {
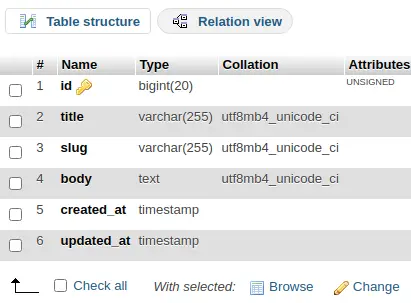
$table->id();
$table->string('title');
$table->string('slug');
$table->text('body');
$table->timestamps();
});
}
/**
* Reverse the migrations.
*
* @return void
*/
public function down()
{
Schema::dropIfExists('posts');
}
};
Run Migration
Back to project terminal and run this command to migrate migrations.
$ php artisan migrateIt will run all migrations and create their respective tables.
Table: posts
Open Post.php model file from /app/Models folder. Write this code into it.
<?php

namespace App\Models;

use Illuminate\Database\Eloquent\Factories\HasFactory;
use Illuminate\Database\Eloquent\Model;

class Post extends Model
{
    use HasFactory;

    protected $fillable = [
        'title', 'slug', 'body'
    ];
}
Create Post Factory (Test Data)
Next,
We will create a factory file by the help of which we can create test data for this laravel application.
$ php artisan make:factory PostFactoryIt will create a file PostFactory.php file inside /database/factories folder.
Open file and write this complete code into it.
<?php

namespace Database\Factories;

use Illuminate\Database\Eloquent\Factories\Factory;
use Illuminate\Support\Str;

/**
 * @extends \Illuminate\Database\Eloquent\Factories\Factory<\App\Models\Post>
 */
class PostFactory extends Factory
{
    /**
     * Define the model's default state.
     *
     * @return array<string, mixed>
     */
    public function definition()
    {
        return [
            'title' => $this->faker->text(),
            'slug' => Str::slug($this->faker->text()),
            'body' => $this->faker->paragraph()
        ];
    }
}
Run Factory File – Seed Data
We will use tinker shell to run factory and generate application’s fake data.
Back to project terminal and execute these commands –
$ php artisan tinkerIt will open tinker shell. Next, run this command to create 50 fake rows for posts table.
>>> App\Models\Post::factory()->count(50)->create();Above command will insert 50 fake rows.

Create Controller
Next,
Back to terminal and run this artisan command for controller file.
$ php artisan make:controller SitemapControllerIt will create SitemapController.php file inside /app/Http/Controllers folder.
Open file and write this complete code into it.
<?php

namespace App\Http\Controllers;

use Illuminate\Http\Request;
use App\Models\Post;

class SitemapController extends Controller
{
    public function index($value = '')
    {
        $posts = Post::latest()->get();

        return response()->view('sitemap', [
            'posts' => $posts
        ])->header('Content-Type', 'text/xml');
    }
}
Create Template File
Create a file sitemap.blade.php inside /resources/views folder.
Open file and write this code into it.
<?php echo '<?xml version="1.0" encoding="UTF-8"?>'; ?>
<urlset xmlns="http://www.sitemaps.org/schemas/sitemap/0.9">
@foreach ($posts as $post)
<url>
<loc>{{ url('/') }}/post/{{ $post->slug }}</loc>
<lastmod>{{ $post->created_at->tz('UTC')->toAtomString() }}</lastmod>
<changefreq>daily</changefreq>
<priority>0.8</priority>
</url>
@endforeach
</urlset>
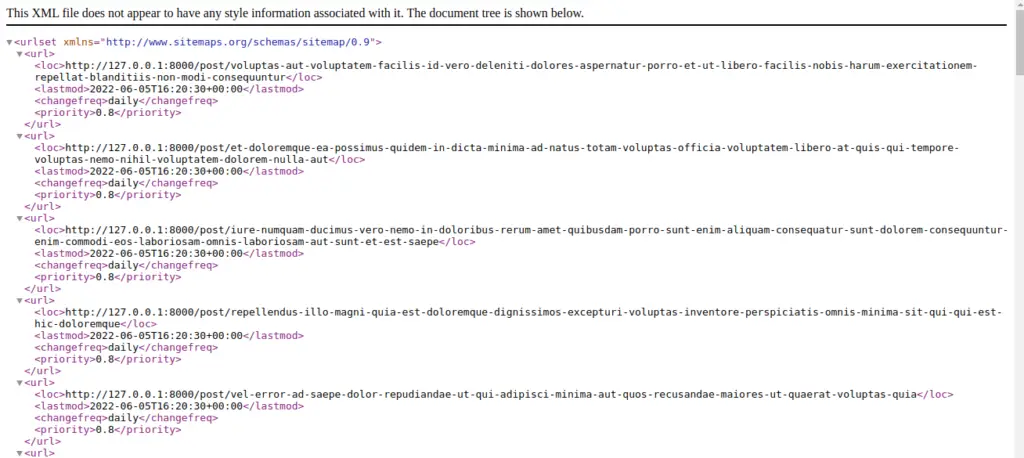
Above is the structure which will be used and generates a dynamic sitemap.xml file.
Add Route
Open web.php file from /routes folder. Add this route into it.
//...

use App\Http\Controllers\SitemapController;

Route::get('sitemap.xml', [SitemapController::class, 'index']);

//...
Application Testing
Run this command into project terminal to start development server,
php artisan serveURL: http://127.0.0.1:8000/sitemap.xml
We hope this article helped you to learn about Laravel 9 How To Generate Dynamic Sitemap Tutorial in a very detailed way.
If you liked this article, then please subscribe to our YouTube Channel for PHP & it’s framework, WordPress, Node Js video tutorials. You can also find us on Twitter and Facebook.
Read more