Inside this article we will see the concept i.e Laravel Migration Add Column After Specific Column Tutorial. Article contains the classified information about How to Add Column After A Column In Laravel Migration.
When we explore application in some advanced features then at some point we need to alter table and it’s properties. So, here in this short tutorial we will see How to add a new column to existing table of laravel using migration concept.
Read More: Laravel Change Table or Column Name with Data Type
Let’s get started.
Laravel Installation
Open terminal and run this command to create a laravel project.
composer create-project laravel/laravel myblogIt will create a project folder with name myblog inside your local system.
To start the development server of laravel –
php artisan serveURL: http://127.0.0.1:8000
Assuming laravel already installed inside your system.
Create a Migration File
Let’s consider a migration file for this.
Open project into terminal and run this command to create a posts migration file for posts table.
$ php artisan make:migration create_posts_tableIt will create a file i.e xxx_create_posts_table.php inside /database/migrations folder.
<?php

use Illuminate\Database\Migrations\Migration;
use Illuminate\Database\Schema\Blueprint;
use Illuminate\Support\Facades\Schema;

return new class extends Migration
{
    /**
     * Run the migrations.
     *
     * @return void
     */
    public function up()
    {
        Schema::create('posts', function (Blueprint $table) {
            $table->id();
            $table->string('title');
            $table->string('slug');
            $table->string('body');
            $table->timestamps();
        });
    }

    /**
     * Reverse the migrations.
     *
     * @return void
     */
    public function down()
    {
        Schema::dropIfExists('posts');
    }
};
Next, run this command.
$ php artisan migrateRead More: Convert CSV File Data To JSON String Using PHP Tutorial
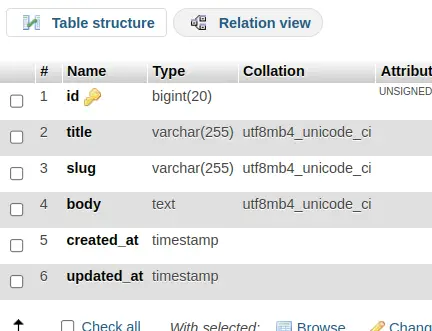
Once you migrate, it will create posts table in your database.
Add Column After a Specific Column
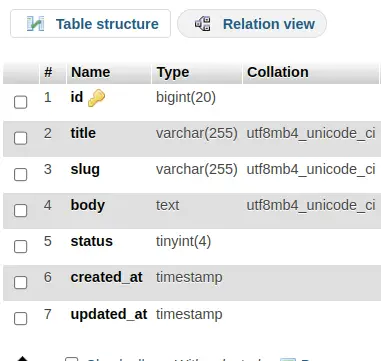
Let’s add a column with name “status” after “body”.
Back to terminal and run this command.
$ php artisan make:migration add_new_column_postsIt will create a file i.e xxx_add_new_column_posts.php inside /database/migrations folder.
Open file and write this complete code into it.
<?php

use Illuminate\Database\Migrations\Migration;
use Illuminate\Database\Schema\Blueprint;
use Illuminate\Support\Facades\Schema;

return new class extends Migration
{
    /**
     * Run the migrations.
     *
     * @return void
     */
    public function up()
    {
        Schema::table('posts', function($table){

            $table->tinyInteger('status')->after('body');
        });
    }

    /**
     * Reverse the migrations.
     *
     * @return void
     */
    public function down()
    {
        //
    }
};
Next, run this command.
$ php artisan migrateOnce you migrate, it will update posts table.
Read More: How To Drop Column From Migration in Laravel Tutorial
Add a status column after body column into your table of database.
We hope this article helped you to learn about Laravel Migration Add Column After Specific Column Tutorial in a very detailed way.
If you liked this article, then please subscribe to our YouTube Channel for PHP & it’s framework, WordPress, Node Js video tutorials. You can also find us on Twitter and Facebook.
Read more