Changing the hostname on an Ubuntu 22.04 system is a typical administrative chore, whether you’re creating a new server or reconfiguring an existing one. The hostname is an important identifier for your system, and understanding how to alter it is important for a variety of reasons, including network configuration, security, and customisation.
This article will take you step by step through the process of changing the hostname on Ubuntu 22.04. This article will provide straightforward instructions ideal for users of all levels, whether you are a beginner or an experienced Linux user.
Let’s get started.
What is a Hostname?
A hostname is a label or identifier assigned to a computer or device on a network in Ubuntu and other Linux-based operating systems. The hostname is used to identify the device on a local network or the internet.
It is especially essential in networking environments since it allows devices to communicate with one another using human-readable names rather than IP addresses alone.
If you wish to change this hostname on Ubuntu 22.04 then there are two possible ways to do it:
- Change hostname using command line
- Change hostname using GUI
Who can update Hostname in Ubuntu?
Updating the hostname in Ubuntu often necessitates administrative or superuser (root) capabilities.
Method #1: How To Change hostname in Ubuntu (Command Line)
There are following process to do this,
- Check the Current Hostname
- Change the Hostname
- Update the Hosts File
- Reboot the System
Note*: Please make sure before running any of these commands in terminal that you must login from Super user.
Step 1: Check the Current Hostname
Before you can change the hostname, you must first determine what the system’s existing hostname is.
Open a terminal window and enter the following command to see the current hostname:
hostnameThe output will show the system’s current hostname.
Step 2: Change the Hostname
You can now update it to your desired hostname.
In order to do this, open a terminal window and enter the following command, replacing newhostname with the desired hostname.
hostname newhostnameStep 3: Update the Hosts File
Next, you need to update the /etc/hosts file.
This file contains a list of hostnames and IP addresses that are used to identify the system on the network.
To open the file, type the following command:
sudo nano /etc/hostsUpdate the 127.0.0.1 line to use the new hostname.
For example, if your new hostname is dev-desktop, the line should look like this:
127.0.0.1 dev-desktopWhen you’re finished, save and close the file.
Step 4: Reboot the System
Finally, in order for the modifications to take effect, you must reboot the system. To accomplish this, enter the following command:
sudo rebootOpen a terminal window and type the following command when the computer has rebooted:
hostnameThe output will display the new hostname of the system.
Method #2: How To Change hostname in Ubuntu (Using GUI)
The GUI is another method for changing the hostname. We have shown you how to achieve this in this section.
- Open settings
- Open Device Name
- Change Hostname
- Verify Change
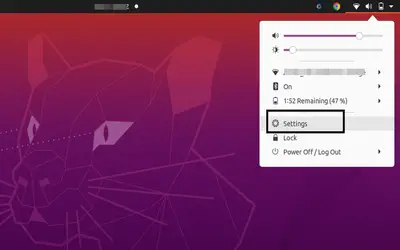
Step 1: Open Settings
Click on the top right corner, which displays the battery, sound, and internet icons. A drop-down menu will appear. Click on the settings options in that menu.

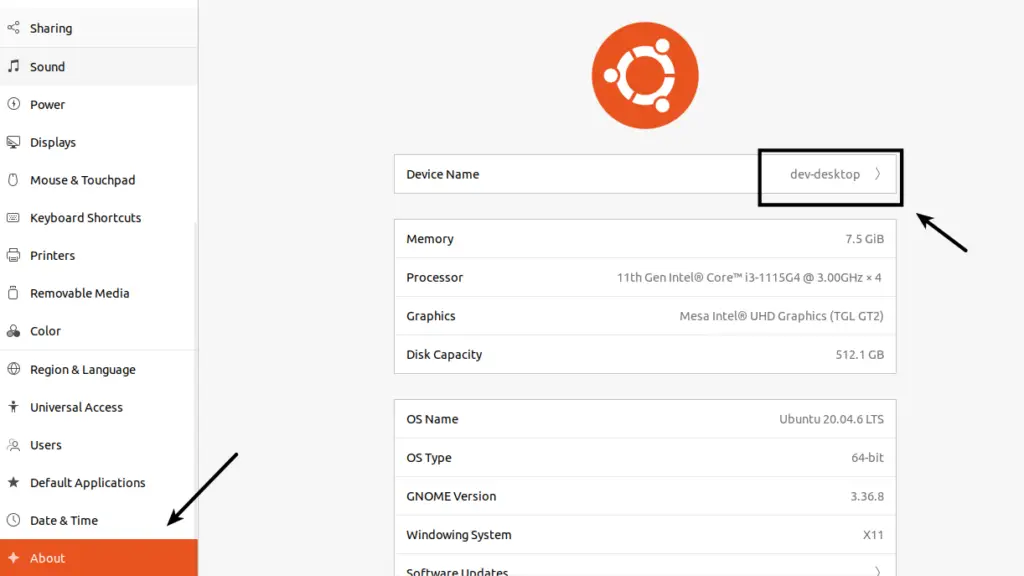
Step 2: Open Device Name
When you select it, the settings will open, and the first option labelled “Device Name” will display the current hostname. Click here.

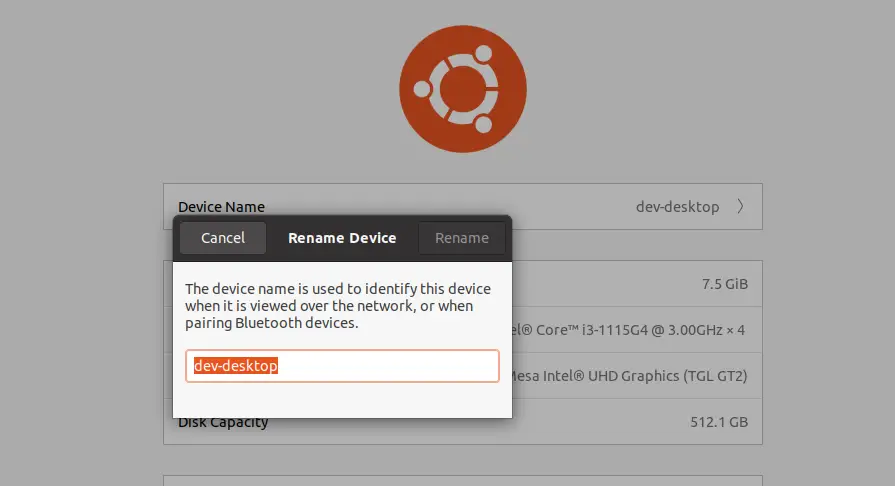
Step 3: Change Hostname
A notice box with your previous hostname will now appear. Erase that name and replace it with your desired hostname before pressing the “Rename” button.

Great! The hostname has been changed.
Step 4: Verify Change
Finally, in order for the modifications to take effect, you must reboot the system. To accomplish this, enter the following command:
sudo rebootOpen a terminal window and type the following command when the computer has rebooted:
hostnameThe output will display the new hostname of the system.
That’s it.
We hope this article helped you to learn about Top Methods How To Change Hostname on Ubuntu 22.04 in a very detailed way.
If you liked this article, then please subscribe to our YouTube Channel for PHP & it’s framework, WordPress, Node Js video tutorials. You can also find us on Twitter and Facebook.
Read more