As we all know in most web application either in CodeIgniter 4 or any of the PHP Framework, we sometimes need to integrate payment gateway.
Inside this article, we will see Stripe payment Integration in codeIgniter 4. Stripe payment system settings in CodeIgniter 4. Easy and in complete detailed concept. This article contains a classified information.
Learn More –
- CodeIgniter 4 Models with Multiple Database Connection
- CodeIgniter 4 Load Data using jQuery AJAX in Select2
- CodeIgniter 4 Models with Multiple Database Connection
- Codeigniter 4 Multi Auth User Role Wise Login
Let’s get started – Stripe payment gateway in CodeIgniter 4
CodeIgniter 4 Installation
To create a CodeIgniter 4 setup run this given command into your shell or terminal. Please make sure composer should be installed.
composer create-project codeigniter4/appstarter codeigniter-4Assuming you have successfully installed application into your local system.
Environment (.env) Setup
When we install CodeIgniter 4, we will have env file at root. To use the environment variables means using variables at global scope we need to do env to .env
Either we can do via renaming file as simple as that. Also we can do by terminal command.
Open project in terminal
cp env .envAbove command will create a copy of env file to .env file. Now we are ready to use environment variables.
Enable Development Mode
CodeIgniter starts up in production mode by default. You need to make it in development mode to see any error if you are working with application.
Open .env file from root.
# CI_ENVIRONMENT = production

 // Do it to

CI_ENVIRONMENT = development
Now application is in development mode.
Stripe PHP Package Installation
We will install stripe package via composer into CodeIgniter 4 setup. Open CodeIgniter 4 project in terminal and hit this composer command.
$ composer require stripe/stripe-php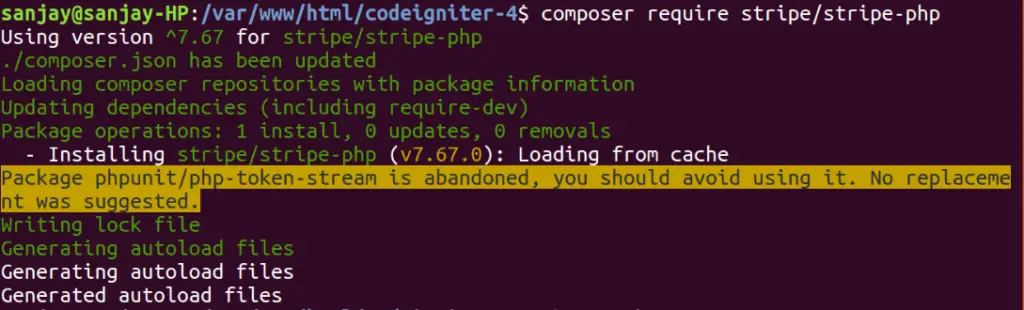
Autoload Stripe Library
Open Autoload.php from /app/Config. Find $psr4 and add stripe library.
//...

public $psr4 = [
		APP_NAMESPACE => APPPATH, // For custom app namespace
		'Config'      => APPPATH . 'Config',
		'Stripe' => ROOTPATH . 'vendor/stripe/stripe-php/init.php' // added here
];

//...
Set Stripe API Key and SECRET
Open up Constants.php from /app/Config folder of CodeIgniter 4 application.
Into the file, set stripe api key and secret.
//...

defined("STRIPE_KEY") || define('STRIPE_KEY', "pk_test_MaQhP2b8XqG9R7PTL6VUmipt");
defined("STRIPE_SECRET") || define('STRIPE_SECRET', "sk_test_MtVxg0tJfCGJXQY8xZlu69Ie");

//...
This is our stripe sandbox detail, you can replace it with your own. If you are wondering to find stripe test account keys. Follow these steps –
- Login to https://dashboard.stripe.com/
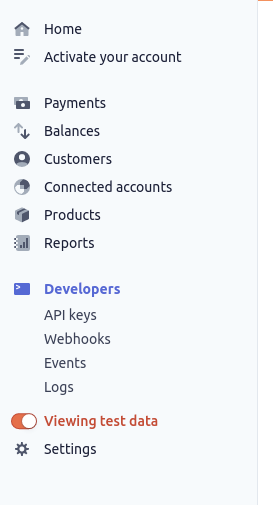
- You need to enable Viewing test data to use Test account details
- Go to Developer >> Click on API keys
Create Routes
Open Routes.php from /app/Config folder. Add these routes into it.
//...

$routes->get("stripe", "StripeController::stripe");
$routes->post("payment", "StripeController::payment");

//...
Create Controller File
Next, we need to create a controller file.
$ php spark make:controller Stripe --suffixIt will create a controller file StripeController.php inside /app/Controllers folder
Open StripeController.php and write this given code.
<?php

namespace App\Controllers;
use App\Controllers\BaseController;
use Stripe;

class StripeController extends BaseController
{
    /**
     * Get All Data from this method.
     *
     * @return Response
     */
    public function __construct()
    {
        helper(["url"]);
    }

    /**
     * Get All Data from this method.
     *
     * @return Response
     */
    public function stripe()
    {
        return view("stripe");
    }

    /**
     * Get All Data from this method.
     *
     * @return Response
     */
    public function payment(){

        Stripe\Stripe::setApiKey(STRIPE_SECRET);

        $stripe = Stripe\Charge::create ([
                "amount" => 70 * 100,
                "currency" => "usd",
                "source" => $_REQUEST["stripeToken"],
                "description" => "Test payment via Stripe From onlinewebtutorblog.com"
        ]);

        // after successfull payment, you can store payment related information into
        // your database

        //$data = array('success' => true, 'data' => $stripe);
        //echo json_encode($data);

        session()->setFlashdata("message", "Payment done successfully");

        return redirect('stripe');
    }
}
Create Template File
Let’s create template file for setting the layout of payment details for user.
Create a file stripe.php inside /app/Views folder. Open file and paste the given code.
<!DOCTYPE html>
<html>

<head>
    <title>CodeIgniter 4 - Stripe Payment Gateway Integration - onlinewebtutorblog.com</title>
    <link rel="stylesheet" href="https://cdnjs.cloudflare.com/ajax/libs/twitter-bootstrap/3.3.7/css/bootstrap.min.css" />
    <script src="https://cdnjs.cloudflare.com/ajax/libs/jquery/3.3.1/jquery.min.js"></script>
    <style type="text/css">
        .panel-title {
            display: inline;
            font-weight: bold;
        }

        .display-table {
            display: table;
        }

        .display-tr {
            display: table-row;
        }

        .display-td {
            display: table-cell;
            vertical-align: middle;
            width: 61%;
        }
    </style>
</head>

<body>

    <div class="container">

        <h3 style="text-align: center;">CodeIgniter 4 - Stripe Payment Gateway Integration - onlinewebtutorblog.com</h3><br />

        <?php

        if (session()->get("message")) {
        ?>
            <div class="alert alert-success">
                <?= session()->get("message") ?>
            </div>
        <?php
        }
        ?>

        <div class="row">
            <div class="col-md-6 col-md-offset-3">
                <div class="panel panel-default credit-card-box">
                    <div class="panel-body">

                        <form role="form" action="<?php echo base_url('payment') ?>" method="post" class="require-validation" data-cc-on-file="false" data-stripe-publishable-key="<?= STRIPE_KEY ?>" id="payment-form">

                            <div class='form-row row'>
                                <div class='col-xs-12 form-group required'>
                                    <label class='control-label'>Name on Card</label>
                                    <input class='form-control' size='4' type='text'>
                                </div>
                            </div>

                            <div class='form-row row'>
                                <div class='col-xs-12 form-group card required'>
                                    <label class='control-label'>Card Number</label>
                                    <input autocomplete='off' class='form-control card-number' size='20' type='text'>
                                </div>
                            </div>

                            <div class='form-row row'>
                                <div class='col-xs-12 col-md-4 form-group cvc required'>
                                    <label class='control-label'>CVC</label>
                                    <input autocomplete='off' class='form-control card-cvc' placeholder='ex. 311' size='4' type='text'>
                                </div>
                                <div class='col-xs-12 col-md-4 form-group expiration required'>
                                    <label class='control-label'>Expiration Month</label>
                                    <input class='form-control card-expiry-month' placeholder='MM' size='2' type='text'>
                                </div>
                                <div class='col-xs-12 col-md-4 form-group expiration required'>
                                    <label class='control-label'>Expiration Year</label>
                                    <input class='form-control card-expiry-year' placeholder='YYYY' size='4' type='text'>
                                </div>
                            </div>

                            <div class='form-row row'>
                                <div class='col-md-12 error form-group hide'>
                                    <div class='alert-danger alert'>Please correct the errors and try
                                        again.</div>
                                </div>
                            </div>

                            <div class="row">
                                <div class="col-xs-12">
                                    <button class="btn btn-primary btn-lg btn-block" type="submit">Pay Now ($70)</button>
                                </div>
                            </div>

                        </form>
                    </div>
                </div>
            </div>
        </div>

    </div>

</body>

<script type="text/javascript" src="https://js.stripe.com/v2/"></script>

<script type="text/javascript">
    $(function() {

        var $form = $(".require-validation");

        $('form.require-validation').bind('submit', function(e) {
            var $form = $(".require-validation"),
                inputSelector = ['input[type=text]'].join(', '),
                $inputs = $form.find('.required').find(inputSelector),
                $errorMessage = $form.find('div.error'),
                valid = true;
            $errorMessage.addClass('hide');

            $('.has-error').removeClass('has-error');
            $inputs.each(function(i, el) {
                var $input = $(el);
                if ($input.val() === '') {
                    $input.parent().addClass('has-error');
                    $errorMessage.removeClass('hide');
                    e.preventDefault();
                }
            });

            if (!$form.data('cc-on-file')) {
                e.preventDefault();
                Stripe.setPublishableKey($form.data('stripe-publishable-key'));
                Stripe.createToken({
                    number: $('.card-number').val(),
                    cvc: $('.card-cvc').val(),
                    exp_month: $('.card-expiry-month').val(),
                    exp_year: $('.card-expiry-year').val()
                }, stripeResponseHandler);
            }

        });

        function stripeResponseHandler(status, response) {
            if (response.error) {
                $('.error')
                    .removeClass('hide')
                    .find('.alert')
                    .text(response.error.message);
            } else {
                /* token contains id, last4, and card type */
                var token = response['id'];

                $form.find('input[type=text]').empty();
                $form.append("<input type='hidden' name='stripeToken' value='" + token + "'/>");
                $form.get(0).submit();
            }
        }

    });
</script>

</html>
This code will will create a UI for payment inputs and added javascript code will help to process the stripe payment.
Application Testing
Now, start development server.
$ php spark serve
Here you can test with these given test card details.
URL: http://localhost:8080/stripe
Name: Sample
Number: 4242 4242 4242 4242
CSV: 123
Expiration Month: 04
Expiration Year: 2024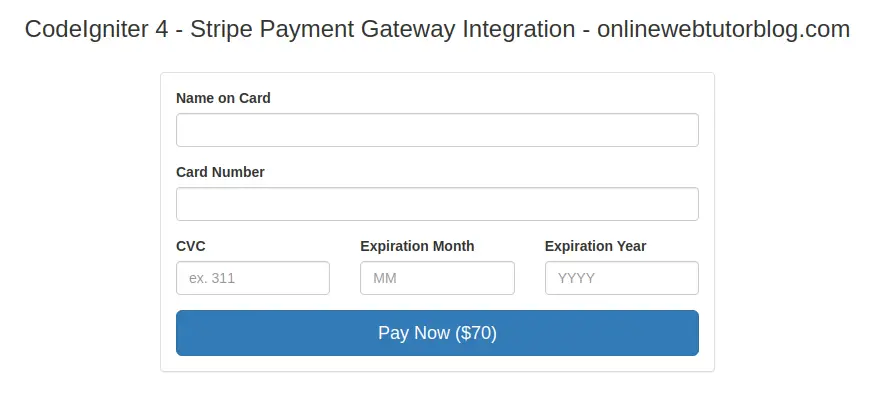

We hope this article helped you to learn about Stripe Payment Gateway Integration in CodeIgniter 4 in a very detailed way.
If you liked this article, then please subscribe to our YouTube Channel for PHP & it’s framework, WordPress, Node Js video tutorials. You can also find us on Twitter and Facebook.
Read more
Brilliant article, tough payment section is returning the following error
Class ‘Stripe\Stripe’ not found
PHP: 7.3.26 — CodeIgniter: 4.1.1
any idea
Stripe class not loaded or installed successfully.