WP CLI is wordpress command line tool to manage and handle wordpress. We can manage everything from here like manage themes, plugins, users, posts etc.
Inside this article we will discuss about WordPress WP CLI Command Line Tutorial. How can we install into system and set of WP CLI commands to handle the wordpress application. Overview of the basic commands of this tool.
Learn More –
- How to use WordPress Global Database Object?
- Learn WordPress CRUD Tutorial with wpdb Object
- How to Use & Work with jQuery UI in WordPress
- An Introduction to WordPress Global Variables Tutorial
Let’s get started.
An Introduction to WP CLI – What is WP CLI ?
WP CLI tool is specifically developed to manage wordpress sites through command line. A set of few simple commands, from which we can manage everything in wordpress without even knowing to login to wordpress panel and going through the pages.
The idea is to use WP CLI to allow users to interact with application and manage. WP CLI manage wordpress sites very easily. There are various set of commnds which can be used with WP CLI to manage posts, pages, users, themes, plugins etc.
The concept WP CLI will be very useful when you are a wordpress developer, system admin etc. This tool provide set of commands which helps to do more tasks in a very less time. Tasks like taking backups of project and it’s database, updating wordpress, plugins, content publishing etc.
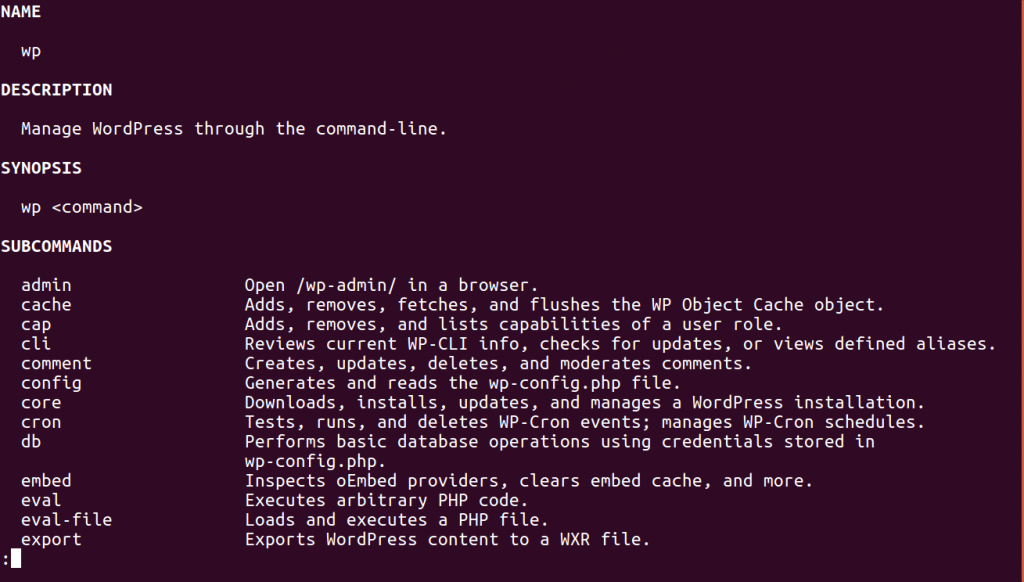
Have a look terminal interface with WP CLI commands –
Basics Requirements of WP CLI
To work with WP CLI, we need few requirements with php and wordpress version.
- PHP version should be greater than or equals to 5.3.2
- WordPress version must be greater than or equals to 3.4
- Your system must have UNIX/Linux like environment. Because for running WP CLI commands.
Step by Step Installation of WP CLI
When I was searching for WP CLI installation, I bit confused from Where I need to start the Installation. The command that was getting to execute bit via commands line / terminal.
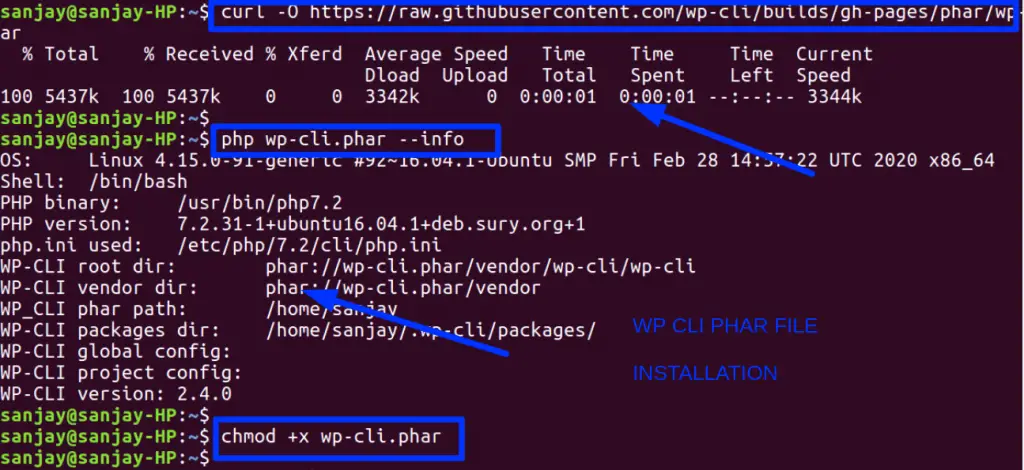
The most recommended method to download WP-CLI from a Phar file. This will be handle by command line. Phar file is a PHP archive file which contains all the needed PHP files which helps WP-CLI to run.
Let’s get started
First we need to open terminal. Leave up to root user at it’s initial directory. We are going to Install WP CLI. Here, we run series of commands.
Step #1 – Download WP CLI Phar File
Type the given command at your terminal and hit enter.
curl -O https://raw.githubusercontent.com/wp-cli/builds/gh-pages/phar/wp-cli.phar
This command should download WP CLI Phar file. If suppose we want to check i.e downloaded or not.
Step #2 – Check download
Type this command to check Phar file download status.
php wp-cli.phar --info
Step #3 – Setting Permission
To execute WP CLI Phar file, we need to set a appropriate permission to this file. Type the given command.
chmod +x wp-cli.phar
Step #4 – Moving File
We can work from here as well. Everything we need to run has been done now. But we can call all commands by typing wp-cli.phar every time. So to make it better, we will move this file to a folder and name it as wp. This will help to call commands by typing wp only.
Type the given command –
sudo mv wp-cli.phar /usr/local/bin/wp
Finally, we have done everything now.
Step #5 – Test Command
Let’s test a basic command to see only information.
Type the given command – wp –info
This should give the output as –
sanjay@sanjay-HP:~$ wp –info
OS: Linux 4.15.0-91-generic #92~16.04.1-Ubuntu SMP Fri Feb 28 14:57:22 UTC 2020 x86_64
Shell: /bin/bash
PHP binary: /usr/bin/php7.2
PHP version: 7.2.31-1+ubuntu16.04.1+deb.sury.org+1
php.ini used: /etc/php/7.2/cli/php.ini
WP-CLI root dir: phar://wp-cli.phar/vendor/wp-cli/wp-cli
WP-CLI vendor dir: phar://wp-cli.phar/vendor
WP_CLI phar path: /home/sanjay
WP-CLI packages dir: /home/sanjay/.wp-cli/packages/
WP-CLI global config:
WP-CLI project config:
WP-CLI version: 2.4.0
Help Manual – WP CLI Commands
As we have downloaded WP CLI Phar file and set everything step by step to our system. Let’s run some commands.
WP CLI version
Command – wp –version , When I was writing this article it is WP-CLI 2.4.0
WP CLI help Manul
Command – wp –help
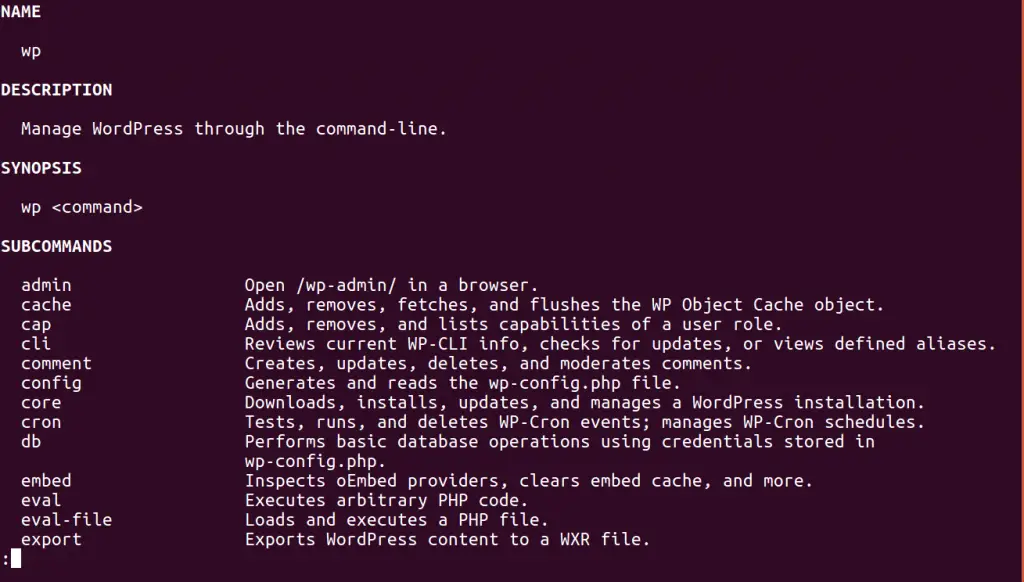
Here inside this we can see the list of subcommands. These sub commands helps to work with WP CLI. It provides the complete guide to work and operate. Also we will see that this help manual has it’s own documentation to use these commands.
Let’s start with wordpress installation to local system. Inside this sub command you can see, we have a sub command called as core.
Sub command: core
Description: Downloads, installs, updates, and manages a WordPress installation.
Every sub command what we can is for every different different work. In any sub command if you want help simply type wp command –help. Press Ctrl + C to go back.
Download & Installing WordPress – WP CLI
First we need to download wordpress by WP CLI. We will use core sub-command.
Command – wp core download and hit enter
You should see the output as –
Downloading WordPress 5.5 (en_US)…
md5 hash verified: 983821e81b5b8398469e5c1807c4abf4
Success: WordPress downloaded.
It will download a new wordpress setup with latest version. At the time of article writing the wp version is 5.5. In your case it may be different. Also we can see that it has downloaded the default locale of wordpress i.e en_US. But in case if we need different then command will be –
Command – wp core download –locale=nl_NL
Next,
We need to generate config.php file i.e wordpress configuration file.
Command – wp config create –help
Output as –
wp config create –dbname= –dbuser= [–dbpass=] [–dbhost=]
[–dbprefix=] [–dbcharset=] [–dbcollate=] [–locale=]
[–extra-php] [–skip-salts] [–skip-check] [–force]
Needs to create a database. Go to your phpmyadmin and create it. In my case database username and password is root.
Command – wp config create –dbname=learnwpcli2 –dbuser=root –dbpass=root
Output – Success: Generated ‘wp-config.php’ file.
Now we need to install this setup.
Next,
Back to terminal, type command – wp core –help
We will see a screen of subcommads –
SUBCOMMANDS

  check-update           Checks for WordPress updates via Version Check API.
  download               Downloads core WordPress files.
  install                Runs the standard WordPress installation process.
  is-installed           Checks if WordPress is installed.
  multisite-convert      Transforms an existing single-site installation into a multisite
                         installation.
  multisite-install      Installs WordPress multisite from scratch.
  update                 Updates WordPress to a newer version.
  update-db              Runs the WordPress database update procedure.
  verify-checksums       Verifies WordPress files against WordPress.org's checksums.
  version                Displays the WordPress version.
We should see, we have a sub command called – install, which will installs wordpress setup but wait we need to learn something more.
Type the command – wp core install –help
Outputs –
wp core install –url= –title= –admin_user=
[–admin_password=] –admin_email= [–skip-email]
While installation of wordpress we need to pass url, title, admin password, email ..
Parameter details
–url=
The address of the new site.
–title=
The title of the new site.
–admin_user=
The name of the admin user.
[–admin_password=]
The password for the admin user. Defaults to randomly generated string.
–admin_email=
The email address for the admin user.
[–skip-email]
Don’t send an email notification to the new admin user.
Let’s Install wordpress –
Command –
wp core install –url=localhost/wpcli –title=Test –admin_user=sample –admin_password=password@123 –admin_email=info@localhost.com
Output –
Success: WordPress installed successfully.
Successfully, we have download the wordpress and installed to the system.
Running WordPress Installation Setup
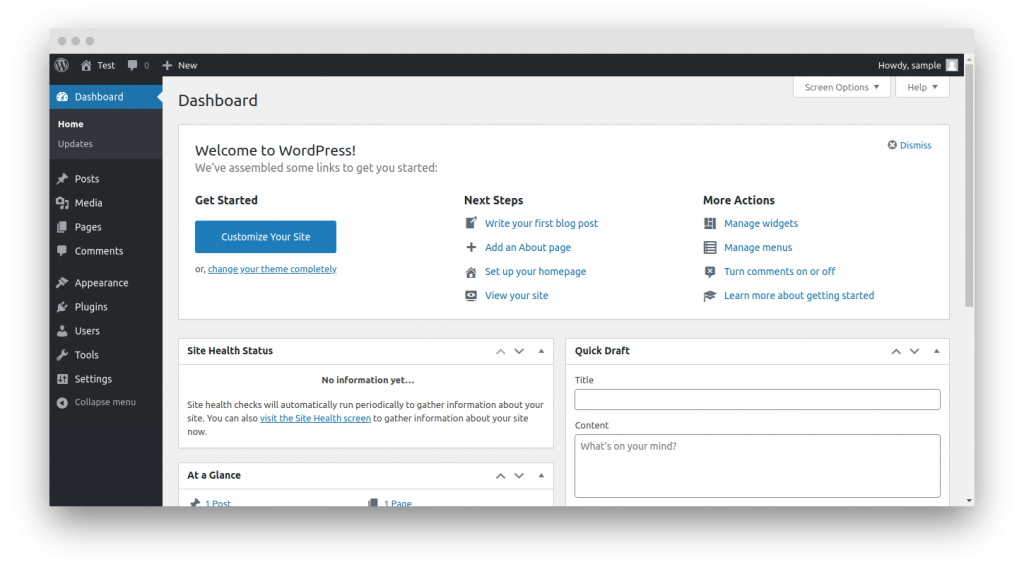
To run application also we have simple command to see our result at browser. When we type the command – wp –help. we will subcommand admin.
Command – wp admin
This command will redirect to your browser and open the site. Login to wordpress admin panel by passing login details –
Manage Themes & Plugins by WP CLI
For theme related sub commands you need to type – wp theme –help. It will open help manual of theme section.
Theme Sub commands
List of themes
Command – wp theme list
+-----------------+----------+--------+---------+
| name            | status   | update | version |
+-----------------+----------+--------+---------+
| twentynineteen  | inactive | none   | 1.7     |
| twentyseventeen | inactive | none   | 2.4     |
| twentytwenty    | active   | none   | 1.5     |
+-----------------+----------+--------+---------+
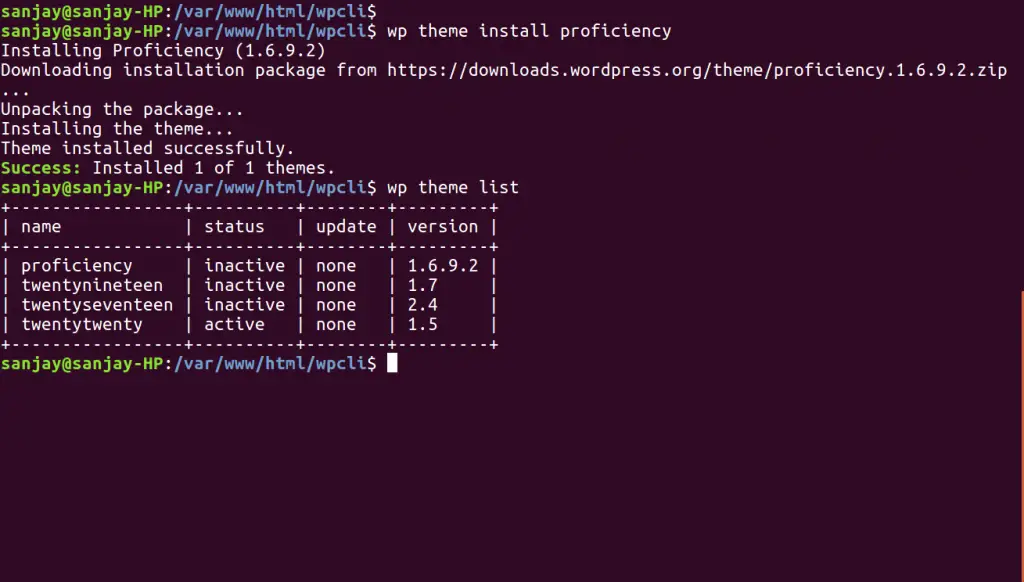
This is available themes what we have in wordpress setup. To Install any new theme, have a look this image –
Theme activate command –
Command – wp theme activate proficiency
Output – Success: Switched to ‘Proficiency’ theme.
proficiency is the theme name
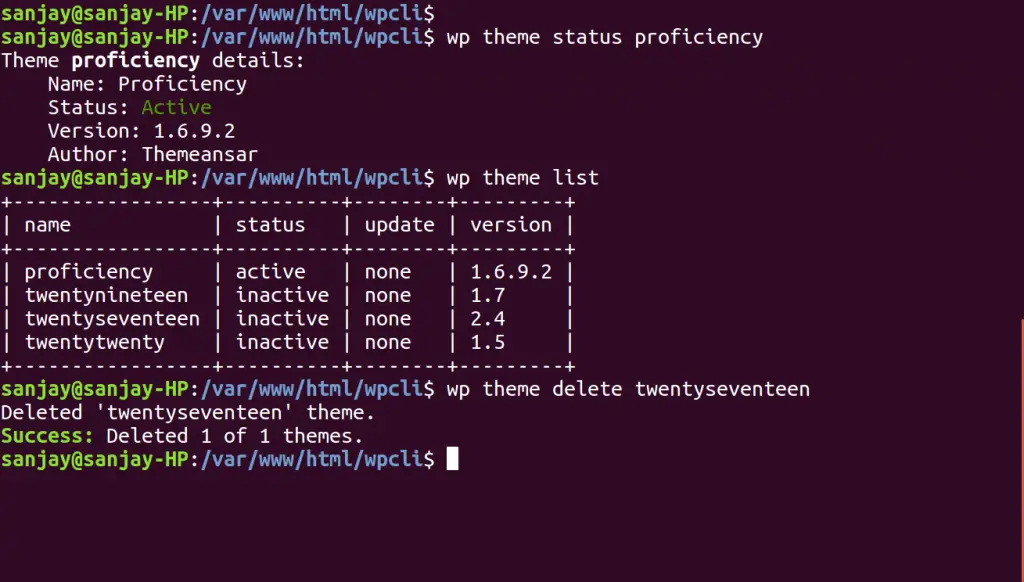
Theme Delete Command, have a look this image
Plugin Sub commands
To see all plugin related available sub commands, simply type wp plugin –help
Commands
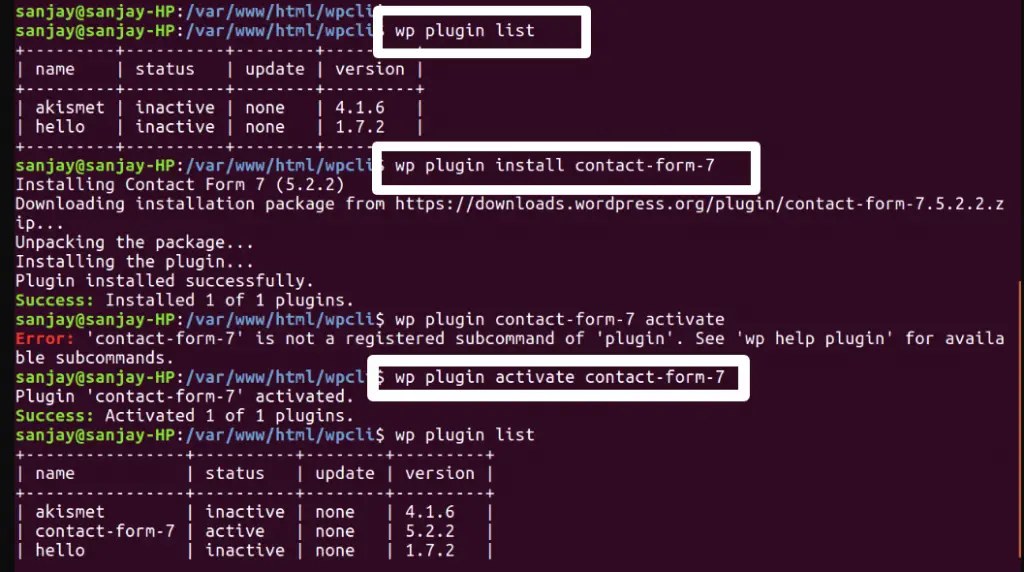
- wp plugin list – This command will list all plugins
- wp plugin install <plugin-name> – To install any plugin into wordpress setup
- wp plugin activate <plugin-name> – Do plugin activate after installation.
- wp plugin delete <plugin-name> – This will delete the plugin from plugin list.
We can follow same instruction set to manage everything like users, posts, categories etc.
We hope this article helped you to learn about WordPress WP CLI Command Line in a very detailed way.
If you liked this article, then please subscribe to our YouTube Channel for PHP & it’s framework, WordPress, Node Js video tutorials. You can also find us on Twitter and Facebook.
Read more
I needed to thank you for this very good read!!
I certainly loved every little bit of it.
I have got you book marked to check out new things you post.
Everyone loves it whenever people get together and share thoughts.
Great blog, continue the good work!
Howdy! Would you mind if I share your blog with my facebook group?
There’s a lot of people that I think would really enjoy your content.
Please let me know. Many thanks
Howdy! Would you mind if I share your blog with my facebook group?
There’s a lot of folks that I think would really appreciate your content.
Please let me know. Many thanks
Sure, you can share. Thanks