Inside this article we will see the concept i.e CodeIgniter 4 How To Work CSRF Token with Ajax Request Tutorial. Article contains the classified information about How To Send AJAX Request with CSRF Token in CodeIgniter 4.
When we develop any application, security should be taken care of it. Security always be the first thing when we are planning for a secure application. In CodeIgniter 4 applications, we have few security library provided by the help of which we can do it in a easy way.
Learn More –
- How To Implement CSRF Token in CodeIgniter 4
- Compare Dates and Times in CodeIgniter 4 Tutorial
- Complete CodeIgniter 4 Basics Tutorial
- Complete CodeIgniter 4 Generators Tutorial
Inside this article we will see CodeIgniter 4 CSRF Token with Ajax Request. Cross-Site Request Forgery (CSRF).
Let’s get started.
What is Cross-site request forgery (CSRF)?
Cross-Site Request Forgery (CSRF) is an attack which forces an end user (an unauthenticated user of site) to execute/run unwanted actions on a web application. These requests sometimes crash the database. This saves attacking data into database tables and execute accordingly and may down the application.
This is a normal attack which every development or even web owner needs to do it first.
How can we avoid CSRF attack in Web application?
There are several ways to do it. Following are the easy way to follow and implement –
- Enable CSRF token feature in web application.
- Send CSRF token in every request of application.
- Security library auto validates CSRF token from requests which requested to server.
- Proceed with the application functions, if everything is fine.
CodeIgniter 4 Installation
To create a CodeIgniter 4 setup run this given command into your shell or terminal. Please make sure composer should be installed.
composer create-project codeigniter4/appstarter codeigniter-4Assuming you have successfully installed application into your local system.
Environment (.env) Setup
When we install CodeIgniter 4, we will have env file at root. To use the environment variables means using variables at global scope we need to do env to .env
Either we can do via renaming file as simple as that. Also we can do by terminal command.
Open project in terminal
cp env .envAbove command will create a copy of env file to .env file. Now we are ready to use environment variables.
Enable Development Mode
CodeIgniter starts up in production mode by default. You need to make it in development mode to see any error if you are working with application.
Open .env file from root.
# CI_ENVIRONMENT = production

 // Do it to

CI_ENVIRONMENT = development
Now application is in development mode.
Enable CodeIgniter 4 CSRF Feature
To enable the features to avoid CSRF in CodeIgniter 4, we have to 2 options.
Either we can do by these –
- By .env file
- By using Filters.php & App.php from /app/Config folder.
This article will use App.php & Filters.php.
Open App.php from /app/Config folder (For Configuration Settings)–
Search for all these variables into file.
Initial Code
public $CSRFTokenName = 'csrf_test_name';
public $CSRFHeaderName = 'X-CSRF-TOKEN';
public $CSRFCookieName = 'csrf_cookie_name';
public $CSRFExpire = 7200;
public $CSRFRegenerate = true;
public $CSRFRedirect = true;
Now, if we want to update token name, CSRF cookie name, CSRF time for regenerate, then accordingly we can do all these settings. These are optional to do.
public $CSRFTokenName = 'app_csrf';
public $CSRFHeaderName = 'X-CSRF-TOKEN';
public $CSRFCookieName = 'app_csrf_cookie';
public $CSRFExpire = 7200;
public $CSRFRegenerate = true;
public $CSRFRedirect = true;
Open Filters.php from /app/Config folder (To Enable CSRF & Route Control)
Update $globals settings into this file. Remove comment from csrf.
//...

public $globals = [
  'before' => [
    //'honeypot'
     'csrf',
  ],
  'after'  => [
    'toolbar',
    //'honeypot'
  ],
];

//...
Successfully, we have enabled all settings for CSRF and now ready to work with it.
Application Settings – Routes, Controller & View
We are going to use and see how we can implment CodeIgniter 4 CSRF token into application form.
Add Routes
Open Routes.php from /app/Config folder.
//...

$routes->get("my-form", "Site::myForm");
$routes->post("submit-data", "Site::submitData");

//...
Create Controller
Open project into terminal and run this spark command to create controller.
$ php spark make:controller SiteIt will create Site.php inside /app/Controllers folder. Open Site.php and write this complete code into it.
<?php

namespace App\Controllers;

class Site extends BaseController
{
    public function myForm()
    {
        return view("my-form");
    }

    public function submitData()
    {
        $data = $this->request->getVar(); // all form data into $data variable

        echo json_encode( array(
           "status" => 1,
           "message" => "Ajax processed",
           "data" => $data
        ));
    }
}
Create View Layout
Create my-form.php inside /app/Views folder.
Open my-form.php and write this complete code into it.
<!doctype html>

<html lang="en">

<head>
  <meta charset="utf-8">
  <meta name="viewport" content="width=device-width, initial-scale=1">
  <title>Codeigniter 4 CSRF Token with Ajax Request Tutorial - Online Web Tutor</title>
  <link rel="stylesheet" href="https://stackpath.bootstrapcdn.com/bootstrap/4.5.0/css/bootstrap.min.css">

  <script>
    var csrfName = '<?= csrf_token() ?>';
    var csrfHash = '<?= csrf_hash() ?>';
  </script>

</head>

<body>
  <div class="container">

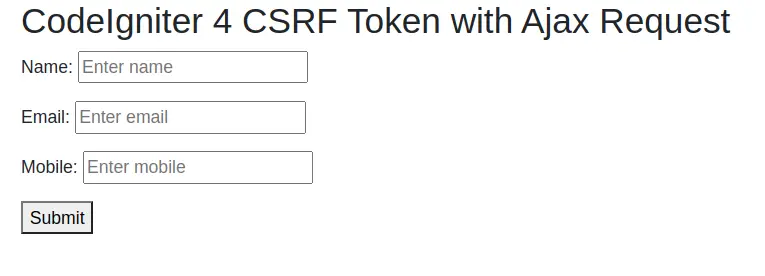
    <h2>CodeIgniter 4 CSRF Token with Ajax Request</h2>

    <form method="post" action="javascript:void(0)" id="frm-my-form">
      <p>
        Name: <input type="text" name="name" id="name" placeholder="Enter name"/>
      </p>
      <p>
        Email: <input type="email" name="email" id="email" placeholder="Enter email"/>
      </p>
      <p>
        Mobile: <input type="text" name="mobile" id="mobile" placeholder="Enter mobile"/>
      </p>
      <p>
        <button type="submit">Submit</button>
      </p>
    </form>

  </div>

  <script src="https://code.jquery.com/jquery-3.5.1.min.js"></script>

  <script>
      $("#frm-my-form").on("submit", function(){
          var dataJson = {
            [csrfName]: csrfHash, // adding csrf here
            name: $("#name").val(),
            email: $("#email").val(),
            mobile: $("#mobile").val()
          };

        $.ajax({
            url : "<?php echo base_url('submit-data'); ?>",
            type: 'post',
            data: dataJson,
            dataType: "json",
            success : function(data)
            {
                console.log(data);
            }
        });
      });
  </script>

</body>

</html>
When we enable CSRF into CodeIgniter 4 application, automatically csrf_token() & csrf_hash() these 2 functions will be available to use.
If you are getting any error while loading these functions it means your application is not configured in a right way.
Application Testing
Open project terminal and start development server via command:
php spark serveURL: http://localhost:8080/my-form

Next, fill data in your form and submit. You should see the data will be processed by server side. If you go to developers console (Network Tab), able to see inside parameters token also passed with request.
To learn about Session Fixation in CodeIgniter 4, Click here.
We hope this article helped you to learn about CodeIgniter 4 How To Work CSRF Token with Ajax Request in a very detailed way.
If you liked this article, then please subscribe to our YouTube Channel for PHP & it’s framework, WordPress, Node Js video tutorials. You can also find us on Twitter and Facebook.
Read more