Creating a CodeIgniter CRUD application that interacts with WordPress through its REST API using JWT authentication offers a robust solution for managing WordPress content from an external application.
In this tutorial, we’ll explore the process of integrating CodeIgniter’s CRUD operations with WordPress’s RESTful API, securing the communication using JSON Web Tokens (JWT). You will see the complete guide to create WordPress posts, list posts and their update operations with CodeIgniter.
WordPress’s REST API provides a way to access and modify WordPress content externally, while JWT authentication ensures secure and authenticated communication between CodeIgniter and WordPress.
Read More: CodeIgniter 4 How To Get Single Row Data Tutorial
Let’s get started.
WordPress Configuration
Set up a WordPress setup and configure the REST API with JWT authentication Using plugins like “JWT Authentication for WP REST API“
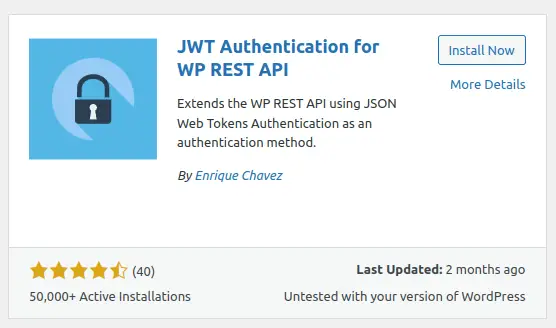
>> Install this plugin and activate.
Configure the JWT Secret Key
The JWT needs a secret key to sign the token this secret key must be unique and never revealed.
To add the secret key edit your wp-config.php file and add a new constant called JWT_AUTH_SECRET_KEY
define('JWT_AUTH_SECRET_KEY', 'your-top-secret-key');Configure CORS Support
To enable the CORs Support edit your wp-config.php file and add a new constant called JWT_AUTH_CORS_ENABLE
define('JWT_AUTH_CORS_ENABLE', true);Generate JWT Auth Token (Use in Calling APIs)
Once you install plugin, you will get a route by which we can get JWT authentication token value. But we need to pass username and password while calling that.
Auth API URL,
http://example.com/wp-json/jwt-auth/v1/tokenExample,
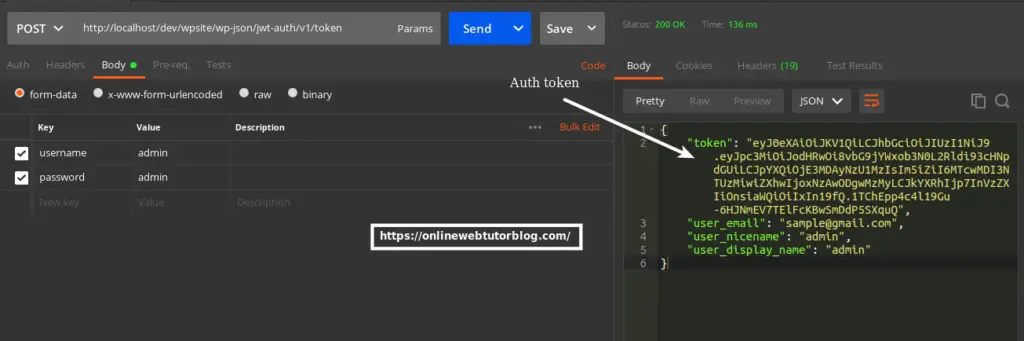
Copy JWT Auth token value for calling REST APIs.
Read More: CodeIgniter 4 How To Read Parse JSON File Tutorial
CodeIgniter 4 Installation
To create a CodeIgniter 4 setup run this given command into your shell or terminal. Please make sure composer should be installed.
composer create-project codeigniter4/appstarter codeigniter-4Assuming you have successfully installed application into your local system.
Application Basic Variables Settings
Open .env file from project folder,
WP_JWT_AUTH_TOKEN="eyJ0eXAiOiJKV1QiLCJhbGciO..."

WP_JSON_POST_URL="https://yourwordpresssite.com/wp-json/wp/v2/posts"
Change your keys values according to your application.
CRUD Application Routes Setup
Open Routes.php file from /app/Config folder.
//...
 $routes->get('/posts', 'PostController::index');
 $routes->match(["get", "post"], "add-post", 'PostController::addPost');
 $routes->match(["get", "post"], 'edit-post/(:num)', 'PostController::editPost/$1');
 $routes->post('delete-post/(:num)', 'PostController::deletePost/$1');
//...
Setup CRUD Controller
Back to project terminal and run this command into it,
php spark make:controller Post --suffixIt will create a PostController.php file inside /app/Controllers folder.
Controller file contains these methods for,
- index(): To list all posts
- addPost(): Open add post layout and save post to wordpress.
- editPost(): Open single post details page with update function
- deletePost(): Delete post by post id.
Open file and write this code into it,
<?php
namespace App\Controllers;
use CodeIgniter\Controller;
use Config\Services;

class PostController extends Controller
{
    // Page: Post List
    public function index()
    {
        $httpClient = Services::curlrequest();

        $wordpressUrl = env("WP_JSON_POST_URL"); // Replace with your WordPress site URL

        $request = $httpClient->request('GET', $wordpressUrl, [
            'headers' => [
                'Content-Type' => 'application/json'
            ],
        ]);

        $posts = json_decode($request->getBody(), true);

        return view('post-list', compact('posts'));
    }

    // Page: Post Create
    public function addPost()
    {
        if($this->request->getMethod() == "post"){

            $httpClient = Services::curlrequest();

            $wordpressUrl = env("WP_JSON_POST_URL");
            $accessToken = env("WP_JWT_AUTH_TOKEN"); // If authentication is required

            // Post data to be created
            $postData = [
                'title' => $this->request->getVar("title"),
                'content' => $this->request->getVar("content"),
                'status' => $this->request->getVar("status"), // Publish the post
                // Add other post fields as needed
            ];

            $request = $httpClient->request('POST', $wordpressUrl, [
                'headers' => [
                    'Content-Type' => 'application/json',
                    // Add authorization headers if required
                    'Authorization' => 'Bearer ' . $accessToken,
                ],
                'json' => $postData,
            ]);

            $response = json_decode($request->getBody(), true);

            session()->setFlashdata("success", "Post has been created");

            return redirect()->to(base_url("add-post"));
        }

        return view('post-create');
    }

    // Page: Post Update
    public function editPost($post_id)
    {
        $wordpressUrl = env("WP_JSON_POST_URL");
        $accessToken = env("WP_JWT_AUTH_TOKEN"); // If authentication is required

        if($this->request->getMethod() == "post"){

            $httpClient = Services::curlrequest();

            // Post data to be created
            $postData = [
                'title' => $this->request->getVar("title"),
                'content' => $this->request->getVar("content"),
                'status' => $this->request->getVar("status"), // Publish the post
                // Add other post fields as needed
            ];

            $request = $httpClient->request('POST', $wordpressUrl. "/" . $post_id, [
                'headers' => [
                    'Content-Type' => 'application/json',
                    // Add authorization headers if required
                    'Authorization' => 'Bearer ' . $accessToken,
                ],
                'json' => $postData,
            ]);

            $response = json_decode($request->getBody(), true);

            session()->setFlashdata("success", "Post has been updated");

            return redirect()->to(base_url("edit-post/". $post_id));
        }

        $httpClient = Services::curlrequest();

        $request = $httpClient->request('GET', $wordpressUrl. "/" .$post_id);

        $post = json_decode($request->getBody(), true);

        return view('post-edit', [
            "post" => $post
        ]);
    }

    // Page: Post Delete
    public function deletePost($post_id)
    {
        $httpClient = Services::curlrequest();

        $wordpressUrl = env("WP_JSON_POST_URL");
        $accessToken = env("WP_JWT_AUTH_TOKEN"); // If authentication is required

        $request = $httpClient->request('DELETE', $wordpressUrl. "/" . $post_id, [
            'headers' => [
                'Content-Type' => 'application/json',
                // Add authorization headers if required
                'Authorization' => 'Bearer ' . $accessToken,
            ]
        ]);

        $response = json_decode($request->getBody(), true);

        return redirect()->to(base_url("posts"));
    }
}
Next, we need to create front-end view files for CRUD operation.
Read More: CodeIgniter 4 How To Read XML Data to JSON Tutorial
Setup CRUD Layout View Files
Create these template files inside /app/Views folder,
- post-list.php
- post-create.php
- post-edit.php
Open each file and write these code
Post list template file: “post-list.php”,
<!DOCTYPE html>
<html lang="en">
<head>
<meta charset="UTF-8">
<title>CodeIgniter CRUD Using WordPress REST API with JWT Tutorial</title>
<link rel="stylesheet" href="https://stackpath.bootstrapcdn.com/bootstrap/4.5.2/css/bootstrap.min.css">
</head>
<body>
<div class="container mt-2">
<div class="row">
<div class="col-lg-12 margin-tb">
<div class="pull-left">
<h3>CodeIgniter CRUD Using WordPress REST API</h3>
</div>
<h4 class="text-center">Post List</h4>
<div class="pull-right mb-2" style="float: right;">
<a class="btn btn-success" href="<?php echo base_url('add-post') ?>">Create Post</a>
</div>
</div>
</div>
<table class="table table-striped table-hover">
<thead>
<th>ID</th>
<th>Post Title</th>
<th>Post Content</th>
<th width="280px">Action</th>
</thead>
<tbody>
<?php foreach($posts as $post) { ?>
<tr>
<td><?php echo $post['id']; ?></td>
<td><?php echo $post['title']['rendered']; ?></td>
<td><?php echo substr($post['content']['rendered'], 0, 100); ?></td>
<td>
<form action="<?php echo base_url('delete-post/'.$post['id']); ?>" method="Post">
<a class="btn btn-primary" href="<?php echo base_url('edit-post/'.$post['id']); ?>">Edit</a>
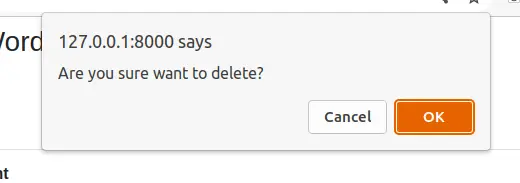
<button type="submit" onclick="return confirm('Are you sure want to delete?')"
class="btn btn-danger">Delete</button>
</form>
</td>
</tr>
<?php } ?>
</tbody>
</table>
</div>
</body>
</html>Create Post template file: “post-create.php”,
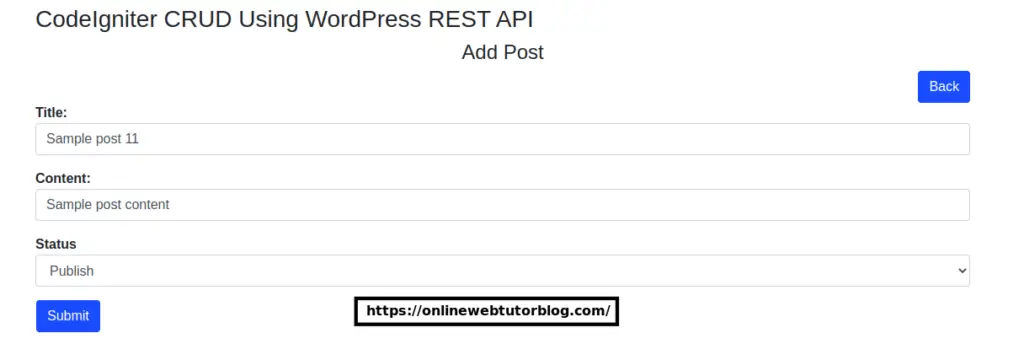
It will give us an interface such as for Title, Content and Status to create post.
<!DOCTYPE html>
<html lang="en">

<head>
    <meta charset="UTF-8">
    <title>CodeIgniter CRUD Using WordPress REST API with JWT Tutorial</title>
    <link rel="stylesheet" href="https://stackpath.bootstrapcdn.com/bootstrap/4.5.2/css/bootstrap.min.css">
</head>

<body>
    <div class="container mt-2">
        <div class="row">
            <div class="col-lg-12 margin-tb">
                <div class="pull-left">
                    <h3>CodeIgniter CRUD Using WordPress REST API</h3>
                </div>
                <h4 class="text-center">Add Post</h4>
                <div class="pull-right" style="float: right;">
                    <a class="btn btn-primary" href="<?php echo base_url('posts') ?>"> Back</a>
                </div>
            </div>
        </div>
        <?php
           if(session()->getFlashdata("success")){
            ?>
            <div class="alert alert-success mb-1 mt-1">
                <?php
                echo session()->getFlashdata("success")
                ?>
            </div>
        <?php
           }
        ?>
        <form action="<?php echo base_url('add-post') ?>" method="POST">
            <div class="row">
                <div class="col-xs-12 col-sm-12 col-md-12">
                    <div class="form-group">
                        <strong>Title:</strong>
                        <input type="text" name="title" class="form-control" placeholder="Post Title">
                    </div>
                </div>
                <div class="col-xs-12 col-sm-12 col-md-12">
                    <div class="form-group">
                        <strong>Content:</strong>
                        <input type="text" name="content" class="form-control" placeholder="Post Content">
                    </div>
                </div>
                <div class="col-xs-12 col-sm-12 col-md-12">
                    <div class="form-group">
                        <strong>Status</strong>
                        <select name="status" class="form-control">
                            <option value="">-- Status --</option>
                            <option value="draft">Draft</option>
                            <option value="publish">Publish</option>
                        </select>
                    </div>
                </div>

                <button type="submit" class="btn btn-primary ml-3">Submit</button>
            </div>
        </form>
    </div>
</body>

</html>
Read More: CodeIgniter 4 How To Send Email with Attachments Tutorial
Update Post template file: “post-edit.php”,
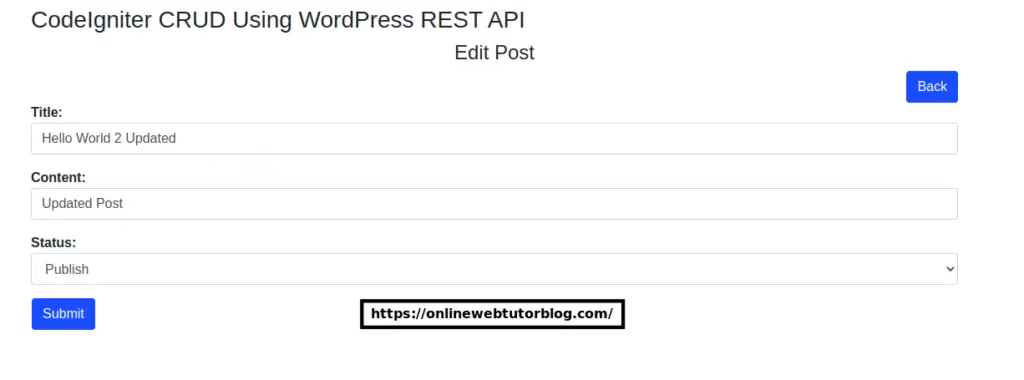
It will give us an interface such as for Title, Content and Status to update post.
<!DOCTYPE html>
<html lang="en">

<head>
    <meta charset="UTF-8">
    <title>CodeIgniter CRUD Using WordPress REST API with JWT Tutorial</title>
    <link rel="stylesheet" href="https://stackpath.bootstrapcdn.com/bootstrap/4.5.2/css/bootstrap.min.css">
</head>

<body>
    <div class="container mt-2">
        <div class="row">
            <div class="col-lg-12 margin-tb">
                <div class="pull-left">
                    <h3>CodeIgniter CRUD Using WordPress REST API</h3>
                </div>
                <h4 class="text-center">Edit Post</h4>
                <div class="pull-right" style="float: right;">
                    <a class="btn btn-primary" href="<?php echo base_url('posts') ?>">
                        Back</a>
                </div>
            </div>
        </div>
        <?php
           if(session()->getFlashdata("success")){
            ?>
            <div class="alert alert-success mb-1 mt-1">
                <?php
                echo session()->getFlashdata("success")
                ?>
            </div>
        <?php
           }
        ?>
        <form action="<?php echo base_url('edit-post/'.$post['id']) ?>" method="POST">

            <div class="row">
                <div class="col-xs-12 col-sm-12 col-md-12">
                    <div class="form-group">
                        <strong>Title:</strong>
                        <input type="text" name="title" value="<?php echo $post['title']['rendered']; ?>" class="form-control"
                            placeholder="Post Title">
                    </div>
                </div>
                <div class="col-xs-12 col-sm-12 col-md-12">
                    <div class="form-group">
                        <strong>Content:</strong>
                        <input type="text" name="content" value="<?php echo $post['content']['rendered']; ?>"
                            class="form-control" placeholder="Content">
                    </div>
                </div>
                <div class="col-xs-12 col-sm-12 col-md-12">
                    <div class="form-group">
                        <strong>Status:</strong>
                        <select name="status" id="status" class="form-control">
                            <option value="">-- Status --</option>
                            <option <?php echo $post['status'] == "draft" ? "selected" : ""; ?> value="draft">Draft</option>
                            <option <?php echo $post['status'] == "publish" ? "selected" : ""; ?> value="publish">Publish
                            </option>
                        </select>
                    </div>
                </div>

                <button type="submit" class="btn btn-primary ml-3">Submit</button>
            </div>
        </form>
    </div>
</body>

</html>
Application Testing
Open project terminal and start development server via command:
php spark serveURL: http://localhost:8080/posts
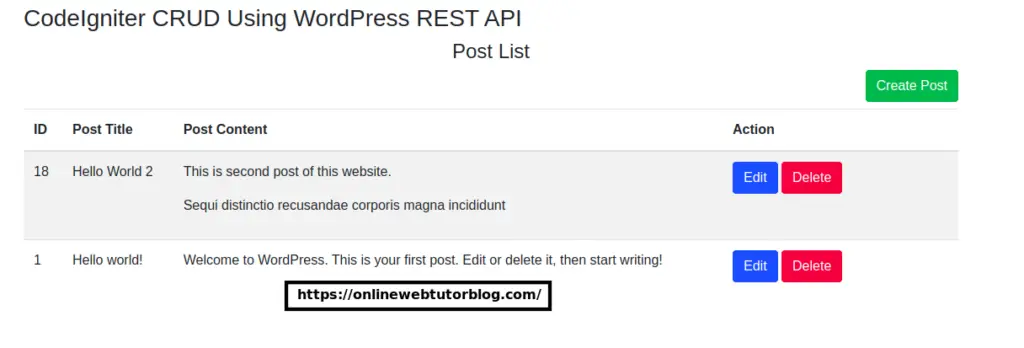
Lists Post,
It will list all posts of wordpress.
Create Post,
When you click on Create Post button, it will open layout to create post.
Update Post,
When you click on Edit button in List Post page, it will open layout to update post with existing data
Delete Post
When click on Delete button of List Post page,
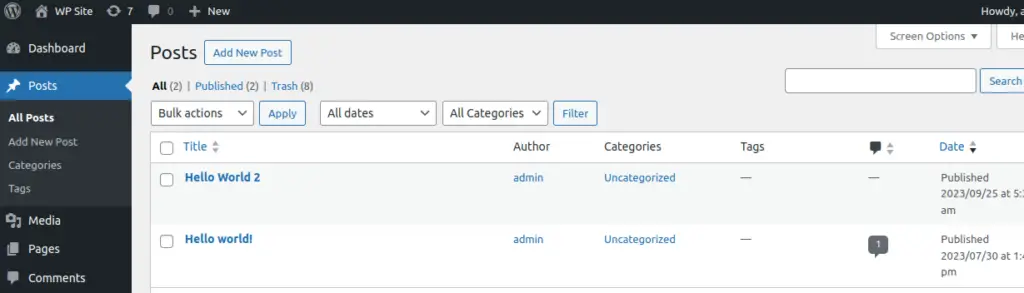
WordPress backend admin panel for Posts data,
That’s it.
We hope this article helped you to learn about CodeIgniter CRUD Using WordPress REST API with JWT Tutorial Example in a very detailed way.
If you liked this article, then please subscribe to our YouTube Channel for PHP & it’s framework, WordPress, Node Js video tutorials. You can also find us on Twitter and Facebook.
Read more