Node.js, a popular JavaScript engine, in conjunction with Sequelize, a sophisticated ORM (Object-Relational Mapping) package, provides a solid foundation for developing CRUD (Create, Read, Update, Delete) APIs for your online applications.
We will walk you through the process of establishing CRUD APIs using Node.js and Sequelize CLI in this tutorial, giving a detailed and practical approach.
Data management in web applications is built on CRUD activities. They enable you to add, read, edit, and remove records in your database, giving you complete control over the data in your application.
Read More: Create HTTP Web Server in Node js Using Express js
Let’s get started.
Step-by-Step Project Plan
Here, these are the steps which you need to follow to create CRUD APIs with Node.js and Sequelize CLI
- Setup package.json file
- Installation of Node packages
- Project Initialization
- Database Connectivity
- Setup Model and Migration (DB Table)
- Create CRUD APIs Routes
- Application Testing
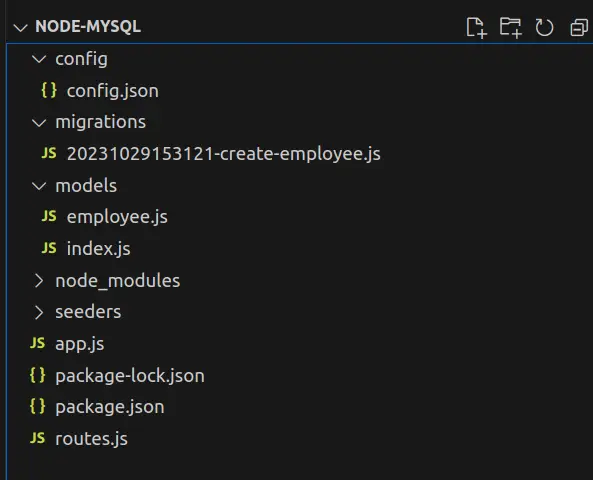
Once you will complete this tutorial, you will find the complete folder structure as:

CRUD APIs with Node.js and Sequelize CLI
Follow all these steps very carefully to create apis.
Step #1: Setup “package.json” file
Open project into terminal and run this command,
npm init -yIt will create a basic file (first file) for your application.
{
    "name": "mysql",
    "version": "1.0.0",
    "description": "",
    "main": "index.js",
    "scripts": {
        "test": "echo \"Error: no test specified\" && exit 1"
    },
    "keywords": [],
    "author": "",
    "license": "ISC"
}
Step #2: Installation of “Node packages”
Back to project terminal and run this command,
npm install express mysql2 sequelize sequelize-cli body-parser nodemonHere, you are installing 6 node packages in a single line command.
Once installed your package.json file will be updated as,
{
    "name": "mysql",
    "version": "1.0.0",
    "description": "",
    "main": "index.js",
    "scripts": {
        "test": "echo \"Error: no test specified\" && exit 1"
    },
    "keywords": [],
    "author": "",
    "license": "ISC",
    "dependencies": {
        "body-parser": "^1.20.2",
        "express": "^4.18.2",
        "mysql2": "^3.6.2",
        "nodemon": "^3.0.1",
        "sequelize": "^6.33.0",
        "sequelize-cli": "^6.6.1"
    }
}
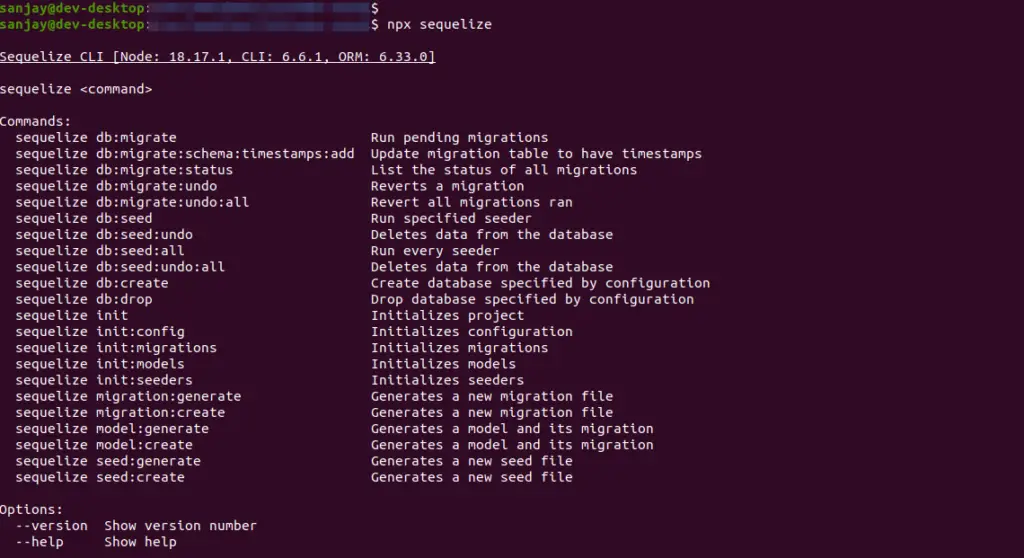
After successful installation of sequelize-cli, you will get the command list of sequelize to work with application.
So, if you run this command
npx sequelize
Step #3: Project Initialization
Back to project terminal and run this command,
npx sequelize initAbove command will initializes your node project and create 4 important folders into it.
Read More: Nodejs Express REST APIs with JWT Authentication Tutorial
Folders are: config, migrations, models, seeders.
Additionally, you will get config.json file inside /config and index.js file inside /models folder.
Also, create these basic files:
- app.js (main file) at project root
- routes.js (routes file) at project root
Once you create these files, update main property of package.json file to app.js. Old value you will get as index.js.
{
    "name": "mysql",
    "version": "1.0.0",
    "description": "",
    "main": "app.js",
    ...
}
Step #4: Database Connectivity
Create a database with name “your_database_name“.
Go inside project editor and open config.json file and update development property. Add database connection string values.
Code of config.json file as,
{
    "development": {
        "username": "your_db_username",
        "password": "your_db_password",
        "database": "your_database_name",
        "host": "127.0.0.1",
        "dialect": "mysql"
    },
    "test": {
        "username": "root",
        "password": null,
        "database": "database_test",
        "host": "127.0.0.1",
        "dialect": "mysql"
    },
    "production": {
        "username": "root",
        "password": null,
        "database": "database_production",
        "host": "127.0.0.1",
        "dialect": "mysql"
    }
}
Step #5: Setup Model and Migration (DB Table)
Back to project terminal and run this command,
npx sequelize model:create --name employee --attributes name:string,email:string,gender:enum,mobile:stringIt will create 2 files in your project folder.
- File 20231029153121-create-employee.js migration file inside /migrations folder.
- File employee.js model file inside /models folder.
Open migration file and write this complete code into it,
'use strict';
/** @type {import('sequelize-cli').Migration} */
module.exports = {
    async up(queryInterface, Sequelize) {
        await queryInterface.createTable('employees', {
            id: {
                allowNull: false,
                autoIncrement: true,
                primaryKey: true,
                type: Sequelize.INTEGER
            },
            name: {
                type: Sequelize.STRING(120),
                allowNull: false
            },
            email: {
                type: Sequelize.STRING(50),
                allowNull: false
            },
            gender: {
                type: Sequelize.ENUM("male", "female", "other"),
                defaultValue: "male"
            },
            mobile: {
                type: Sequelize.STRING(50),
                allowNull: true
            }
        });
    },
    async down(queryInterface, Sequelize) {
        await queryInterface.dropTable('employees');
    }
};
Open model file and write this complete code into it,
'use strict';
const {
    Model
} = require('sequelize');
module.exports = (sequelize, DataTypes) => {
    class employee extends Model {
        /**
         * Helper method for defining associations.
         * This method is not a part of Sequelize lifecycle.
         * The `models/index` file will call this method automatically.
         */
        static associate(models) {
            // define association here
        }
    }
    employee.init({
        name: DataTypes.STRING,
        email: DataTypes.STRING,
        gender: DataTypes.ENUM("male", "female", "other"),
        mobile: DataTypes.STRING
    }, {
        sequelize,
        modelName: 'employee',
        timestamps: false
    });
    return employee;
};
Back to project terminal and run this command,
npx sequelize db:migrateRead More: How To Read and Write Json File in Node Js Tutorial
Step #6: Create CRUD APIs Routes
Open routes.js file from project root. Add this complete code into it.
const express = require("express");
const employeeTable = require("./models").employee;

const router = express.Router();

// Add Employee API (POST)
router.post("/add-employee", (req, res) => {

    employeeTable.findOne({
        where: {
            email: req.body.email
        }
    }).then((data) => {

        if (data) {

            res.json({
                status: false,
                message: "Email already exists"
            });
        } else {

            employeeTable.create({
                name: req.body.name,
                email: req.body.email,
                gender: req.body.gender,
                mobile: req.body.mobile
            }).then((success) => {

                res.json({
                    status: true,
                    message: "Employee created successfully"
                });
            }).catch((error) => {

                res.json({
                    status: false,
                    message: "Failed to execute insert query"
                })
            });
        }
    }).catch((error) => {

        res.json({
            status: false,
            message: "Failed to execute query"
        });
    })
});

// Get all Employee (GET)
router.get("/list-employee", (req, res) => {

    employeeTable.findAll()
        .then((data) => {

            if (data) {

                res.json({
                    status: true,
                    message: "Employees found",
                    users: data
                })
            } else {

                res.json({
                    status: false,
                    message: "No employee found"
                })
            }
        }).catch((error) => {
            res.json({
                status: false,
                message: "Failed to execute query"
            })
        })
});

// Get Single Employee Information
router.get("/single-employee/:id", (req, res) => {

    employeeTable.findOne({
        where: {
            id: req.params.id
        }
    }).then((data) => {

        if (data) {

            res.json({
                status: true,
                message: "Employee data found",
                user: data
            });
        } else {

            res.json({
                status: false,
                message: "No employee found"
            })
        }
    }).catch((error) => {

        res.json({
            status: false,
            message: "Failed to execute query"
        })
    })
});

// Update Employee API (PUT)
router.put("/update-employee/:id", (req, res) => {

    employeeTable.findOne({
        where: {
            id: req.params.id
        }
    }).then((data) => {

        if (data) {

            employeeTable.update({
                name: req.body.name,
                mobile: req.body.mobile
            }, {
                where: {
                    id: req.params.id
                }
            }).then((data) => {

                res.json({
                    status: true,
                    message: "Employee updated successfully"
                })
            }).catch((error) => {
                res.json({
                    status: false,
                    message: "Failed to execute query"
                })
            })
        } else {

            res.json({
                status: false,
                message: "No employee found"
            })
        }
    }).catch((error) => {
        res.json({
            status: false,
            message: "Failed to execute query"
        })
    })
});

// Delete Employee (Delete)
router.delete("/delete-employee/:id", (req, res) => {

    employeeTable.findOne({
        where: {
            id: req.params.id
        }
    }).then((data) => {

        if (data) {

            employeeTable.destroy({
                where: {
                    id: req.params.id
                }
            }).then((data) => {

                res.json({
                    status: true,
                    message: "Employee deleted successfully"
                })
            }).catch((error) => {

                res.json({
                    status: false,
                    message: "Failed to execute query"
                })
            })
        } else {

            res.json({
                status: false,
                message: "No employee found"
            })
        }
    }).catch((error) => {

        res.json({
            status: false,
            message: "Failed to execute query"
        })
    })
});

// Welcome page
router.get("/", (req, res) => {
    res.json({
        status: true,
        message: "Welcome to Node js APIs"
    });
});

module.exports = router;
Next,
Open app.js and add this complete code into it,
const express = require("express");
const bodyParser = require("body-parser");
const appRoutes = require("./routes");

const PORT = 8087;

const app = express();

app.use(bodyParser.json());
app.use("/", appRoutes);

app.listen(PORT, () => {

    console.log("Application started...")
});
Everything is done now.
Step #7: Application Testing
Open project terminal and run this command,
npx nodemonAbove command will start development server.
Add Employee API
URL – http://localhost:8087/add-employee
Method – POST
Header –
Accept:application/json

Content-Type: application/json
Form data –
{
	"name": "Vijay Kumar",
	"email": "vijay@gmail.com",
	"gender": "male",
	"mobile": "8529631470"
}
Screenshot –

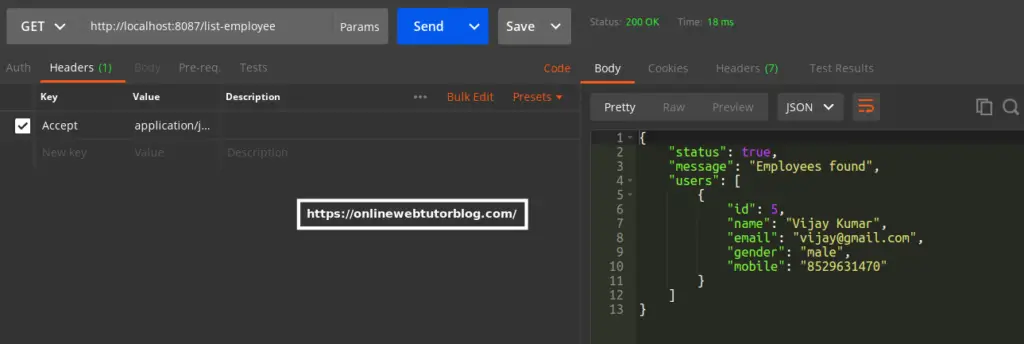
List Employee API
URL – http://localhost:8087/list-employee
Method – GET
Header –
Accept:application/jsonScreenshot –

Single Employee Details API
URL – http://localhost:8087/single-employee/5
Method – GET
Header –
Accept:application/jsonScreenshot –

Update Employee API
URL – http://localhost:8087/update-employee/5
Method – PUT
Header –
Accept:application/json

Content-Type: application/json
Form data –
{
	"name": "Vijay Singh",
	"mobile": "88888888888"
}
Screenshot –

Delete Employee API
URL – http://localhost:8087/delete-employee/5
Method – DELETE
Header –
Accept:application/jsonThat’s it.
We hope this article helped you to learn about Creating CRUD APIs with Node.js and Sequelize CLI Tutorial in a very detailed way.
Online Web Tutor invites you to try Skillshike! Learn CakePHP, Laravel, CodeIgniter, Node Js, MySQL, Authentication, RESTful Web Services, etc into a depth level. Master the Coding Skills to Become an Expert in PHP Web Development. So, Search your favourite course and enroll now.
If you liked this article, then please subscribe to our YouTube Channel for PHP & it’s framework, WordPress, Node Js video tutorials. You can also find us on Twitter and Facebook.
