Throttler is used to limit some actions for number of times for given time period. Inside this article, we will see the complete details about throtller in CodeIgniter 4.
This is the newest feature added in CodeIgniter. By the help of this concept, we can control the number of attempts to a specific operation i.e rate limit.
Using throttler concept, we can limit number of attempts over login page, set rate limit or request limit for a specific IP etc. Inside this tutorial we will see an example of Login page and it’s request attempts.
Learn More –
- Methods of Query Builder Class In CodeIgniter 4 Tutorial
- Multiple Files Upload in CodeIgniter 4 Tutorial
- Multiple Images Upload in CodeIgniter 4 Tutorial
- MySQL Group By in CodeIgniter 4 Query Builder Tutorial
Let’s get started.
CodeIgniter 4 Installation
To create a CodeIgniter 4 setup run this given command into your shell or terminal. Please make sure composer should be installed.
composer create-project codeigniter4/appstarter codeigniter-4Assuming you have successfully installed application into your local system.
Environment (.env) Setup
When we install CodeIgniter 4, we will have env file at root. To use the environment variables means using variables at global scope we need to do env to .env
Either we can do via renaming file as simple as that. Also we can do by terminal command.
Open project in terminal
cp env .envAbove command will create a copy of env file to .env file. Now we are ready to use environment variables.
Enable Development Mode
CodeIgniter starts up in production mode by default. You need to make it in development mode to see any error if you are working with application.
Open .env file from root.
# CI_ENVIRONMENT = production

 // Do it to

CI_ENVIRONMENT = development
Now application is in development mode.
How can we use Throttler in Application
As we already discussed, rate limit or throtller concept is the newly added feature in CodeIgniter v4. Throttler is a Service. So by using this concept, actually we can restrict the number attempts to a request over some time period.
For example –
- Number of Login attempts should not be allowed more than 4 times in a minute.
- Not more than 5 request we will process from any specific IP.
These are few examples, where we can use the concept of throtller of CodeIgniter 4. Inside this tutorial, we will see Restrict Number of Login attempts in a minute.
Create Routes
Open Routes.php from /app/Config. Into this file, add few routes.
//...

$routes->get("login", "LoginController::index");
$routes->post("validate-user", "LoginController::validateUser");

//...
Enable CSRF Protection
Open .env file and search for CSRFProtection
# app.CSRFProtection = false

<strong>Change To</strong>

app.CSRFProtection = true
Open Filters.php from /app/Config. Search for $globals. Uncomment csrf from list.
//...

public $globals = [
  'before' => [
    //'honeypot',
    'csrf',
  ],
  'after'  => [
    'toolbar',
    //'honeypot',
  ],
];

//...
Now, we have done all the settings to enable CSRF rule.
Create Controller
Open project into terminal and run this spark command.
$ php spark make:controller Login --suffixIt will create a file with name LoginController.php at /app/Controllers folder. Open LoginController.php and write this following code into it.
<?php

namespace App\Controllers;

use App\Controllers\BaseController;

class LoginController extends BaseController
{
    public function index()
    {
        return view("login-form");
    }

    public function validateUser()
    {
		$throttler = \Config\Services::throttler();

		// Checking login attempt 4 times in a minute
        $allowed = $throttler->check('login', 4, MINUTE);

		if ($allowed) { // if form_submitted <= 4

			//do your login process
        } else {

            //return error or do nothing according to your need.
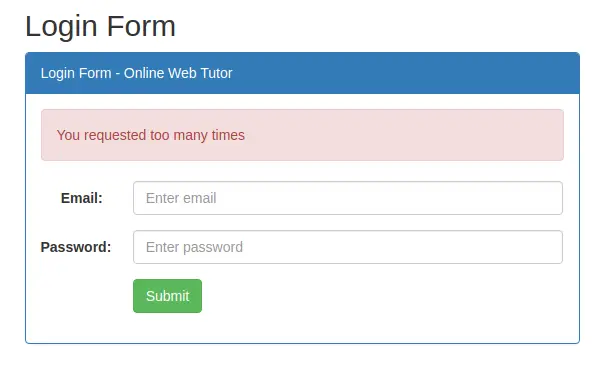
            session()->setFlashdata("error", "You requested too many times");
        }

        return redirect()->to("login");
    }
}- $throttler = \Config\Services::throttler(); Throttler service initialized
- $allowed = $throttler->check(‘login’, 4, MINUTE); login is a key where each attempt after form submission getting stored.
4is limit (how much operation we want to perform) MINUTEis constant in CodeIgniter 4 which is equivalent to60, and here60is seconds. So instead ofMINUTEyou can pass60or90.- session()->setFlashdata(“error”, “You requested too many times”); After 4 login attempts we are setting a flash message for end users.
- redirect()->to(“login”); Redirect to login route
Create View File
Create a layout file with name login-form.php at /app/Views folder. Open login-form.php and write this code into it.
<!DOCTYPE html>
<html lang="en">
<head>
  <title>Throttler Tutorial in CodeIgniter 4 - Online Web Tutor</title>
  <meta charset="utf-8">
  <meta name="viewport" content="width=device-width, initial-scale=1">
  <link rel="stylesheet" href="https://maxcdn.bootstrapcdn.com/bootstrap/3.4.1/css/bootstrap.min.css">
  <script src="https://ajax.googleapis.com/ajax/libs/jquery/3.5.1/jquery.min.js"></script>
  <script src="https://maxcdn.bootstrapcdn.com/bootstrap/3.4.1/js/bootstrap.min.js"></script>
</head>
<body>

<div class="container">
  <h2>Login Form</h2>
  <div class="row">
    <div class="col-sm-6">
    <div class="panel panel-primary">
        <div class="panel-heading">Login Form - Online Web Tutor</div>
            <div class="panel-body">

                <?php
                    if(session()->has("error")){
                        ?>
                        <div class="alert alert-danger">
                            <?= session("error") ?>
                        </div>
                        <?php
                    }
                ?>

                <form class="form-horizontal" action="<?= base_url('validate-user') ?>" method="post">

                    <input type="hidden" name="<?=csrf_token()?>" value="<?=csrf_hash()?>" />

                    <div class="form-group">
                        <label class="control-label col-sm-2" for="email">Email:</label>
                        <div class="col-sm-10">
                        <input type="email" class="form-control" id="email" placeholder="Enter email" name="email">
                        </div>
                    </div>
                    <div class="form-group">
                        <label class="control-label col-sm-2" for="pwd">Password:</label>
                        <div class="col-sm-10">
                        <input type="password" class="form-control" id="pwd" placeholder="Enter password" name="password">
                        </div>
                    </div>
                    <div class="form-group">
                        <div class="col-sm-offset-2 col-sm-10">
                        <button type="submit" class="btn btn-success">Submit</button>
                        </div>
                    </div>
                </form>
            </div>
    </div>
    </div>
  </div>
</div>

</body>
</html>
Application Testing
Open project terminal and start development server via command:
php spark serveURL: http://localhost:8080/login
After more than 4 login attempts

We hope this article helped you to learn How Throttler and Rate limiting work in Codeigniter 4 in a very detailed way.
If you liked this article, then please subscribe to our YouTube Channel for PHP & it’s framework, WordPress, Node Js video tutorials. You can also find us on Twitter and Facebook.
Read more