Accessing data from a specific time range, such as the last 30 days, is a frequent necessity in web development for various analytical, reporting, or monitoring purposes. In CodeIgniter 4, fetching data from the past 30 days enables developers to efficiently access recent but specific information.
In this tutorial, we’ll explore the comprehensive process of retrieving data from the last 30 days using CodeIgniter 4. This functionality empowers developers to extract records falling within the time frame of the previous month
Selecting data rows from database in codeigniter 4, we have several options available as – Using Models, Using Query Builder, Using Raw queries.
Read More: How to Get Last Week Data in CodeIgniter 4 Tutorial
Last 30 days data selection is very helpful when we are creating data reports of application.
Let’s get started.
CodeIgniter 4 Installation
To create a CodeIgniter 4 setup run this given command into your shell or terminal. Please make sure composer should be installed.
composer create-project codeigniter4/appstarter codeigniter-4Assuming you have successfully installed application into your local system.
Environment (.env) Setup
When we install CodeIgniter 4, we will have env file at root. To use the environment variables means using variables at global scope we need to do env to .env
Either we can do via renaming file as simple as that. Also we can do by terminal command.
Open project in terminal
cp env .envAbove command will create a copy of env file to .env file. Now we are ready to use environment variables.
Enable Development Mode
CodeIgniter starts up in production mode by default. You need to make it in development mode to see any error if you are working with application.
Open .env file from root.
# CI_ENVIRONMENT = production

 // Do it to

CI_ENVIRONMENT = development
Now application is in development mode.
Database Connection
Open .env file from project root.
Search for DATABASE. You should see the connection environment variables into it. Put your updated details of database connection string values.
#--------------------------------------------------------------------
# DATABASE
#--------------------------------------------------------------------

database.default.hostname = localhost
database.default.database = codeigniter4_app
database.default.username = admin
database.default.password = admin
database.default.DBDriver = MySQLi
database.default.DBPrefix =
database.default.port = 3306
Now, database successfully connected with the application.
Read More: CodeIgniter 4 How To Load Database in Custom Library
Sample Database Data Rows
Here, we have taken a sample database to understand this example. codeigniter4_app is the name of database.
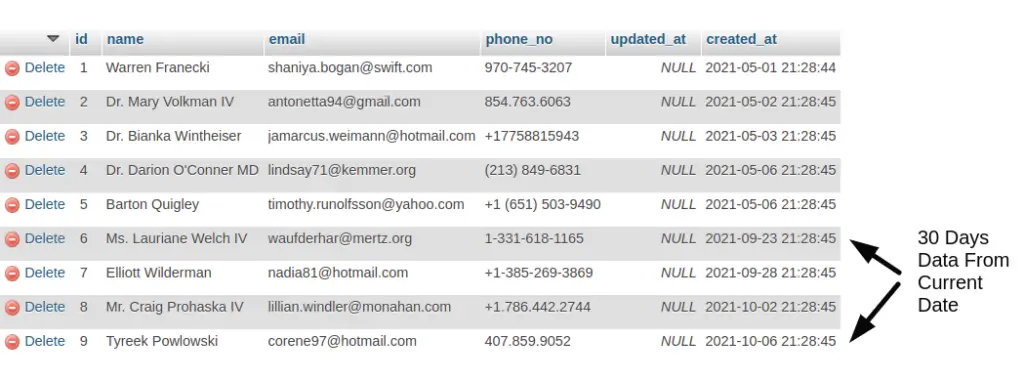
Let’s say we have a users table inside it which contains users data. Please look into this screenshot to get clear vision about table.

Next,
We want to get all data from this table of last 30 days in CodeIgniter 4.
Create Query for Data
Open any controller from your application.
Let’s add Last 30 days concept into it to get data.
<?php

namespace App\Controllers;

class Site extends BaseController
{
    private $db;

    public function __construct()
    {
        $this->db = db_connect();
    }

    public function getUsers()
    {
        $usersTable = $this->db->table("users");
        $usersTable->select('name, email, phone_no');
        $usersTable->where("created_at >= DATE(NOW()) - INTERVAL 30 DAY");
        $query = $usersTable->get();

        //echo $this->db->getLastQuery();

        echo "<pre>";
        print_r($query->getResult());
    }
}
Query Concept
Make use of MySQL Last 30 Days Data Selection Concept.
Generated Query
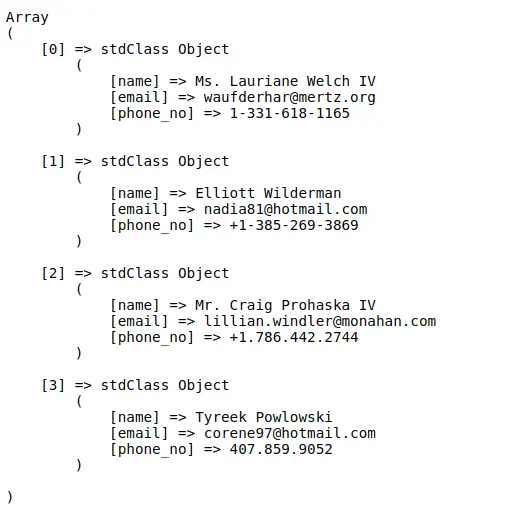
SELECT `name`, `email`, `phone_no` FROM `users` WHERE `created_at` >= DATE(NOW()) - INTERVAL 30 DAYWhen we run this code, we will get result as

That’s it.
We hope this article helped you to learn about How to Get Last 30 Days Data in CodeIgniter 4 Tutorial in a very detailed way.
If you liked this article, then please subscribe to our YouTube Channel for PHP & it’s framework, WordPress, Node Js video tutorials. You can also find us on Twitter and Facebook.
Read more