Inside this article we will see How to upload and save XML file in laravel 8. There are actually very few simple steps and also you can follow this step in any PHP and it’s framework. This is not laravel specific.
To know the topic, reading xml, upload and save file in laravel we will consider a sample xml and read it in code.
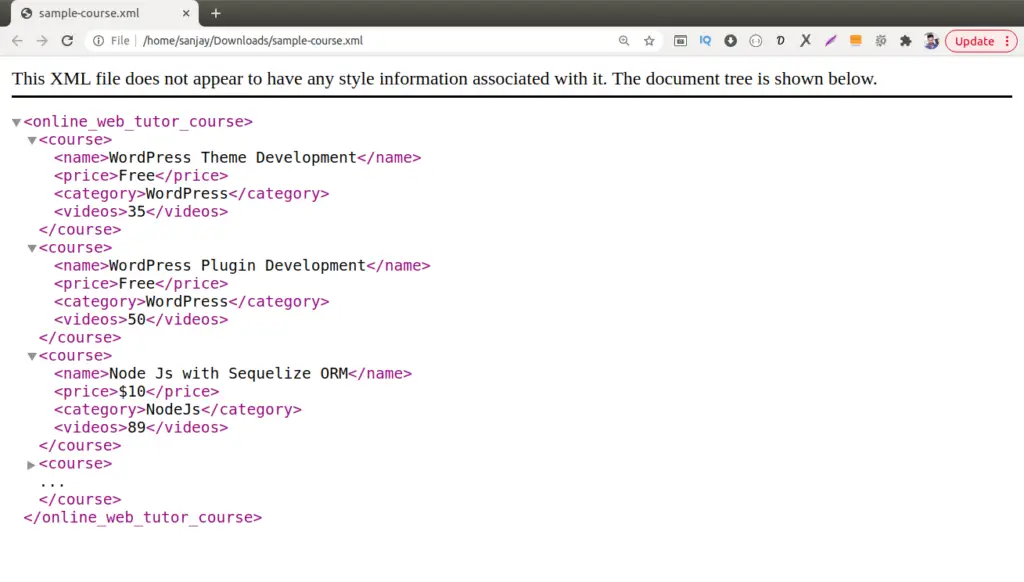
Above image is view of sample xml file and it’s data. You can download this
Let’s get started.
Laravel Installation
We will create laravel project using composer. So, please make sure your system should have composer installed. If not, may be this article will help you to Install composer in system.
Here is the command to create a laravel project-
composer create-project --prefer-dist laravel/laravel blog
To start the development server of Laravel –
php artisan serve
URL: http://127.0.0.1:8000
Assuming laravel already installed inside your system.
Application Database Configuration
Inside this we will make database configuration using .env file. So to connect with database we need to pass database name, username, password etc.
Let’s open .env file and provide the following details.
DB_CONNECTION=mysql
DB_HOST=127.0.0.1
DB_PORT=3306
DB_DATABASE=xml_app
DB_USERNAME=root
DB_PASSWORD=root
By the above step we are now successfully connected with database.
Create Route
Open web.php file from /routes
//.. other code

# Import controller
use App\Http\Controllers\ReadXmlController;

Route::match(["get", "post"], "read-xml", [ReadXmlController::class, "index"])->name('xml-upload');
Create Model & Migration
Open project into terminal. Let’s create model and migration by using a single command.
Creating model and migration …
$ php artisan make:model XmlData -m
Above command will create 2 files –
- Model file with name XmlData.php at /app/Models
- Migration File with name 2021_01_21_040518_create_xml_data_table.php at /database/migrations
Open up the Model file and write this code snippet
<?php

namespace App\Models;

use Illuminate\Database\Eloquent\Factories\HasFactory;
use Illuminate\Database\Eloquent\Model;

class XmlData extends Model
{
    use HasFactory;

    public $timestamps = false;
}
Open migration file and write the following piece of code
<?php

use Illuminate\Database\Migrations\Migration;
use Illuminate\Database\Schema\Blueprint;
use Illuminate\Support\Facades\Schema;

class CreateXmlDataTable extends Migration
{
    /**
     * Run the migrations.
     *
     * @return void
     */
    public function up()
    {
        Schema::create('xml_data', function (Blueprint $table) {
            $table->id();
            $table->string("name", 120);
            $table->string("category", 20);
            $table->string("price", 10);
            $table->integer("total_videos");
        });
    }

    /**
     * Reverse the migrations.
     *
     * @return void
     */
    public function down()
    {
        Schema::dropIfExists('xml_data');
    }
}
Now, let’s migrate the created migration file in database. Back to terminal and run this command.
$ php artisan migrate
This command will create table in database.
Create Controller
We need to create a controller where we will parse or read xml data string from file. Open laravel project into shell or terminal and type this command.
To create Controller –
$ php artisan make:controller ReadXmlController
It will create a file inside /app/Http/Controllers.
Open up the created file ReadXmlController.php into editor
<?php
namespace App\Http\Controllers;
use Illuminate\Http\Request;
use App\Models\XmlData;
class ReadXmlController extends Controller
{
public function index(Request $req)
{
if($req->isMethod("POST")){
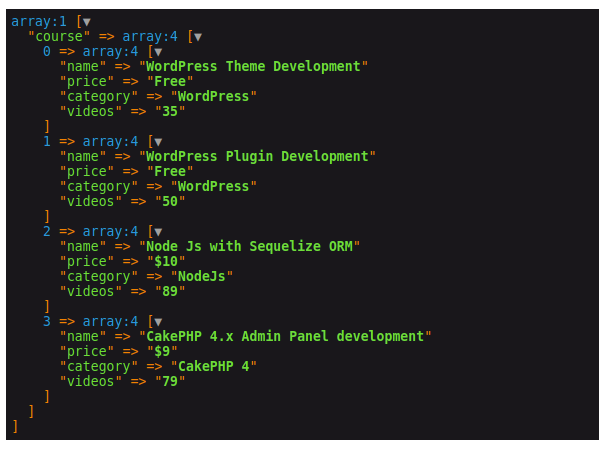
$xmlDataString = file_get_contents(public_path('sample-course.xml'));
$xmlObject = simplexml_load_string($xmlDataString);
$json = json_encode($xmlObject);
$phpDataArray = json_decode($json, true);
// echo "<pre>";
// print_r($phpDataArray);
if(count($phpDataArray['course']) > 0){
$dataArray = array();
foreach($phpDataArray['course'] as $index => $data){
$dataArray[] = [
"name" => $data['name'],
"category" => $data['category'],
"price" => $data['price'],
"total_videos" => $data['videos']
];
}
XmlData::insert($dataArray);
return back()->with('success','Data saved successfully!');
}
}
return view("xml-data");
}
}- public_path(‘sample-course.xml’) XML file should be placed in public directory. public_path returns the path upto /public folder
- simplexml_load_string($xmlDataString); It’s a PHP function used to read xml file
- XmlData::insert($dataArray); Insert data array into table
Create Blade Template File
Next, we need to create a blade template file with the name xml-data.blade.php at /resources/views
Open up the file xml-data.blade.php
<!DOCTYPE html>
<html lang="en">

<head>
    <title>How To Upload And Save XML Data in Laravel 8 - Online Web Tutor</title>
    <meta charset="utf-8">
    <meta name="viewport" content="width=device-width, initial-scale=1">
    <link rel="stylesheet" href="https://maxcdn.bootstrapcdn.com/bootstrap/4.5.2/css/bootstrap.min.css">
    <script src="https://ajax.googleapis.com/ajax/libs/jquery/3.5.1/jquery.min.js"></script>
    <script src="https://cdnjs.cloudflare.com/ajax/libs/popper.js/1.16.0/umd/popper.min.js"></script>
    <script src="https://maxcdn.bootstrapcdn.com/bootstrap/4.5.2/js/bootstrap.min.js"></script>
    <style>
        #frm-create-post label.error{
            color:red;
        }
    </style>
</head>

<body>

    <div class="container" style="margin-top: 50px;">
        <h4 style="text-align: center;">How To Upload And Save XML Data in Laravel 8 - Online Web Tutor</h4>

        @if ($message = Session::get('success'))
        <div class="alert alert-success alert-block">
            <button type="button" class="close" data-dismiss="alert">×</button>
            <strong>{{ $message }}</strong>
        </div>
        @endif

        <form action="{{ route('xml-upload') }}" id="frm-create-course" method="post">
           @csrf
            <div class="form-group">
                <label for="file">Select XML File:</label>
                <input type="file" class="form-control" required id="file" name="file">
            </div>

            <button type="submit" class="btn btn-primary" id="submit-post">Submit</button>
        </form>
    </div>
</body>

</html>
Application Testing
Run this command into project terminal to start development server,
php artisan serveOpen up the URL – http://localhost:8000/read-xml
XML File Dump View
Upload Data Layout View
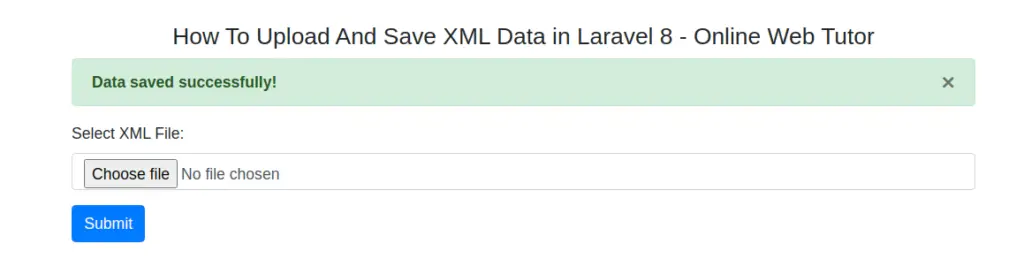
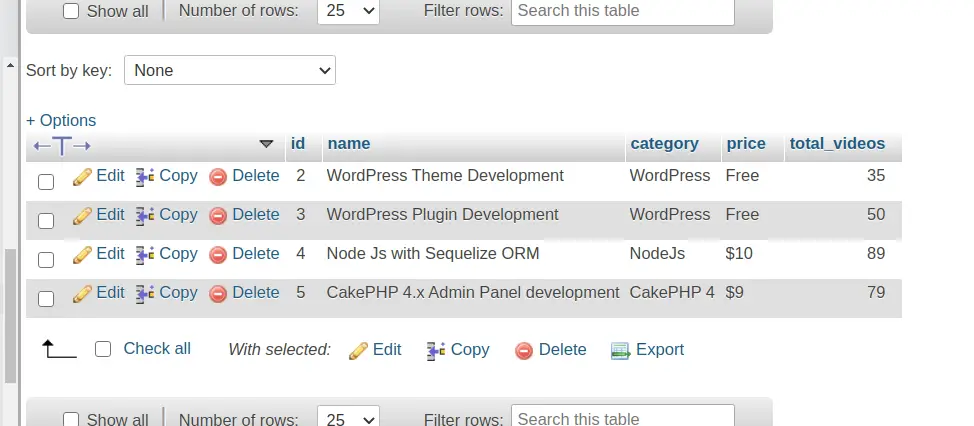
Data Saved in MySQL DB
We hope this article helped you to learn about i.e How To Upload And Save XML Data in Laravel 8 Tutorial in a very detailed way.
If you liked this article, then please subscribe to our YouTube Channel for PHP & it’s framework, WordPress, Node Js video tutorials. You can also find us on Twitter and Facebook.
Read more