
Making HTTP POST requests using cURL and custom headers in Laravel 10 provides a reliable approach to exchange data with other APIs, services, or endpoints. The cURL library sends and receives data via the HTTP protocol, making it a useful tool for integrating and communicating with various web services.
In this tutorial, we will walk you through the process of making HTTP POST requests with custom headers in Laravel 10. We’ll look at how to make cURL requests, add custom headers, provide request data, and manage the result in your Laravel application.
Read More: Laravel 10 Http cURL Get Request Tutorial
Let’s get started.
Laravel Installation
Open terminal and run this command to create a laravel project.
composer create-project laravel/laravel myblogIt will create a project folder with name myblog inside your local system.
To start the development server of laravel –
php artisan serveURL: http://127.0.0.1:8000
Assuming laravel already installed inside your system.
Next,
Setup Controller & Add cURL Concept
We need to create a controller file.
$ php artisan make:controller SiteControllerIt will create a file SiteController.php inside /app/Http/Controllers folder.
Read More: Laravel 10 How to Get Last Executed Query Tutorial
Open SiteController.php and write this complete code into it.
cURL Request with POST Data Using HTTP
<?php

namespace App\Http\Controllers;

use Illuminate\Http\Request;
use Illuminate\Support\Facades\Http;

class SiteController extends Controller
{
    public function index(): void
    {
        // URL
        $apiURL = 'https://api.onlinewebtutorblog.com/employees';

        // POST Data
        $postInput = [
            "username" => "sanjay_owt",
            "name" => "Sanjay Kumar",
            "email" => "sanjay@example.net",
            "gender" => "Male",
            "designation" => "Web Developer",
            "phone_number" => "1234567890",
            "complete_address" => "Sample, Test Address"
        ];

        $response = Http::withHeaders($headers)->post($apiURL, $postInput);

        $statusCode = $response->status();
        $responseBody = json_decode($response->getBody(), true);

        echo "Status code: ". $statusCode;  // status code

        dd($responseBody); // body response
    }
}
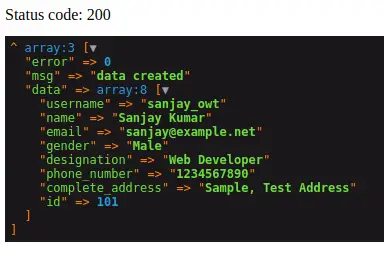
Output
cURL Request with POST Data Using GuzzleHttp
To work with GuzzleHttp, we need to install guzzle package into laravel application.
Here is the given command to install guzzlehttp package into application –
Read More: Beta Character AI: A Complete Guide For Character.ai
Install guzzlehttp/guzzle Package
Open project into terminal run this command.
$ composer require guzzlehttp/guzzleThis package will install guzzlehttp and also updates composer.json file at root.
"require": {
     //...
     "guzzlehttp/guzzle": "^7.2",
     //...
},
<?php
namespace App\Http\Controllers;
use Illuminate\Http\Request;
class SiteController extends Controller
{
public function index(): void
{
// URL
$apiURL = 'https://api.onlinewebtutorblog.com/employees';
// POST Data
$postInput = [
"username" => "sanjay_owt",
"name" => "Sanjay Kumar",
"email" => "sanjay@example.net",
"gender" => "Male",
"designation" => "Web Developer",
"phone_number" => "1234567890",
"complete_address" => "Sample, Test Address"
];
// Headers
$headers = [
//...
];
$client = new \GuzzleHttp\Client();
$response = $client->request('POST', $apiURL, ['form_params' => $postInput, 'headers' => $headers]);
$responseBody = json_decode($response->getBody(), true);
echo "Status code: ". $response->getStatusCode(); // status code
dd($responseBody); // body response
}
}
Output –

We hope this article helped you to learn Laravel 10 Http cURL Post Request with Headers Tutorial in a very detailed way.
Read More: Laravel 10 How To Add Social Media Share Buttons Tutorial
If you liked this article, then please subscribe to our YouTube Channel for PHP & it’s framework, WordPress, Node Js video tutorials. You can also find us on Twitter and Facebook.
Read more