
It is vital to populate your database with realistic and diverse data when designing and testing online apps. The Faker module appears as a powerful feature in Laravel 10 that allows you to construct fake data with precision and ease.
This data seeding procedure not only saves time but also ensures that the database of your application is populated with representative data for testing and development.
Read More: Laravel 10 How To Generate UUID Tutorial
In this tutorial, we will walk you through the process of seeding your database in Laravel 10 using the Faker module. We will look at installing and integrating the Faker library, defining seeders, and generating various sorts of false data for various database tables.
Let’s get started.
Laravel Installation
Open terminal and run this command to create a laravel project.
composer create-project laravel/laravel myblogIt will create a project folder with name myblog inside your local system.
To start the development server of laravel –
php artisan serveURL: http://127.0.0.1:8000
Assuming laravel already installed inside your system.
Create Database & Connect
To create a database, either we can create via Manual tool of PhpMyadmin or by means of a mysql command.
CREATE DATABASE laravel_app;
To connect database with application, Open .env file from application root. Search for DB_ and update your details.
DB_CONNECTION=mysql
DB_HOST=127.0.0.1
DB_PORT=3306
DB_DATABASE=laravel_app
DB_USERNAME=root
DB_PASSWORD=root
Create Migration
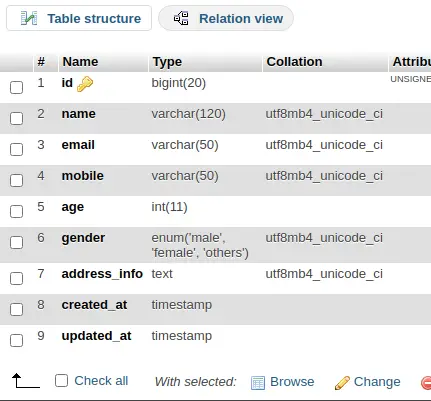
We will create a students table using migration and then we seed test data inside it.
Open project into terminal and run this command to create migration file.
$ php artisan make:migration create_students_tableIt will create 2023_08_15_093811_create_students_table file inside /database/migrations folder. Open migration file and write this following code into it.
Read More: Laravel 10 Read JSON File Example Tutorial
The code is all about for the schema of students table.
<?php

use Illuminate\Database\Migrations\Migration;
use Illuminate\Database\Schema\Blueprint;
use Illuminate\Support\Facades\Schema;

return new class extends Migration
{
    /**
     * Run the migrations.
     */
    public function up(): void
    {
        Schema::create('students', function (Blueprint $table) {
            $table->id();
            $table->string("name", 120);
            $table->string("email", 50)->nullable();
            $table->string("mobile", 50)->nullable();
            $table->integer("age");
            $table->enum("gender", ["male", "female", "others"]);
            $table->text("address_info");
            $table->timestamp("created_at")->useCurrent();
            $table->timestamp("updated_at")->useCurrent();
        });
    }

    /**
     * Reverse the migrations.
     */
    public function down(): void
    {
        Schema::dropIfExists('students');
    }
};
Run Migration
Back to terminal and run this command.
$ php artisan migrateIt will create students table inside database.
Create Model
Back to project terminal and run this command to create model.
$ php artisan make:model StudentIt will create Student.php file inside /app/Models folder. This file will help when we generate data using factory and insert into table.
Create Data Factory
Next,
Copy this command and run into terminal to create a factory file.
$ php artisan make:factory StudentFactoryIt will create a file StudentFactory.php inside /database/factories folder. Open file and write this following code into it.
<?php

namespace Database\Factories;

use Illuminate\Database\Eloquent\Factories\Factory;

/**
 * @extends \Illuminate\Database\Eloquent\Factories\Factory<\App\Models\Student>
 */
class StudentFactory extends Factory
{
    /**
     * Define the model's default state.
     *
     * @return array<string, mixed>
     */
    public function definition(): array
    {
        return [
            "name" => $this->faker->name(),
            "email" => $this->faker->safeEmail,
            "mobile" => $this->faker->phoneNumber,
            "age" => $this->faker->numberBetween(25, 45),
            "gender" => $this->faker->randomElement([
                "male",
                "female",
                "others"
            ]),
            "address_info" => $this->faker->address
        ];
    }
}
Call Model Factory
Open DatabaseSeeder.php from /database/seeders folder. Load model and factory.
<?php

namespace Database\Seeders;

// use Illuminate\Database\Console\Seeds\WithoutModelEvents;
use Illuminate\Database\Seeder;

class DatabaseSeeder extends Seeder
{
    /**
     * Seed the application's database.
     */
    public function run(): void
    {
        \App\Models\Student::factory(100)->create();
    }
}
Concept
\App\Models\Student::factory(100)->create();Read More: Laravel 10 MySQL Right Join Example Tutorial
It will generate 100 fake rows of student using StudentFactory.php file and save into students table.
Run Data Seeder
Back to project terminal and run this command to run factory to seed fake data.
$ php artisan db:seedIt will generate and save fake data into students table.

We hope this article helped you to learn about Laravel 10 Seed Database Using Faker Library Tutorial in a very detailed way.
[do_widget “buy me a coffee”]
Online Web Tutor invites you to try Skillshare free for 1 month! Learn CakePHP 4, Laravel APIs Development, CodeIgniter 4, Node Js, etc into a depth level. Master the Coding Skills to Become an Expert in Web Development. So, Search your favourite course and enroll now. Click here to join.
If you liked this article, then please subscribe to our YouTube Channel for PHP & it’s framework, WordPress, Node Js video tutorials. You can also find us on Twitter and Facebook.
Read more