Inside this article we will see the concept i.e Laravel 9 Custom Validation Error Messages Tutorial. Article contains the classified information about laravel form validation custom error messages.
If you are looking for a solution i.e How to return custom validation error messages in Laravel then this article will help you a lot for this. Tutorial is super easy to understand and implement it in your code as well.
Read More: Laravel 9 How To Limit The Length of a String Example
Laravel 9 by default provides many validation rules to validate user inputs either for string value, integer value along with their validation error messages as well. But in several cases we need show custom messages for rules. This article will help you for this.
Let’s get started.
Laravel Installation
Open terminal and run this command to create a laravel project.
composer create-project laravel/laravel myblogIt will create a project folder with name myblog inside your local system.
To start the development server of laravel –
php artisan serveURL: http://127.0.0.1:8000
Assuming laravel already installed inside your system.
Create Database & Connect
To create a database, either we can create via Manual tool of PhpMyadmin or by means of a mysql command.
CREATE DATABASE laravel_app;
To connect database with application, Open .env file from application root. Search for DB_ and update your details.
DB_CONNECTION=mysql
DB_HOST=127.0.0.1
DB_PORT=3306
DB_DATABASE=laravel_app
DB_USERNAME=root
DB_PASSWORD=root
Create Controller
Open project into terminal and run this command to create controller file.
$ php artisan make:controller CustomControllerIt will create a file CustomController.php inside /app/Http/Controllers folder.
Read More: Laravel 9 How to Set Timezone Example Tutorial
Open this controller file and write this code into it.
<?php

namespace App\Http\Controllers;

use Illuminate\Http\Request;
use App\Models\User;

class CustomController extends Controller
{
    public function index()
    {
        return view('form');
    }

    public function store(Request $request)
    {
        $request->validate(
            [
                'name' => 'required',
                'password' => 'required',
                'email' => 'required'
            ],
            [
                'name.required' => 'Name is required',
                'password.required' => 'Password is required'
            ]
        );

        $input = $request->all();
        $input['password'] = bcrypt($input['password']);
        $user = User::create($input);

        return back()->with('success', 'User created successfully.');
    }
}
Create Blade Template File
Next,
Create a fie form.blade.php inside /resources/views folder.
Open form.blade.php and write this code into it.
<!DOCTYPE html>
<html>
<head>
    <title>Laravel 9 Custom Validation Error Messages Tutorial</title>
    <meta charset="utf-8">
    <meta http-equiv="X-UA-Compatible" content="IE=edge">
    <meta name="viewport" content="width=device-width, initial-scale=1">
    <link href="https://cdn.jsdelivr.net/npm/bootstrap@5.0.2/dist/css/bootstrap.min.css" rel="stylesheet">
    <style>
        body{
            background-color: #d2d2d2;
        }
        form{
            background-color: #fff;
        }
    </style>
</head>
<body>
    <div class="container">
        <div class="row">
            <div class="col-md-12 mt-5">
                <div class="row">
                    <form method="POST" action="{{ route('store') }}" class="border rounded p-5 mt-5" autocomplete='off'>
                        @csrf
                        <div class="col-md-12">
                            <div class="row">
                                <h4 class="col-md-7 ps-2 m-0">Laravel 9 Custom Validation Error Messages Tutorial</h4>
                                @if(Session::has('success'))
                                <div class="alert alert-success">
                                    {{ Session::get('success') }}
                                    @php
                                        Session::forget('success');
                                    @endphp
                                </div>
                                @endif
                            </div>
                        </div>
                        <div class="col-md-12 mt-2">
                            <label for="name" class="form-label mb-0">Name:</label>
                            <input type="text" name="name" class="form-control" placeholder="Name">
                            @if ($errors->has('name'))
                                <span class="text-danger">{{ $errors->first('name') }}</span>
                            @endif
                        </div>
                        <div class="col-md-12 mt-2">
                            <label for="email" class="form-label mb-0">Email:</label>
                            <input type="text" name="email" class="form-control" placeholder="Email">
                            @if ($errors->has('email'))
                                <span class="text-danger">{{ $errors->first('email') }}</span>
                            @endif
                        </div>
                        <div class="col-md-12 mt-2">
                            <label for="password" class="form-label mb-0">Password:</label>
                            <input type="password" name="password" class="form-control" placeholder="Password">
                            @if ($errors->has('password'))
                                <span class="text-danger">{{ $errors->first('password') }}</span>
                            @endif
                        </div>
                        <div class="col-md-12">
                            <button class="col-md-12 btn btn-success btn-submit mt-3">Submit</button>
                        </div>
                    </form>
                </div>
            </div>
        </div>
    </div>
</body>
</html>
Read More: PHP How to Convert Camel Case to Snake Case Tutorial
Add Route
Open web.php from /routes folder. Add these routes into it.
//...

use App\Http\Controllers\CustomController;

Route::get('form', [CustomController::class, 'index'])->name('form');
Route::post('store', [CustomController::class, 'store'])->name('store');
//...
Application Testing
Run this command into project terminal to start development server,
php artisan serveURL: http://127.0.0.1:8000/form
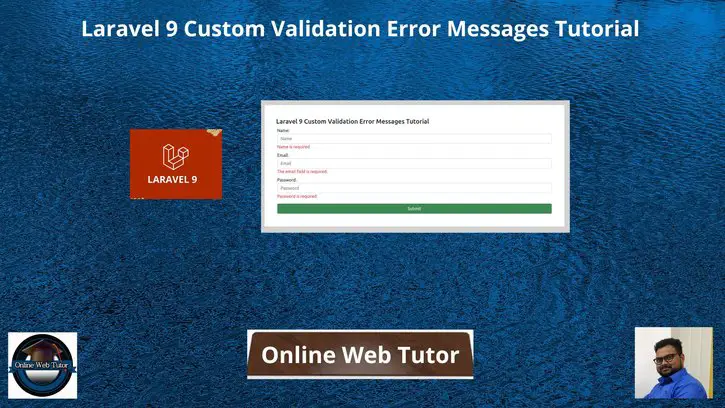
Above route will open a form with these input fields – Name, Email, & Password. If you submit this form without any value, then form validations will work and gives you the custom messages what you set from controller.

Once, you submit form with all input data then form will be submitted with success message.
We hope this article helped you to learn Laravel 9 Custom Validation Error Messages Tutorial in a very detailed way.
Read More: 5 Best Ways to Convert PNG to SVG Example Tutorial
If you liked this article, then please subscribe to our YouTube Channel for PHP & it’s framework, WordPress, Node Js video tutorials. You can also find us on Twitter and Facebook.
Read more