Inside this article we will see the concept i.e Laravel 9 Drag and Drop Reorder Items with jQuery Tutorial. Article contains the classified information about Sorting MySQL Row Order using jQuery.
If you are looking for a solution i.e Drag & Drop Reorder Items in Laravel then this article will help you a lot for this. Tutorial is super easy to understand and implement it in your code as well.
We will see drag, drop and sort concept using Laravel & jQuery UI. We will use sorting function of jquery ui.
Learn More –
- How To Use Froala WYSIWYG HTML Editor in PHP Tutorial
- CodeIgniter 4 How To Use Froala WYSIWYG HTML Editor Tutorial
- CodeIgniter 4 Autocomplete Places Search Box Using Google Maps JavaScript API
- PHP & MySQLi Drag and Drop Reorder Items with jQuery
Let’s get started.
Laravel Installation
Open terminal and run this command to create a laravel project.
composer create-project laravel/laravel myblogIt will create a project folder with name myblog inside your local system.
To start the development server of laravel –
php artisan serveURL: http://127.0.0.1:8000
Assuming laravel already installed inside your system.
Create Database & Connect
To create a database, either we can create via Manual tool of PhpMyadmin or by means of a mysql command.
CREATE DATABASE laravel_app;
To connect database with application, Open .env file from application root. Search for DB_ and update your details.
DB_CONNECTION=mysql
DB_HOST=127.0.0.1
DB_PORT=3306
DB_DATABASE=laravel_app
DB_USERNAME=root
DB_PASSWORD=root
Create Migration
Open project into terminal and run this command to create migration file.
$ php artisan make:migration create_items_tableIt will create a file –
- Migration file – xxx_create_items_table.php inside /database/migrations folder.
Open Migration file and write this complete code into it.
<?php

use Illuminate\Database\Migrations\Migration;
use Illuminate\Database\Schema\Blueprint;
use Illuminate\Support\Facades\Schema;

return new class extends Migration
{
    /**
     * Run the migrations.
     *
     * @return void
     */
    public function up()
    {
        Schema::create('items', function (Blueprint $table) {
            $table->id();
            $table->string("item_name", 50);
            $table->integer("priority")->default(0);
            $table->enum("status", [1, 0])->default(1);
        });
    }

    /**
     * Reverse the migrations.
     *
     * @return void
     */
    public function down()
    {
        Schema::dropIfExists('items');
    }
};
Run Migration
Next,
We need to create table inside database.
$ php artisan migrateThis command will create table – items inside database.
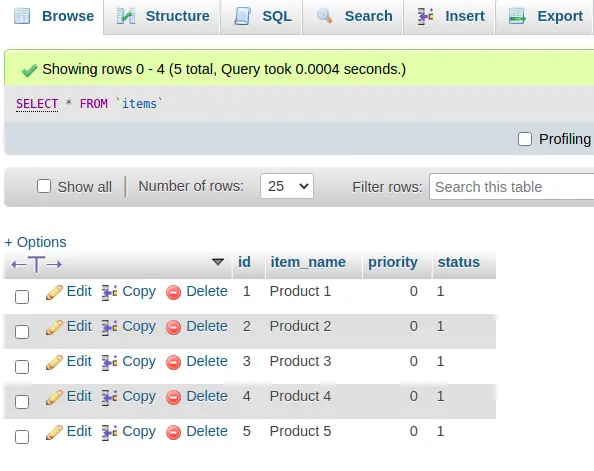
Let’s insert some Test data into this table.
Execute this sql query into database for fake rows.
INSERT INTO `items` (`id`, `item_name`, `priority`, `status`) VALUES
(1, 'Product 1', 0, '1'),
(2, 'Product 2', 0, '1'),
(3, 'Product 3', 0, '1'),
(4, 'Product 4', 0, '1'),
(5, 'Product 5', 0, '1');
Create Model & Controller
Next,
We need to create a model and a controller file.
$ php artisan make:model Item -cIt will create a model Item.php inside /app/Models folder and also a controller ItemController.php inside /app/Http/Controllers folder.
Open ItemController.php and write this complete code into it.
<?php

namespace App\Http\Controllers;

use Illuminate\Http\Request;
use App\Models\Item;

class ItemController extends Controller
{
    public function index()
    {
        $items = Item::orderBy('priority')->get();

        return view("items", compact("items"));
    }

    public function updateOrder(Request $request)
    {
        $input = $request->all();

        if (isset($input["order"])) {

            $order  = explode(",", $input["order"]);

            for ($i = 0; $i < count($order); $i++) {

                Item::where('id', $order[$i])->update(['priority' => $i]);
            }

            return json_encode([
                "status" => true,
                "message" => "Order updated"
            ]);
        }
    }
}
Update Model
Open model file Item.php from /app/Models folder.
<?php

namespace App\Models;

use Illuminate\Database\Eloquent\Factories\HasFactory;
use Illuminate\Database\Eloquent\Model;

class Item extends Model
{
    use HasFactory;

    public $timestamps = false;
}
Create Blade Template File
Go to /resources/views folder and create a file with name items.blade.php
Open items.blade.php and write this complete code into it.
<!doctype html>
<html lang="en">

<head>
    <meta charset="utf-8">
    <meta name="csrf-token" content="{{ csrf_token() }}" />
    <meta name="viewport" content="width=device-width, initial-scale=1">
    <title>Laravel 9 Drag and Drop Reorder Items with jQuery</title>
    <link rel="stylesheet" href="//code.jquery.com/ui/1.13.1/themes/base/jquery-ui.css">
    <style>
        #sortable {
            list-style-type: none;
            margin: 0 auto;
            padding: 0;
            width: 60%;
        }

        #sortable li {
            margin: 0 3px 3px 3px;
            padding: 0.4em;
            padding-left: 1.5em;
            font-size: 1.4em;
            height: 18px;
        }

        #sortable li span {
            position: absolute;
            margin-left: -1.3em;
        }
    </style>
</head>

<body>

    <h4 style="text-align: center;">Laravel 9 Drag and Drop Reorder Items with jQuery</h4>
    <ul id="sortable">
        @if (count($items) > 0)
        @foreach ($items as $row)
        <li class="ui-state-default" id="<?php echo $row->id; ?>"><span class="ui-icon ui-icon-arrowthick-2-n-s"></span><?php echo $row->item_name; ?></li>
        @endforeach
        @endif
    </ul>

    <script src="https://code.jquery.com/jquery-3.6.0.js"></script>
    <script src="https://code.jquery.com/ui/1.13.1/jquery-ui.js"></script>
    <script>
        $(function() {

            $.ajaxSetup({
                headers: {
                    'X-CSRF-TOKEN': $('meta[name="csrf-token"]').attr('content')
                }
            });

            $("#sortable").sortable({
                update: function(event, ui) {
                    updateOrder();
                }
            });
        });

        function updateOrder() {
            var item_order = new Array();
            $('#sortable li').each(function() {
                item_order.push($(this).attr("id"));
            });
            var order_string = 'order=' + item_order;
            $.ajax({
                type: "POST",
                url: "{{ route('update-order') }}",
                data: order_string,
                cache: false,
                success: function(data) {}
            });
        }
    </script>
</body>

</html>
Add Route
Open web.php from /routes folder and add these route into it.
//...

use App\Http\Controllers\ItemController;

Route::get('items', [ItemController::class, "index"]);
Route::post('update-order', [ItemController::class, "updateOrder"])->name("update-order");

//...
Application Testing
Run this command into project terminal to start development server,
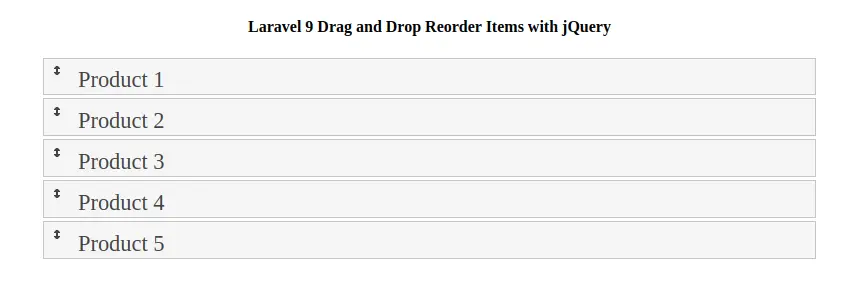
php artisan serveURL: http://127.0.0.1:8000/items
List of Items before sorting:
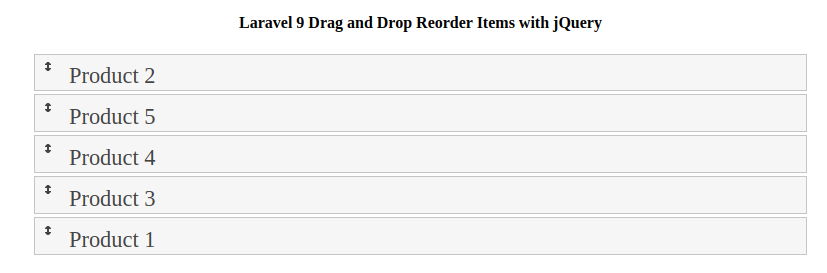
Drag & Sorted Items:
We hope this article helped you to learn Laravel 9 Drag and Drop Reorder Items with jQuery Tutorial in a very detailed way.
If you liked this article, then please subscribe to our YouTube Channel for PHP & it’s framework, WordPress, Node Js video tutorials. You can also find us on Twitter and Facebook.
Read more