The Hierarchical Model-View-Controller (HMVC) architectural paradigm improves the modularity and organisation of CodeIgniter 4 applications. It enables the creation of reusable modules with their own MVC framework, making complicated applications easier to manage. We will walk you through the process of HMVC programming in CodeIgniter 4 in this step-by-step tutorial.
HMVC is a powerful concept that can improve the structure and maintainability of your CodeIgniter 4 applications significantly. You may construct complex apps more efficiently and with better organisation by dividing them down into smaller, independent modules.
Read More: How To Create CodeIgniter 4 Custom Library Tutorial
Let’s get started.
What is HMVC Programming?
HMVC is an abbreviation for Hierarchical Model-View-Controller. It is a design and architectural pattern that builds on the well-known Model-View-Controller (MVC) architecture. HMVC is frequently used in online application development, particularly in frameworks like as CodeIgniter and Kohana.
HMVC extends MVC by providing the concept of nested or hierarchical MVC triads. In the context of an HMVC architecture:
Module: A module is a self-contained MVC triad that encapsulates a specific piece of application functionality. Models, Views, and Controllers are often unique to each module.
Controller: The top-level controller is in charge of handling the initial HTTP request and deciding which module’s controller should handle it. It can also communicate with and assemble responses from many modules.
Model: Each module has its own collection of Models that represent the module’s data and business logic.
View: Similarly, each module has its own Views, which serve as the module’s presentation layer.

Advantages of HMVC:
Modularity is promoted by HMVC by splitting the application down into smaller, self-contained modules. This simplifies the management and maintenance of large and complicated applications.
Reusability: Because modules are self-contained and do not have strong dependencies on the rest of the application, they can be reused in different portions of the application or even in different projects.
Read More: How To Enable CORS in CodeIgniter 4 for REST APIs
Parallel development allows separate teams or developers to work on different modules at the same time, which reduces development time.
Scalability: HMVC can help you scale your application by distributing modules across multiple servers or containers if necessary.
Code Organisation: It ensures that your application has a clear structure and separation of concerns.
Let’s understand with an example.
CodeIgniter 4 Installation
To create a CodeIgniter 4 setup run this given command into your shell or terminal. Please make sure composer should be installed.
composer create-project codeigniter4/appstarter codeigniter-4Assuming you have successfully installed application into your local system.
Environment (.env) Setup
When we install CodeIgniter 4, we will have env file at root. To use the environment variables means using variables at global scope we need to do env to .env
Either we can do via renaming file as simple as that. Also we can do by terminal command.
Open project in terminal
cp env .envAbove command will create a copy of env file to .env file. Now we are ready to use environment variables.
Enable Development Mode
CodeIgniter starts up in production mode by default. You need to make it in development mode to see any error if you are working with application.
Open .env file from root.
# CI_ENVIRONMENT = production

 // Do it to

CI_ENVIRONMENT = development
Now application is in development mode.
Step #1: HMVC Module Setup
Go to your project setup. At application root create a folder called Modules. We will create module inside this folder and then combine with application.
Next, let’s create folder called Student into /Modules folder. Student is the application module.
So, you have /Modules/Student folder at project root alongwith other application folders like /app, /public, etc.
Step #2: Register HMVC Module (Autoload)
Now, you need to register Student module into application.
Open Autoload.php from /app/Config folder. Search for $psr4 and register created module in it.
public $psr4 = [
    APP_NAMESPACE => APPPATH, // For custom app namespace
    'Config'      => APPPATH . 'Config',
    'Modules\Student' => ROOTPATH. 'Modules/Student', // here we have added.
];
Step #3: HMVC Module (Create Controller)
Open project into terminal and type this spark command to create controller into Student Module.
php spark make:controller Student --suffix --namespace "Modules\Student"It will create a file named StudentController.php into /Modules/Student/Controllers folder. In command “Modules\Student” is the namespace.
Read More: CodeIgniter 4 Form Validation Library Example Tutorial
Open file StudentController.php and write this code into it.
<?php

namespace Modules\Student\Controllers;

use App\Controllers\BaseController;
use Modules\Student\Models\StudentModel;

class StudentController extends BaseController
{
	public function index()
	{
		// echo "This is simple from Student Module";

        $data = [ "name" => "Sanjay", "email" => "sanjay_kumar@gmail.com" ];

		return view("\Modules\Student\Views\student_index", $data);
	}

    public function otherMethod()
	{
		echo "This is other method from Student Module";
	}
}
Step #4: HMVC Module (Add View)
Create a folder with the name Views inside /Modules/Student folder.
Create a view file i.e student_index.php into it.
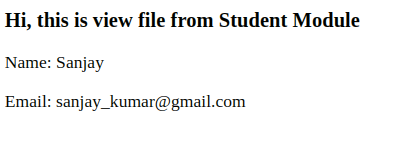
<h3>Hi, this is view file from Student Module</h3>

<p>Name: <?= $name ?>  </p>
<p>Email: <?= $email ?> </p>
Step #5: HMVC Module (Add Route)
Create a folder with name Config into /Modules/Student folder.
Create a file i.e Routes.php into it.
Inside this file, we will do all routes settings for student module.
<?php

//...

$routes->group("student", ["namespace" => "\Modules\Student\Controllers"], function ($routes) {

	// welcome page - URL: /student
	$routes->get("/", "StudentController::index");

    // other page - URL: /student/other-method
	$routes->get("other-method", "StudentController::otherMethod");

});

//...
Here, we have create a route group in which /student will be the prefix for each route.
Step #6: Including Module routes into Main application
Open Routes.php file from /app/Config folder. This is main routes file of application.
//...

// Add this to Footer, Including all module routes

$modules_path = ROOTPATH . 'Modules/';
$modules = scandir($modules_path);

foreach ($modules as $module) {
	if ($module === '.' || $module === '..') {
		continue;
	}

	if (is_dir($modules_path) . '/' . $module) {
		$routes_path = $modules_path . $module . '/Config/Routes.php';
		if (file_exists($routes_path)) {
			require $routes_path;
		} else {
			continue;
		}
	}
}

//...
This code is looking for /Modules folder, if Modules folder available then it includes Routes.php from each module’s Config folder.
Application Testing
Open project terminal and start development server via command:
php spark serveURL: http://localhost:8080/student
Read More: Create Automated Logs Every 2 hours in CodeIgniter 4 Tutorial
Method will be called – /Modules/Student/Controllers/StudentController::index()
Output,
URL: http://localhost:8080/student/other-method
Method will be called – /Modules/Student/Controllers/StudentController::otherMethod()
Output,
This is other method from Student ModuleThat’s it.
We hope this article helped you to learn about Step-by-Step CodeIgniter 4 HMVC Programming Tutorial in a very detailed way.
If you liked this article, then please subscribe to our YouTube Channel for PHP & it’s framework, WordPress, Node Js video tutorials. You can also find us on Twitter and Facebook.
Read more
program not working