Inside this article we will see the concept i.e Codeigniter 4 How To Handle Login and Register Methods. Article contains the classified information about How to work for Login and Registration methods to handle user authentication.
Every application nowadays must have an authenticated system. In that we will have some login, registration, forgot password, reset password, change password and other packed modules available.
To learn about Multi authentication system in CodeIgniter 4, Click here.
Learn More –
- Create Signature Pad & Save Using jQuery in CodeIgniter 4
- CRUD Operation in CodeIgniter 4 Tutorial
- Custom Helper in CodeIgniter 4 Tutorial
- DataTable Excel Data Export in CodeIgniter 4 Tutorial
Let’s get started.
CodeIgniter 4 Installation
To create a CodeIgniter 4 setup run this given command into your shell or terminal. Please make sure composer should be installed.
composer create-project codeigniter4/appstarter codeigniter-4Assuming you have successfully installed application into your local system.
Now, let’s configure database and application connectivity.
Environment (.env) Setup
When we install CodeIgniter 4, we will have env file at root. To use the environment variables means using variables at global scope we need to do env to .env
Either we can do via renaming file as simple as that. Also we can do by terminal command.
Open project in terminal
cp env .envAbove command will create a copy of env file to .env file. Now we are ready to use environment variables.
Enable Development Mode
CodeIgniter starts up in production mode by default. You need to make it in development mode to see any error if you are working with application.
Open .env file from root.
# CI_ENVIRONMENT = production

 // Do it to

CI_ENVIRONMENT = development
Now application is in development mode.
Create Database
To create a database, either we can create via Manual tool of PhpMyadmin or by means of a mysql command.
We will use MySQL command to create database. Run this command into Sql tab of PhpMyAdmin.
CREATE DATABASE codeigniter4_app;Successfully, we have created a database.
Create Database Table
Next, we need a table. That table will be responsible to store data.
Let’s create a table with some columns.
CREATE TABLE `tbl_users` (
 `id` int(11) NOT NULL AUTO_INCREMENT,
 `name` varchar(120) DEFAULT NULL,
 `email` varchar(120) DEFAULT NULL,
 `phone_no` varchar(120) DEFAULT NULL,
 `password` varchar(120) DEFAULT NULL,
 `created_at` timestamp NOT NULL DEFAULT CURRENT_TIMESTAMP,
 PRIMARY KEY (`id`)
) ENGINE=InnoDB DEFAULT CHARSET=latin1;
Successfully, we have created a table.
Next, connect with the application.
Database Connection
Open .env file from project root.
Search for DATABASE. You should see the connection environment variables into it. Put your updated details of database connection string values.
#--------------------------------------------------------------------
# DATABASE
#--------------------------------------------------------------------

database.default.hostname = localhost
database.default.database = codeigniter4_app
database.default.username = admin
database.default.password = admin
database.default.DBDriver = MySQLi
database.default.DBPrefix =
database.default.port = 3306
Now, database successfully connected with the application.
Application Routes Configuration
To configure application routes, we need to open up the file /app/Config/Routes.php. This is the main routes config file where we will do all routes of application.
Inside this we will have login & registration routes.
//...

$routes->match(['get', 'post'], 'register', 'User::register', ['filter' => 'noauth']);
$routes->match(['get', 'post'], 'login', 'User::login', ['filter' => 'noauth']);
$routes->get('dashboard', 'Dashboard::index', ['filter' => 'auth']);
$routes->get('profile', 'User::profile', ['filter' => 'auth']);
$routes->get('logout', 'User::logout');

//...
Inside these routes, we are using filters. Filters are the sections from where we can check every request to application and do action. We will create two filters – Auth & Noauth.
Let’s create Model.
Set Application Model
Model is the face of application with the database. We need a User Model which will do some basic model configuration.
Models are created at /app/Models. We are going to create UserModel.php at this location.
$ php spark make:model User --suffix<?php
namespace App\Models;
use CodeIgniter\Model;
class UserModel extends Model
{
protected $DBGroup = 'default';
protected $table = 'tbl_users';
protected $primaryKey = 'id';
protected $useAutoIncrement = true;
protected $insertID = 0;
protected $returnType = 'array';
protected $useSoftDelete = false;
protected $protectFields = true;
protected $allowedFields = [
"name",
"email",
"phone_no",
"password"
];
// Dates
protected $useTimestamps = false;
protected $dateFormat = 'datetime';
protected $createdField = 'created_at';
protected $updatedField = 'updated_at';
protected $deletedField = 'deleted_at';
// Validation
protected $validationRules = [];
protected $validationMessages = [];
protected $skipValidation = false;
protected $cleanValidationRules = true;
// Callbacks
protected $allowCallbacks = true;
protected $beforeInsert = ["beforeInsert"];
protected $afterInsert = [];
protected $beforeUpdate = [];
protected $afterUpdate = [];
protected $beforeFind = [];
protected $afterFind = [];
protected $beforeDelete = [];
protected $afterDelete = [];
protected function beforeInsert(array $data)
{
$data = $this->passwordHash($data);
return $data;
}
protected function passwordHash(array $data)
{
if (isset($data['data']['password'])) {
$data['data']['password'] = password_hash($data['data']['password'], PASSWORD_DEFAULT);
}
return $data;
}
}- $table – Passing table name where we will store user data
- $allowedFields – User fields for mass assignment which we will insert at the time of user registration.
- $beforeInsert – Inside this we are binding a method which is going to create a hashed password string before data insert into specified table.
Configuring CodeIgniter 4 Filters
Filters in CodeIgniter 4 are just like guards. They detect request and process what we have created it for. So here, we will create and configure two different filters which we use in application.
To create filters, we will use the folder inside app directory i.e /app/Filters.
$ php spark make:filter AuthIt will create file Auth.php at /app/Filters
<?php
namespace App\Filters;

use CodeIgniter\Filters\FilterInterface;
use CodeIgniter\HTTP\RequestInterface;
use CodeIgniter\HTTP\ResponseInterface;

class Auth implements FilterInterface
{
    public function before(RequestInterface $request, $arguments = null)
    {
        if (!session()->get('isLoggedIn')) {
            return redirect()->to(site_url('login'));
        }

    }

    public function after(RequestInterface $request, ResponseInterface $response, $arguments = null)
    {
        // Do something here
    }
}
$ php spark make:filter Noauth
It will create Noauth.php at /app/Filters
<?php
namespace App\Filters;

use CodeIgniter\Filters\FilterInterface;
use CodeIgniter\HTTP\RequestInterface;
use CodeIgniter\HTTP\ResponseInterface;

class Noauth implements FilterInterface
{
    public function before(RequestInterface $request, $arguments = null)
    {
        if (session()->get('isLoggedIn')) {
            return redirect()->to(site_url('dashboard'));
        }

    }

    public function after(RequestInterface $request, ResponseInterface $response, $arguments = null)
    {
        // Do something here
    }
}
Successfully, we have created filters. Next, we need to configure into application so that we will able to use.
To register these filters. Open up the file – /app/Config/Filters.php
# Add to Header
use App\Filters\Auth;
use App\Filters\Noauth;

//...

# Update this
public $aliases = [
  // .. others
  "auth" => Auth::class,
  "noauth" => Noauth::class,
];

//...
As, you can see we have added our filter config lines
'auth' => \App\Filters\Auth::class,
'noauth' => \App\Filters\Noauth::class,
Register Custom Rule in Application – validateUser
When we do controller’s code, then at login method we will use a custom rule which checks user is valid or invalid at the time of login. We can actually do this task in several ways, but I have preferred this for neater & cleaner code.
To store custom validation rules file, Validation folder may or may not be present in /app directory.
Let’s create a file with the name of Userrules.php in /app/Validation.
$ php spark make:validation UserrulesSource code of /app/Validation/Userrules.php
<?php
namespace App\Validation;
use App\Models\UserModel;

class Userrules{

  public function validateUser(string $str, string $fields, array $data){
    $model = new UserModel();
    $user = $model->where('email', $data['email'])
                  ->first();

    if(!$user)
      return false;

    return password_verify($data['password'], $user['password']);
  }
}
Next, we need to need to register this custom rule to application for use.
Open up the file /app/Config/Validation.php
# Add to Header
use App\Validation\Userrules;

//...

public $ruleSets = [
  // .. other rules
  Userrules::class, // here we have registered
];

//...
Application Controller Settings
Loading url Helper
Open BaseController.php from /app/Controllers folder.
Search for $helpers, inside this helpers array simply add this url helper.
protected $helpers = ["url"];This url helper will load base_url() and site_url() functions.
We will create application controller at /app/Controllers. Let’s create User.php & Dashboard.php inside the given folder.
$ php spark make:controller User

$ php spark make:controller Dashboard
Write the following code into /app/Controllers/User.php
<?php

namespace App\Controllers;

use App\Controllers\BaseController;
use App\Models\UserModel;

class User extends BaseController
{
    public function login()
    {
        $data = [];

        if ($this->request->getMethod() == 'post') {

            $rules = [
                'email' => 'required|min_length[6]|max_length[50]|valid_email',
                'password' => 'required|min_length[8]|max_length[255]|validateUser[email,password]',
            ];

            $errors = [
                'password' => [
                    'validateUser' => "Email or Password don't match",
                ],
            ];

            if (!$this->validate($rules, $errors)) {

                return view('login', [
                    "validation" => $this->validator,
                ]);

            } else {
                $model = new UserModel();

                $user = $model->where('email', $this->request->getVar('email'))
                    ->first();

                // Stroing session values
                $this->setUserSession($user);
                // Redirecting to dashboard after login
                return redirect()->to(base_url('dashboard'));

            }
        }
        return view('login');
    }

    private function setUserSession($user)
    {
        $data = [
            'id' => $user['id'],
            'name' => $user['name'],
            'phone_no' => $user['phone_no'],
            'email' => $user['email'],
            'isLoggedIn' => true,
        ];

        session()->set($data);
        return true;
    }

    public function register()
    {
        $data = [];

        if ($this->request->getMethod() == 'post') {
            //let's do the validation here
            $rules = [
                'name' => 'required|min_length[3]|max_length[20]',
                'phone_no' => 'required|min_length[9]|max_length[20]',
                'email' => 'required|min_length[6]|max_length[50]|valid_email|is_unique[tbl_users.email]',
                'password' => 'required|min_length[8]|max_length[255]',
                'password_confirm' => 'matches[password]',
            ];

            if (!$this->validate($rules)) {

                return view('register', [
                    "validation" => $this->validator,
                ]);
            } else {
                $model = new UserModel();

                $newData = [
                    'name' => $this->request->getVar('name'),
                    'phone_no' => $this->request->getVar('phone_no'),
                    'email' => $this->request->getVar('email'),
                    'password' => $this->request->getVar('password'),
                ];
                $model->save($newData);
                $session = session();
                $session->setFlashdata('success', 'Successful Registration');
                return redirect()->to(base_url('login'));
            }
        }
        return view('register');
    }

    public function profile()
    {

        $data = [];
        $model = new UserModel();

        $data['user'] = $model->where('id', session()->get('id'))->first();
        return view('profile', $data);
    }

    public function logout()
    {
        session()->destroy();
        return redirect()->to('login');
    }
}- login() Method which handles both GET & POST request type. Inside this user login function will process with the help of email and password. Inside this method we are using Form Validation service, session, model. After successful login we are setting user data into session by using this $this->setUserSession($user);
- setUserSession($user) This is a private method what we have created. Inside this method simply we are storing user data into session. These session data we can use either in filters and/or at the profile page.
- register() Method used to register or create new users and store them into users table.
- profile() Display logged in user profile data.
- logout() Method used to destroy all user data from session and do user logged out.
Next, we need to create Dashboard Controller
Code for /app/Controllers/Dashboard.php
<?php

namespace App\Controllers;

use App\Controllers\BaseController;

class Dashboard extends BaseController
{
    public function index()
    {
        return view("dashboard");
    }
}
View File Setup in Application
View files generally created inside /app/Views. We need view files for login, register, profile, dashboard etc.
Let’s create those step by step.
Create Parent Template
Create a folder layouts inside /app/Views. Inside layouts create a file app.php. This is be parent layout.
Open file /app/Views/layouts/app.php and write this code.
<!DOCTYPE html>
<html lang="en">
<head>
  <title>CodeIgniter 4 Login & Registation Tutorial</title>
  <meta charset="utf-8">
  <meta name="viewport" content="width=device-width, initial-scale=1">
  <link rel="stylesheet" href="https://maxcdn.bootstrapcdn.com/bootstrap/3.4.1/css/bootstrap.min.css">
  <script src="https://ajax.googleapis.com/ajax/libs/jquery/3.5.1/jquery.min.js"></script>
  <script src="https://maxcdn.bootstrapcdn.com/bootstrap/3.4.1/js/bootstrap.min.js"></script>
</head>
<body>

   <?= $this->renderSection("body") ?>

</body>
</html>
We will extend this template file to every view file and dynamically attach page views in it’s body.
Register View File
Add registration view file. File with the name of register.php
Code of /app/Views/register.php
<?= $this->extend("layouts/app") ?>
<?= $this->section("body") ?>
<div class="container" style="margin-top:20px;">
<div class="row">
<div class="panel panel-primary">
<div class="panel-heading">Register</div>
<div class="panel-body">
<?php if (isset($validation)) : ?>
<div class="col-12">
<div class="alert alert-danger" role="alert">
<?= $validation->listErrors() ?>
</div>
</div>
<?php endif; ?>
<form class="" action="<?= base_url('register') ?>" method="post">
<div class="form-group">
<label for="name">Name</label>
<input type="text" class="form-control" name="name" id="name">
</div>
<div class="form-group">
<label for="email">Email</label>
<input type="email" class="form-control" name="email" id="email">
</div>
<div class="form-group">
<label for="phone_no">Phone No</label>
<input type="text" class="form-control" name="phone_no" id="phone_no">
</div>
<div class="form-group">
<label for="password">Password</label>
<input type="password" class="form-control" name="password" id="password">
</div>
<div class="form-group">
<label for="password_confirm">Confirm Password</label>
<input type="password" class="form-control" name="password_confirm" id="password_confirm">
</div>
<button type="submit" class="btn btn-success">Submit</button>
</form>
</div>
</div>
</div>
</div>
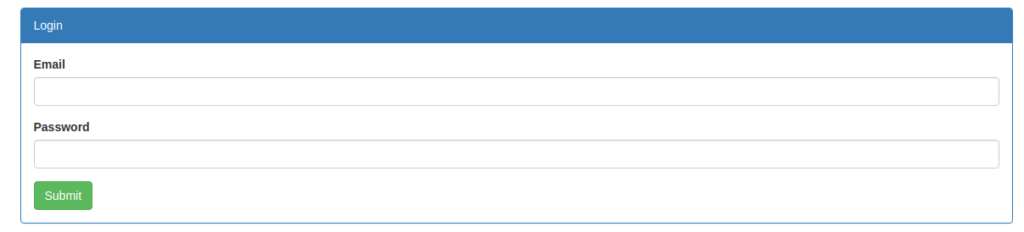
<?= $this->endSection() ?>Login View File
Create login.php
Source code for /app/Views/login.php
<?= $this->extend("layouts/app") ?>
<?= $this->section("body") ?>
<div class="container" style="margin-top:20px;">
<div class="row">
<div class="panel panel-primary">
<div class="panel-heading">Login</div>
<div class="panel-body">
<?php if (isset($validation)) : ?>
<div class="col-12">
<div class="alert alert-danger" role="alert">
<?= $validation->listErrors() ?>
</div>
</div>
<?php endif; ?>
<form class="" action="<?= base_url('login') ?>" method="post">
<div class="form-group">
<label for="email">Email</label>
<input type="email" class="form-control" name="email" id="email">
</div>
<div class="form-group">
<label for="password">Password</label>
<input type="password" class="form-control" name="password" id="password">
</div>
<button type="submit" class="btn btn-success">Submit</button>
</form>
</div>
</div>
</div>
</div>
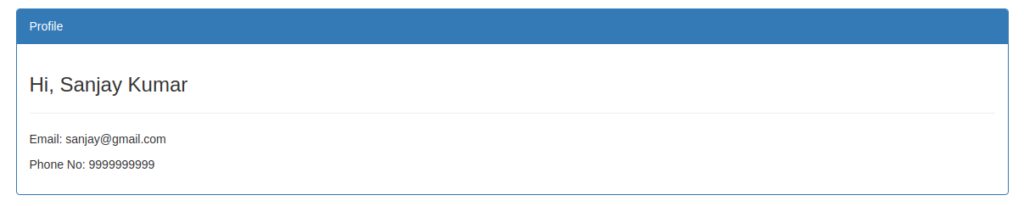
<?= $this->endSection() ?>Profile Page
Create profile.php
Source code of /app/Views/profile.php
<?= $this->extend("layouts/app") ?>

<?= $this->section("body") ?>

<div class="container" style="margin-top:20px;">
    <div class="row">
        <div class="panel panel-primary">
            <div class="panel-heading">Profile</div>
            <div class="panel-body">
                <h3>Hi, <?= $user['name'] ?></h3>
                <hr>
                <p>Email: <?= $user['email'] ?></p>
                <p>Phone No: <?= $user['phone_no'] ?></p>
            </div>
        </div>
    </div>
</div>

<?= $this->endSection() ?>
Dashboard View File
Create dashboard.php
Source code of /app/Views/dashboard.php
<?= $this->extend("layouts/app") ?>

<?= $this->section("body") ?>

<div class="container" style="margin-top:20px;">
    <div class="row">
        <div class="panel panel-primary">
            <div class="panel-heading">Dashboard</div>
            <div class="panel-body">
                <h1>Hello, <?= session()->get('name') ?></h1>
                <h3><a href="<?= site_url('logout') ?>">Logout</a></h3>
            </div>
        </div>
    </div>
</div>

<?= $this->endSection() ?>
Application Testing
Open project into terminal and start development server.
$ php spark serve
Open these urls to see the action.
Login URL: http://localhost:8080/login
Register URL: http://localhost:8080/register
Profile Page URL: http://localhost:8080/profile
User Dashboard URL: http://localhost:8080/dashboard

We hope this article helped you for Codeigniter 4 How To Handle Login and Register Methods in a very detailed way.
If you liked this article, then please subscribe to our YouTube Channel for PHP & it’s framework, WordPress, Node Js video tutorials. You can also find us on Twitter and Facebook.
Read more
knowledge base
Good that this kind of example is provided. Not everybody has advanced skills.
This give some good basic use of CI4
Thanks
Gloves
Way cool! Some very valid points! I appreciate you writing this post
and also the rest of the site is also very good.
Please upload version 3
Ok sure.
why does when I login while setting the route this: $routes->get(‘dashboard’, ‘Dashboard::index’, [‘filter’ => ‘auth’]); it keeps redirecting me to login page instead and it wont allow me to get logged in
Okay.
even if I entered the correct credentials. Why do you respond okay when I asked why lol
Hi,
Here we have checked it’s working fine after putting correct logins details. I think you have missed any step. Please check.
Hello Nice Post, how to prevent going to a page without being logged in?
By using Filters, you can put some condition into it.
I’m not sure why but this weblog is loading very slow for me.
Is anyone else having this issue or is it a issue on my end?
I’ll check back later and see if the problem still exists.
Hi, loading speed is perfect. Try to open in different browser.