Inside this article we will see the concept i.e CodeIgniter 4 How To Upload Image using Ajax Request. Article contains the classified information about How to use ajax method to upload an image with form data.
CodeIgniter 4 is a open source PHP Framework. Nowadays, every application somewhere uses Ajax request either for any database operations or to upload anything. It’s a common feature now.
Already we have article over How To Upload Form Data By Using Ajax, Click here to learn.
Learn More –
- Image Upload with Preview Using Ajax in CodeIgniter 4, Click here
- Export Data Into Excel Report In CodeIgniter 4 Tutorial
- ext-intl PHP Extension Error CodeIgniter 4 Installation
- Find Date Differences in CodeIgniter 4 Tutorial
Let’s get started.
CodeIgniter 4 Installation
To create a CodeIgniter 4 setup run this given command into your shell or terminal. Please make sure composer should be installed.
composer create-project codeigniter4/appstarter codeigniter-4Assuming you have successfully installed application into your local system.
Now, let’s configure database and application connectivity.
Environment (.env) Setup
When we install CodeIgniter 4, we will have env file at root. To use the environment variables means using variables at global scope we need to do env to .env
Either we can do via renaming file as simple as that. Also we can do by terminal command.
Open project in terminal
cp env .envAbove command will create a copy of env file to .env file. Now we are ready to use environment variables.
Enable Development Mode
CodeIgniter starts up in production mode by default. You need to make it in development mode to see any error if you are working with application.
Open .env file from root.
# CI_ENVIRONMENT = production

 // Do it to

CI_ENVIRONMENT = development
Now application is in development mode.
Create Database
To create a database, either we can create via Manual tool of PhpMyadmin or by means of a mysql command.
We will use MySQL command to create database. Run this command into Sql tab of PhpMyAdmin.
CREATE DATABASE codeigniter4_app;Successfully, we have created a database.
Create Database Table
Next, we need a table. That table will be responsible to store data.
Let’s create a table with some columns.
CREATE TABLE students (
id int(11) NOT NULL AUTO_INCREMENT,
name varchar(120) DEFAULT NULL,
email varchar(120) DEFAULT NULL,
mobile varchar(45) DEFAULT NULL,
profile_image varchar(150) DEFAULT NULL,
PRIMARY KEY (id)
) ENGINE=InnoDB DEFAULT CHARSET=latin1;
Successfully, we have created a table.
Next, connect with the application.
Database Connection
Open .env file from project root.
Search for DATABASE. You should see the connection environment variables into it. Put your updated details of database connection string values.
#--------------------------------------------------------------------
# DATABASE
#--------------------------------------------------------------------

database.default.hostname = localhost
database.default.database = codeigniter4_app
database.default.username = admin
database.default.password = admin
database.default.DBDriver = MySQLi
database.default.DBPrefix =
database.default.port = 3306
Now, database successfully connected with the application.
Add Routes
Open Routes.php file from /app/Config folder. Add these routes into it.
//...

$routes->get("add-student", "StudentController::addStudent");
$routes->post("save-student", "StudentController::saveStudent");

//...
Let’s create Model.
Create Model
Open project into terminal and run this spark command to create model file.
$ php spark make:model Student --suffixIt will create StudentModel.php file at /app/Models folder. Open file and write this complete code into it.
<?php

namespace App\Models;

use CodeIgniter\Model;

class StudentModel extends Model
{
	protected $DBGroup              = 'default';
	protected $table                = 'students';
	protected $primaryKey           = 'id';
	protected $useAutoIncrement     = true;
	protected $insertID             = 0;
	protected $returnType           = 'array';
	protected $useSoftDelete        = false;
	protected $protectFields        = true;
	protected $allowedFields        = [
		"name",
		"email",
		"mobile",
        "profile_image"
	];

	// Dates
	protected $useTimestamps        = false;
	protected $dateFormat           = 'datetime';
	protected $createdField         = 'created_at';
	protected $updatedField         = 'updated_at';
	protected $deletedField         = 'deleted_at';

	// Validation
	protected $validationRules      = [];
	protected $validationMessages   = [];
	protected $skipValidation       = false;
	protected $cleanValidationRules = true;

	// Callbacks
	protected $allowCallbacks       = true;
	protected $beforeInsert         = [];
	protected $afterInsert          = [];
	protected $beforeUpdate         = [];
	protected $afterUpdate          = [];
	protected $beforeFind           = [];
	protected $afterFind            = [];
	protected $beforeDelete         = [];
	protected $afterDelete          = [];
}
Create Controller
Back to terminal and run this spark command to create controller.
$ php spark make:controller Student --suffixIt will creates StudentController.php file inside /app/Controllers folder.
Open StudentController.php and write this complete code into it.
<?php

namespace App\Controllers;

use App\Models\StudentModel;

class StudentController extends BaseController
{
	public function __construct()
	{
		helper(["url"]);
	}
	public function addStudent()
	{
		// layout of add student form
		return view('add-student');
	}

	public function saveStudent()
	{
		if ($this->request->getMethod() == "post") {

			$rules = [
				"name" => "required",
				"email" => "required|valid_email",
				"mobile" => "required",
				"profileImage" => [
					"rules" => "uploaded[profileImage]|max_size[profileImage,1024]|is_image[profileImage]|mime_in[profileImage,image/jpg,image/jpeg,image/gif,image/png]",
					"label" => "Profile Image",
				],
			];

			if (!$this->validate($rules)) {

				$response = [
					'success' => false,
					'msg' => "There are some validation errors",
				];

				return $this->response->setJSON($response);
			} else {

				$file = $this->request->getFile('profileImage');

				$profile_image = $file->getName();

				// Renaming file before upload
				$temp = explode(".",$profile_image);
				$newfilename = round(microtime(true)) . '.' . end($temp);

				if ($file->move("images", $newfilename)) {

					$studentModel = new StudentModel();

					$data = [
						"name" => $this->request->getVar("name"),
						"email" => $this->request->getVar("email"),
						"mobile" => $this->request->getVar("mobile"),
						"profile_image" => "images/" . $newfilename,
					];

					if ($studentModel->insert($data)) {

						$response = [
							'success' => true,
							'msg' => "Student created successfully",
						];
					} else {

						$response = [
							'success' => false,
							'msg' => "Failed to create student",
						];
					}

					return $this->response->setJSON($response);
				} else {

					$response = [
						'success' => false,
						'msg' => "Failed to upload Image",
					];

					return $this->response->setJSON($response);
				}
			}
		}
	}
}- if ($this->request->getMethod() == “post”) {} Checking request type
- $rules = []; Defining input field validation rules
- if (!$this->validate($rules)) {} Validating form values with validation rules
- $file = $this->request->getFile(‘profileImage’); Reading file from submitted form data
- if ($file->move(“images”, $newfilename)) {} Create images folder inside /public folder. Storing images inside that folder
- if ($studentModel->insert($data)) {} Saving form data to database table.
- return $this->response->setJSON($response); Sending response in JSON format
Create Image Folder
As we are uploading image from form. move() method in codeigniter 4 will upload image into /images folder.
It will be created automatically inside /public folder. But in case if you are getting error about file upload path, then you can create images folder inside /public folder.
Create Layout File
Go to /app/Views folder.
Create a file add-student.php inside it.
Open add-student.php file and write this complete code into it.
<!DOCTYPE html>
<html lang="en">

<head>
    <title>CodeIgniter 4 Upload Image using Ajax Method</title>
    <meta charset="utf-8">
    <meta name="viewport" content="width=device-width, initial-scale=1">
    <link rel="stylesheet" href="https://maxcdn.bootstrapcdn.com/bootstrap/3.4.1/css/bootstrap.min.css">
    <link href="https://cdn.jsdelivr.net/npm/sweetalert2@9.17.2/dist/sweetalert2.min.css" rel="stylesheet" />
    <style>
        #frm-add-student label.error{
            color:red;
        }
    </style>
</head>

<body>

    <div class="container">
        <h4 style="text-align: center;">CodeIgniter 4 Upload Image using Ajax Method</h4>
        <div class="panel panel-primary">
            <div class="panel-heading">CodeIgniter 4 Upload Image using Ajax Method</div>
            <div class="panel-body">
                <form class="form-horizontal" enctype="multipart/form-data" action="javascript:void(0)" id="frm-add-student">
                    <div class="form-group">
                        <label class="control-label col-sm-2" for="name">Name:</label>
                        <div class="col-sm-10">
                            <input type="text" class="form-control" required id="name" placeholder="Enter name" name="name">
                        </div>
                    </div>
                    <div class="form-group">
                        <label class="control-label col-sm-2" for="email">Email:</label>
                        <div class="col-sm-10">
                            <input type="email" class="form-control" required id="email" placeholder="Enter email" name="email">
                        </div>
                    </div>
                    <div class="form-group">
                        <label class="control-label col-sm-2" for="mobile">Mobile:</label>
                        <div class="col-sm-10">
                            <input type="text" class="form-control" required id="mobile" placeholder="Enter mobile" name="mobile">
                        </div>
                    </div>
                    <div class="form-group">
                        <label class="control-label col-sm-2" for="profileImage">Profile Image:</label>
                        <div class="col-sm-10">
                            <input type="file" accept="image/*" required class="form-control" id="profileImage" name="profileImage">
                        </div>
                    </div>
                    <div class="form-group">
                        <div class="col-sm-offset-2 col-sm-10">
                            <button type="submit" class="btn btn-primary">Submit</button>
                        </div>
                    </div>
                </form>
            </div>
        </div>
    </div>

</body>

</html>

<script src="https://ajax.googleapis.com/ajax/libs/jquery/3.5.1/jquery.min.js"></script>
<!-- Validation library file -->
<script src="https://cdnjs.cloudflare.com/ajax/libs/jquery-validate/1.19.2/jquery.validate.min.js"></script>
<!-- Sweetalert library file -->
<script src="https://cdn.jsdelivr.net/npm/sweetalert2@9.17.2/dist/sweetalert2.min.js"></script>

<script>
    $(function() {

        // Adding form validation
        $('#frm-add-student').validate();

        // Ajax form submission with image
        $('#frm-add-student').on('submit', function(e) {

            e.preventDefault();

            var formData = new FormData(this);

            //We can add more values to form data
            //formData.append("key", "value");

            $.ajax({
                url: "<?= site_url('save-student') ?>",
                type: "POST",
                cache: false,
                data: formData,
                processData: false,
                contentType: false,
                dataType: "JSON",
                success: function(data) {
                    if (data.success == true) {
                        Swal.fire('Saved!', '', 'success')
                    }
                },
                error: function(jqXHR, textStatus, errorThrown) {
                    alert('Error at add data');
                }
            });
        });
    });
</script>- $(‘#frm-add-student’).validate(); Adding client side form validation
- $(‘#frm-add-student’).on(‘submit’, function(e){}) This code is going to submit formdata to server
- $.ajax({}); Using Ajax Method of jquery.
- e.preventDefault(); It prevents from default behaviour
Application Testing
Open project terminal and start development server via command:
php spark serveURL: http://localhost:8080/add-student.
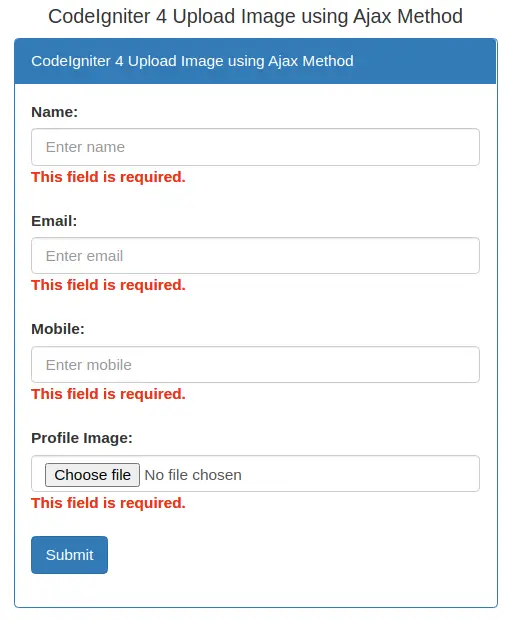
Submitting form without data

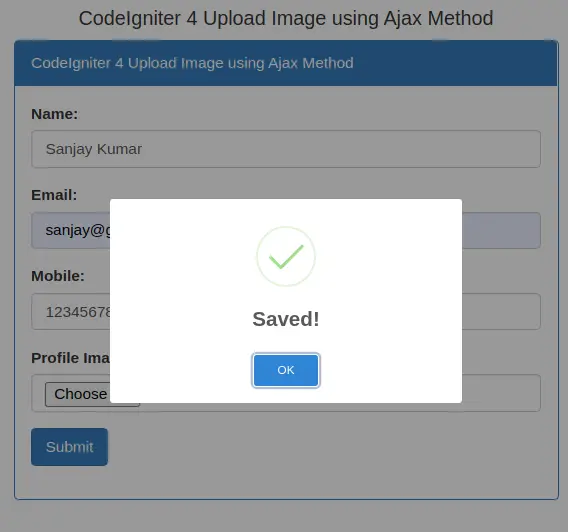
Provide value to form & submit form

Data saved into database table

We hope this article helped you to learn CodeIgniter 4 How To Upload Image using Ajax Request Tutorial in a very detailed way.
Online Web Tutor invites you to try Skillshike! Learn CakePHP, Laravel, CodeIgniter, Node Js, MySQL, Authentication, RESTful Web Services, etc into a depth level. Master the Coding Skills to Become an Expert in PHP Web Development. So, Search your favourite course and enroll now.
If you liked this article, then please subscribe to our YouTube Channel for PHP & it’s framework, WordPress, Node Js video tutorials. You can also find us on Twitter and Facebook.
