Developing a multilingual website is critical for reaching a wide audience and offering a consistent user experience to those who speak different languages.
Building a multilingual website in CodeIgniter 4 entails creating a structure that allows material to be shown in many languages while maintaining efficient management and user-friendly navigation.
This article will walk you through the steps of building a multilingual website in CodeIgniter 4. We’ll look at how to create language files, handle language switching, and display content dynamically based on the user’s language option.
Read More: How To Integrate ChatGPT API in CodeIgniter 4 Tutorial
Let’s get started.
What is Website Language Localization?
Simply creating an website in different different languages is termed as Website Language Localization. A website can be created in various technologies. Each technology has their own syntax to deploy web application in into multi language.
If we are talking about wordpress a PHP CMS, there are several plugins available which works for the same. Creating site in different different languages gain users/viewers/visitors world wide. It ultimately increases site traffic. Nowadays every client wants site should be multi lingual supported.
CodeIgniter 4 Installation
To create a CodeIgniter 4 setup run this given command into your shell or terminal. Please make sure composer should be installed.
composer create-project codeigniter4/appstarter codeigniter-4Assuming you have successfully installed application into your local system.
Environment (.env) Setup
When we install CodeIgniter 4, we will have env file at root. To use the environment variables means using variables at global scope we need to do env to .env
Either we can do via renaming file as simple as that. Also we can do by terminal command.
Open project in terminal
cp env .envAbove command will create a copy of env file to .env file. Now we are ready to use environment variables.
Enable Development Mode
CodeIgniter starts up in production mode by default. You need to make it in development mode to see any error if you are working with application.
Open .env file from root.
# CI_ENVIRONMENT = production

 // Do it to

CI_ENVIRONMENT = development
Now application is in development mode.
Locale Configuration Settings
Open configuration file, App.php from /app/Config folder.
Search for defaultLocale. You will see,
public string $defaultLocale = 'en';This is default locale with application i.e English.
Configuration Steps
Step 1
public bool $negotiateLocale = false;Change To
public bool $negotiateLocale = true;True value is for enabling auto detection mode for locale into application.
Read More: How To Connect CodeIgniter 4 with Multiple Databases?
Step 2
public array $supportedLocales = ['en'];Change To
public array $supportedLocales = ['en', 'es', 'fr'];Here, we have passed our site supported locales. You can pass more than this.
In this article we will see in 3 languages locales i.e en(English), es(Spanish), fr(French). You can find all details about language and it’s locale code.
Language Controller Settings
Loading url Helper
Open BaseController.php from /app/Controllers folder.
Search for $helpers, inside this helpers array simply add this url helper.
protected $helpers = ["url"];This url helper will load base_url() and site_url() functions.
Controller Setup
Open terminal and run this spark command to create controller.
php spark make:controller LanguageIt will create Language.php file inside /app/Controllers folder.
Open Language.php and write this complete code into it.
<?php

namespace App\Controllers;

use App\Controllers\BaseController;

class Language extends BaseController
{
    public function index()
    {
        $session = session();
        $locale = $this->request->getLocale();
        $session->remove('lang');
        $session->set('lang', $locale);
        $url = base_url();
        return redirect()->to($url);
    }
}
Read More: Step-by-Step CodeIgniter 4 HMVC Programming Tutorial
Code Explanation
- $session = session(); // Creating session service instance variable.
- $locale = $this->request->getLocale(); // Reading requested locale and storing into $locale variable.
- $session->remove(‘lang’); // Removing existing saved locale “lang” key from session
- $session->set(‘lang’, $locale); // Saving requested locale into “lang” session key
- $url = base_url(); // Getting application base URL
- redirect()->to($url) // Redirecting to base URL
Parent Controller Settings
In CodeIgniter 4, BaseController.php is the parent controller for every controller file.
We need to add configuration lines to it’s constructor method.
Open BaseController.php from /app/Controllers folder.
//...

public function initController(RequestInterface $request, ResponseInterface $response, LoggerInterface $logger)
{
    // Do Not Edit This Line
    parent::initController($request, $response, $logger);

    // Add these lines
    $session = \Config\Services::session();
    $language = \Config\Services::language();
    $language->setLocale($session->lang);
}
//...
Setup Language Files (Multi Language Settings)
Language files are those files which stores key value pairs of texts.
As we have discussed earlier that you will see site in 3 different languages. So, as per the languages we need to create language folders in /app/Language directory.
We need to create 3 language locale folders(en, es, fr). You can name these folders as per the code of locale. These language locales we will pass into URL redirection.
By default, you can find /en folder into /app/Language directory. So, next to create 2 more folders in it.
Locale folders like,
- /app/Language/en
- /app/Language/es
- /app/Language/fr
Now, we need to create language file which stores languages keys and respective texts.
Setup Language Keys & Texts
Create Text.php into all those three locale folders. This is user defined file name. It will use to call the keys. You can name it as per your requirement.
en Locale (English)
/en/Text.php
<?php
return [
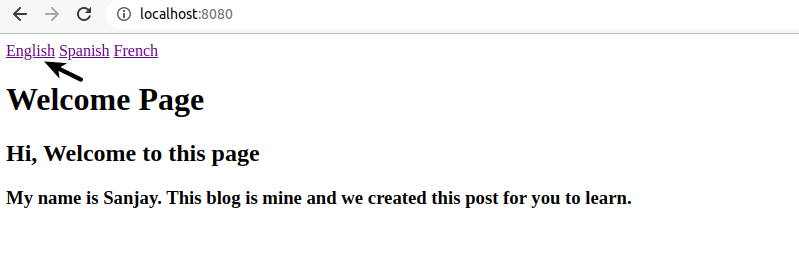
'page_title' => 'Welcome Page',
'welcome_message' => 'Hi, Welcome to this page',
'author_information' => 'My name is Sanjay. This blog is mine and we created this post for you to learn.',
];
es Locale (Spanish)
/es/Text.php
<?php
return [
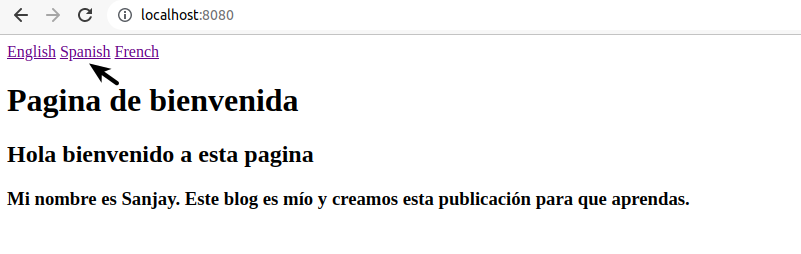
'page_title' => 'Pagina de bienvenida',
'welcome_message' => 'Hola bienvenido a esta pagina',
'author_information' => 'Mi nombre es Sanjay. Este blog es mío y creamos esta publicación para que aprendas.',
];
Read More: Create Automated Logs Every 2 hours in CodeIgniter 4 Tutorial
fr Locale (French)
/fr/Text.php
<?php
return [
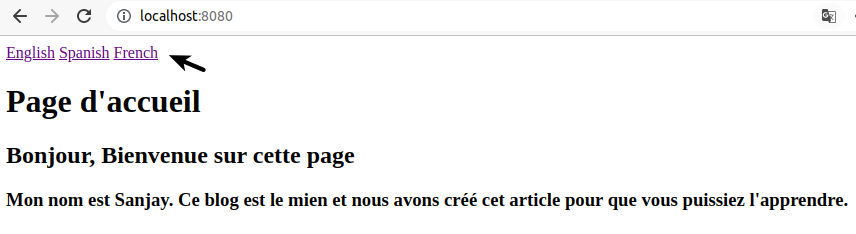
'page_title' => "Page d'accueil",
'welcome_message' => "Bonjour, Bienvenue sur cette page",
'author_information' => "Mon nom est Sanjay. Ce blog est le mien et nous avons créé cet article pour que vous puissiez l'apprendre.",
];
Successfully, you have configured language keys and texts in their respective folders.
Setup Site Controller
This is controller which handles users interface (UI) for multi language site.
$ php spark make:controller SiteIt will create Site.php file inside /app/Controllers folder.
Open Site.php and write this complete code into it.
<?php

namespace App\Controllers;

use App\Controllers\BaseController;

class Site extends BaseController
{
    public function index()
    {
        return view("welcome_user");
    }
}
welcome_user is the view file name which you need to create into /app/Views folder.
Create User View File
Layout file where you will put language change option for user.
According to changed language you have to pick the key from languages according to user’s request and render into the output screen.
Open welcome_user.php from /app/Views folder. Write these simple lines of code into it. You can change it to with your creative designs.
<a class="dropdown-item" href="<?= site_url('lang/en'); ?>">English</a>
<a class="dropdown-item" href="<?= site_url('lang/es'); ?>">Spanish</a>
<a class="dropdown-item" href="<?= site_url('lang/fr'); ?>">French</a>

<h1><?= lang("Text.page_title") ?></h1>
<h2><?= lang("Text.welcome_message") ?></h2>
<h3><?= lang("Text.author_information") ?></h3>
Routes Explanation
- site_url(‘lang/en’) – It will convert site locale to en(English)
- site_url(‘lang/es’) – It will convert site locale to es(Spanish)
- site_url(‘lang/fr’) – It will convert site locale to fr(French)
Add Routes
Open Routes.php from /app/Config folder. Add these routes into it.
//...

$routes->get('/', 'Site::index');
$routes->get('lang/{locale}', 'Language::index');

//...
Application Testing
Open project terminal and start development server via command:
php spark serveURL: http://localhost:8080/
When you click on English
When you click on Spanish
When you click on French
After getting site locale, this code lang(“Text.page_title”) read Text.php file of respective local folder and pick the key page_title.
That’s it.
We hope this article helped you to learn about CodeIgniter 4 How To Create Multi Language Website in a very detailed way.
If you liked this article, then please subscribe to our YouTube Channel for PHP & it’s framework, WordPress, Node Js video tutorials. You can also find us on Twitter and Facebook.
Read more
Hello .. I followed the steps in your tutorial, but I can’t get the translation done .. I think it’s because of how I’m handling the routes in groups. I’m doing the translations to Spanish and English of the backend (dashboard). If you can guide me in advance, I appreciate it.
What error you are getting?
It doesnt change the language.
I got this on the routes.php files:
$routes->get(‘/lang/{locale}’, ‘SiteLanguage::index’);
$routes->group(‘auth’, [‘namespace’ => ‘App\Controllers\Auth’], function($routes){
$routes->get(‘login’, ‘LoginController::loginForm’,[‘as’ => ‘login’]);
$routes->post(‘signin’, ‘LoginController::signin’, [‘as’ => ‘signin’]);
$routes->get(‘logout’, ‘LoginController::signout’, [‘as’ => ‘signout’]);
});
$routes->group(‘/’, [‘namespace’ => ‘App\Controllers\Frontend’], function($routes){
$routes->get(”, ‘PagesController::index’, [‘as’=> ‘home’]);
});
$routes->group(‘dashboard’, [‘namespace’ => ‘App\Controllers\Backend’, ‘filter’ => ‘auth:Admin’], function($routes){
$routes->get(”, ‘DashboardController::index’,[‘as’=>’dashboard’]);
$routes->group(‘languages’, function($routes){
$routes->get (”, ‘LanguageController::index’, [‘as’=> ‘languages’]);
$routes->get (‘create’, ‘LanguageController::create’, [‘as’=> ‘create’]);
$routes->post(‘store’, ‘LanguageController::store’, [‘as’=> ‘store’]);
$routes->get (‘edit/(:num)’, ‘LanguageController::edit/$1’, [‘as’=> ‘edit’]);
$routes->post(‘update’, ‘LanguageController::update’, [‘as’=> ‘update’]);
$routes->get (‘delete/(:num)’, ‘LanguageController::delete/$1’, [‘as’=> ‘delete’]);
});
$routes->group(‘usersgroups’, function($routes)
{
$routes->get (”, ‘UserGroupController::index’, [‘as’=> ‘usersgroups’]);
$routes->get (‘create’, ‘UserGroupController::create’, [‘as’=> ‘creategroup’]);
$routes->post(‘store’, ‘UserGroupController::store’, [‘as’=> ‘storegroup’]);
$routes->get (‘edit/(:num)’, ‘UserGroupController::edit/$1’, [‘as’=> ‘editgroup’]);
$routes->post(‘update’, ‘UserGroupController::update’, [‘as’=> ‘updategroup’]);
$routes->get (‘delete/(:num)’, ‘UserGroupController::delete/$1’, [‘as’=> ‘deletegroup’]);
});
$routes->group(‘users’, function($routes)
{
$routes->get (”, ‘UserController::index’, [‘as’=> ‘users’]);
$routes->get (‘create’, ‘UserController::create’, [‘as’=> ‘createuser’]);
$routes->post(‘store’, ‘UserController::store’, [‘as’=> ‘storeuser’]);
$routes->get (‘edit/(:num)’, ‘UserController::edit/$1’, [‘as’=> ‘edituser’]);
$routes->post(‘update’, ‘UserController::update’, [‘as’=> ‘updateuser’]);
$routes->get (‘delete/(:num)’, ‘UserController::delete/$1’, [‘as’=> ‘deleteuser’]);
});
$routes->group(‘siteadmin’, function($routes)
{
$routes->get(”, ‘SiteadminController::index’, [‘as’=> ‘siteadmin’]);
});
$routes->group(‘posts’, function($routes)
{
$routes->get(”, ‘PostController::index’, [‘as’=> ‘posts’]);
});
$routes->group(‘categories’, function($routes)
{
$routes->get(”, ‘CategoryController::index’, [‘as’=> ‘categories’]);
});
$routes->group(‘services’, function($routes)
{
$routes->get(”, ‘ServiceController::index’, [‘as’=> ‘services’]);
});
});
Everytime I click to change the language it redirects to the home page.
What am I doing wrong?
Hi, I think this is due to using Auth. You have implemented auth which i think checking session and redirecting to home page if there is no value.
You said:
“Hi, I think this is due to using Auth. You have implemented auth which i think checking session and redirecting to home page if there is no value.”
auth is a filter that I use to access or not to the dashboard; How can I implement your multilanguage solution in this case? Thanks in advanced.
Let me tell you what I did,
in LoginController.php :
session()->set([
‘user_id’ => $user->id,
‘username’ => $user->username,
‘real_name’ => $user->name . ‘ ‘ . $user->last_name,
‘group’ => $user->groupname,
‘is_logged’ => true,
‘lang’ => $this->request->getLocale(), // $this->request->getLocale()” then when I login it sends me to homepage, but I got back to dashboard it takes the language, to solve this I changed in the SiteLanguage.php Controller:
” return redirect()->route(‘dashboard’); ” and it works but when I’m in Form, for example, a form to create a user, and want to change the language, It get me out to the dashboard, I know that is for the redirection to ‘dasboard’.
Is there a way to change the language while in a form o any section in the dashboard without to go out it? I mean to stay in that section.
thanks in advanced
Hi Sanjay, do you know how to implement a tree directory inside the language folder? e.g.
app
Language
en
siteA
header.php
SiteB
header.php
siteA and siteB are 2 different directories, and I want to load header.php depending on the route
I know I can do
header.php
return [
‘SiteA.title’ => ‘Hello A!’,
‘SiteB.title’ => ‘Hello B!’
];
But I want to organize the directories better because I have an APP that runs like 10 sites, and each site has its translations in each language.
Hi its working fine but can you help to add locale to url for example https://example.com/en/page/view, https://example.com/lt/page/view, https://example.com/ru/page/view It mean i want change language and stay in same page, because i then want to generate meta tags for Google SEO better search in Google. Or maybe you can configure this code (https://www.youtube.com/watch?v=CTb9ZqUM2Hw) i founded in youtube because he make all i need but not working for some reason
Okay