Laravel’s queue system provides a powerful mechanism for handling time-consuming tasks, such as sending emails, in a background process, ensuring a smoother and more responsive user experience. Leveraging Laravel 10’s queue system to send emails allows developers to offload email sending tasks to background jobs, optimizing application performance.
In this tutorial, we’ll see the comprehensive process of utilizing Laravel 10’s queue system to send emails. This functionality empowers developers to queue email sending tasks, enabling faster responses for users while the emails are processed asynchronously in the background.
Read More: Build WordPress User Login Using Laravel Corcel Tutorial
Let’s get started.
Laravel Installation
Open terminal and run this command to create a laravel project.
composer create-project laravel/laravel myblogIt will create a project folder with name myblog inside your local system.
To start the development server of laravel –
php artisan serveURL: http://127.0.0.1:8000
Assuming laravel already installed inside your system.
Step #1: Setup Mail Class with Configuration
Create a Mail class using Laravel Mail facade,
php artisan make:mail SendEmailTestIt will create a new folder “Mail” in app directory with SendEmailTest.php file.
Open app/Mail/SendEmailTest.php file and write this complete code into it,
<?php

namespace App\Mail;

use Illuminate\Bus\Queueable;
use Illuminate\Contracts\Queue\ShouldQueue;
use Illuminate\Mail\Mailable;
use Illuminate\Mail\Mailables\Content;
use Illuminate\Mail\Mailables\Envelope;
use Illuminate\Queue\SerializesModels;

class SendEmailTest extends Mailable
{
    use Queueable, SerializesModels;
    /**
     * Create a new message instance.
     */
    public function __construct()
    {

    }

    /**
     * Get the message envelope.
     */
    public function envelope(): Envelope
    {
        return new Envelope(
            subject: 'Mail from Online Web Tutor',
        );
    }

    /**
     * Get the message content definition.
     */
    public function content(): Content
    {
        return new Content(
            view: 'emails.test',
        );
    }

    /**
     * Get the attachments for the message.
     *
     * @return array

     */
    public function attachments(): array
    {
        return [];
    }
}
Next,
We have to create a blade file for email template,
Read More: Laravel with Gupshup API Send WhatsApp Message
Email Template Settings
Create a blade view file test.blade.php inside resources/views/emails folder.
Open file and write this complete code into it,
<!DOCTYPE html>
<html>
<head>
    <title>How To Use Laravel 10 Queue To Send Emails Tutorial</title>
</head>
<body>

<center>
<h2 style="padding: 23px;background: #b3deb8a1;border-bottom: 6px green solid;">
    <a href="https://onlinewebtutorblog.com/">Visit Our Website : Online Web Tutor</a>
</h2>
</center>

<p>Hi User,</p>
<p>Lorem ipsum dolor sit amet, consectetur adipisicing elit, sed do eiusmod
tempor incididunt ut labore et dolore magna aliqua. Ut enim ad minim veniam,
quis nostrud exercitation ullamco laboris nisi ut aliquip ex ea commodo
consequat. Duis aute irure dolor in reprehenderit in voluptate velit esse
cillum dolore eu fugiat nulla pariatur. Excepteur sint occaecat cupidatat non
proident, sunt in culpa qui officia deserunt mollit anim id est laborum.</p>

<strong>Best Regards,</strong>

</body>
</html>
Step #2: How To Configure SMTP in Laravel?
To configure SMTP details, open up the file .env from application root.
We will pass mail driver as gmail server, mail host, mail port, mail username, mail password.
//..

MAIL_MAILER=smtp
MAIL_HOST=smtp.gmail.com
MAIL_PORT=587
MAIL_USERNAME="your_username@gmail.com"
MAIL_PASSWORD="your_password"
MAIL_ENCRYPTION=null
MAIL_FROM_ADDRESS="your_email_address@gmail.com"
MAIL_FROM_NAME="Online Web Tutor Support"

//...
Step #3: Queue Configuration
Configure queue driver,
Open .env file and update this key value,
QUEUE_CONNECTION=databaseAfter that you need to generate migration and create tables for queue,
php artisan queue:tableRun Migrations,
php artisan migrateRead More: How To Fix Laravel “Vite Manifest Not Found” Error Tutorial
Step #4: Setup Queue Job
Open project terminal and run this command.
php artisan make:job SendEmailJobIt will create app/Jobs/SendEmailJob.php queue job file. Open file and add this complete code into it,
<?php

namespace App\Jobs;

use Illuminate\Bus\Queueable;
use Illuminate\Contracts\Queue\ShouldBeUnique;
use Illuminate\Contracts\Queue\ShouldQueue;
use Illuminate\Foundation\Bus\Dispatchable;
use Illuminate\Queue\InteractsWithQueue;
use Illuminate\Queue\SerializesModels;
use App\Mail\SendEmailTest;
use Illuminate\Support\Facades\Mail;

class SendEmailJob implements ShouldQueue
{
    use Dispatchable, InteractsWithQueue, Queueable, SerializesModels;

    protected $details;

    /**
     * Create a new job instance.
     */
    public function __construct($details)
    {
        $this->details = $details;
    }

    /**
     * Execute the job.
     */
    public function handle(): void
    {
        $email = new SendEmailTest();
        Mail::to($this->details['email'])->send($email);
    }
}
Step #5: Add Route
Open web.php file from /routes folder. Add this route and code into it.
Route::get('email-test', function(){

    $details['email'] = 'email_to@gmail.com';

    dispatch(new App\Jobs\SendEmailJob($details));

    dd('done');
});
Step #6: Test Queue Job
Next, you have to run the given command to see queue process.
php artisan queue:workDon’t close this terminal tab. It will show your running job status.
Application Testing
Run this command into project terminal to start development server,
php artisan serveURL: http://127.0.0.1:8000/email-test
Output
done
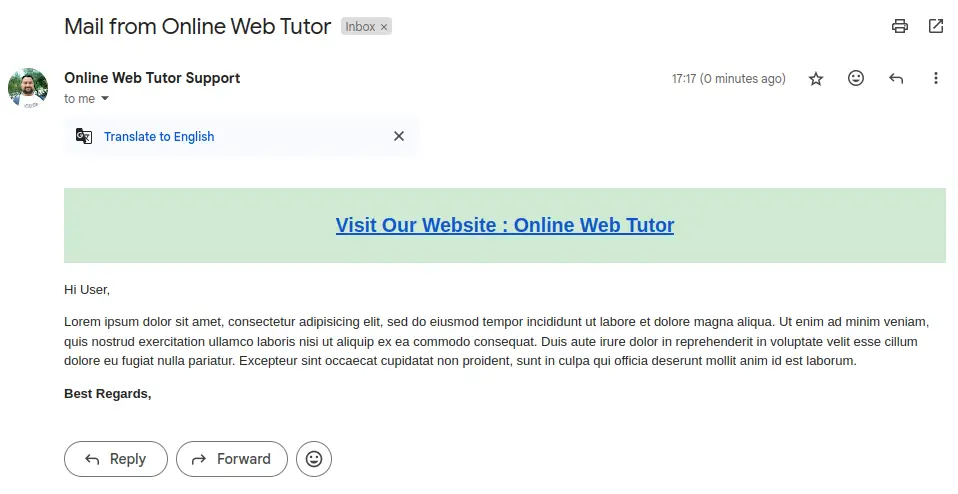
Job Queue Status

That’s it.
We hope this article helped you to learn about How To Use Laravel 10 Queue To Send Emails Tutorial in a very detailed way.
If you liked this article, then please subscribe to our YouTube Channel for PHP & it’s framework, WordPress, Node Js video tutorials. You can also find us on Twitter and Facebook.
Read more