Handling XML files and putting their data into the database is a common requirement for numerous web applications in Laravel 10. Laravel provides a simple and effective way to handle and save XML data into your database, whether you’re working with XML-based data feeds, configurations, or any other XML files.
In this lesson, we’ll walk you through the steps of uploading an XML file, parsing its data, and saving it to the database in Laravel 10. We’ll look at the tools and strategies for working with XML files, extracting useful information, and storing it in a database with Laravel’s Eloquent ORM.
Read More: Laravel 10 Remove Composer Package Tutorial
Let’s get started.
Laravel Installation
Open terminal and run this command to create a laravel project.
composer create-project laravel/laravel myblogIt will create a project folder with name myblog inside your local system.
To start the development server of laravel –
php artisan serveURL: http://127.0.0.1:8000
Assuming laravel already installed inside your system.
Create Database & Connect
To create a database, either we can create via Manual tool of PhpMyadmin or by means of a mysql command.
CREATE DATABASE laravel_app;
To connect database with application, Open .env file from application root. Search for DB_ and update your details.
DB_CONNECTION=mysql
DB_HOST=127.0.0.1
DB_PORT=3306
DB_DATABASE=laravel_app
DB_USERNAME=root
DB_PASSWORD=root
Create Model & Migration
Open project into terminal.
Let’s create model and migration by using a single command.
Read More: Top 40 Pixwox Alternatives for Viewing and Downloading Instagram Stories
Creating model and migration …
$ php artisan make:model XmlData -mAbove command will create 2 files –
- Model file with name XmlData.php inside /app/Models folder.
- Migration File with name 2023_03_21_040518_create_xml_data_table.php inside /database/migrations folder.
Open up the migration file and write this code snippet
<?php

use Illuminate\Database\Migrations\Migration;
use Illuminate\Database\Schema\Blueprint;
use Illuminate\Support\Facades\Schema;

return new class extends Migration
{
    /**
     * Run the migrations.
     */
    public function up(): void
    {
        Schema::create('xml_data', function (Blueprint $table) {
            $table->id();
            $table->string("name", 120);
            $table->string("category", 20);
            $table->string("price", 10);
            $table->integer("total_videos");
        });
    }

    /**
     * Reverse the migrations.
     */
    public function down(): void
    {
        Schema::dropIfExists('xml_data');
    }
};
Open model file XmlData.php and write this code into it.
<?php

namespace App\Models;

use Illuminate\Database\Eloquent\Factories\HasFactory;
use Illuminate\Database\Eloquent\Model;

class XmlData extends Model
{
    use HasFactory;

    public $timestamps = false;
}
Run Migration
Back to terminal and run this command to run migration file.
$ php artisan migrateIt will run all pending migrations of your application. xml_data table will be created.

Read More: Laravel 10 Custom Validation Rule Tutorial
Next,
Create Data Controller
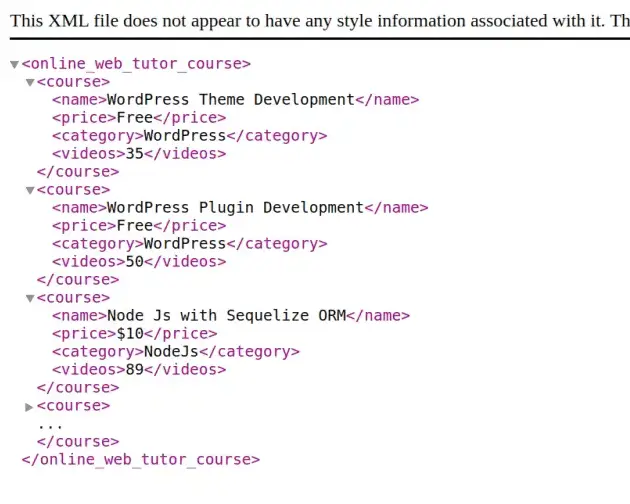
We need to create a controller where we will parse or read xml data string from file. Put your XML file into public folder.
To create controller, run this command –
$ php artisan make:controller ReadXmlControllerIt will create a file inside /app/Http/Controllers folder.
Open up the created file ReadXmlController.php and write this code into it.
<?php
namespace App\Http\Controllers;
use Illuminate\Http\Request;
use App\Models\XmlData;
class ReadXmlController extends Controller
{
public function index(Request $req)
{
$xmlDataString = file_get_contents(public_path('sample-course.xml'));
$xmlObject = simplexml_load_string($xmlDataString);
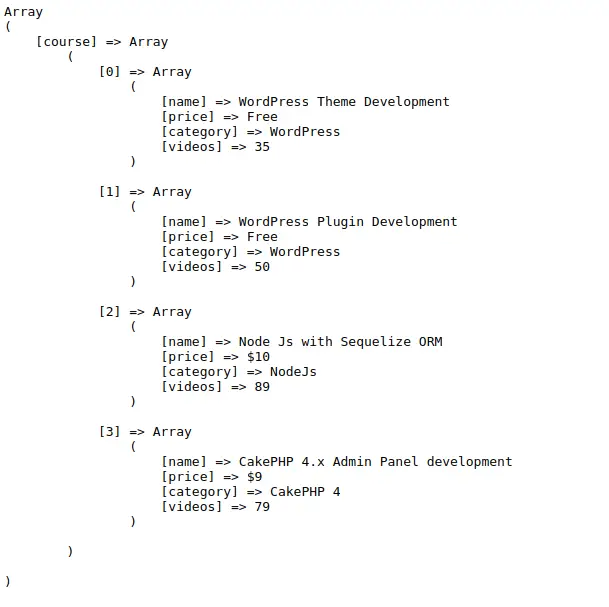
$json = json_encode($xmlObject);
$phpDataArray = json_decode($json, true);
// echo "<pre>";
// print_r($phpDataArray);
if (count($phpDataArray['course']) > 0) {
$dataArray = array();
foreach ($phpDataArray['course'] as $index => $data) {
$dataArray[] = [
"name" => $data['name'],
"category" => $data['category'],
"price" => $data['price'],
"total_videos" => $data['videos']
];
}
XmlData::insert($dataArray);
}
}
}
- public_path(‘sample-course.xml’) XML file should be placed in public directory. public_path returns the path upto /public folder
- simplexml_load_string($xmlDataString); It’s a PHP function used to read xml file
- XmlData::insert($dataArray); Insert data array into table
Add Route
Open web.php from /routes folder. Add this route into it.
//...
use App\Http\Controllers\ReadXmlController;

Route::get("read-xml", [ReadXmlController::class, "index"]);

//...
Application Testing
Run this command into project terminal to start development server,
php artisan serveURL: http://127.0.0.1:8000/read-xml
Read More: PeopleTools Att – Benefits and Everything You Need to Know
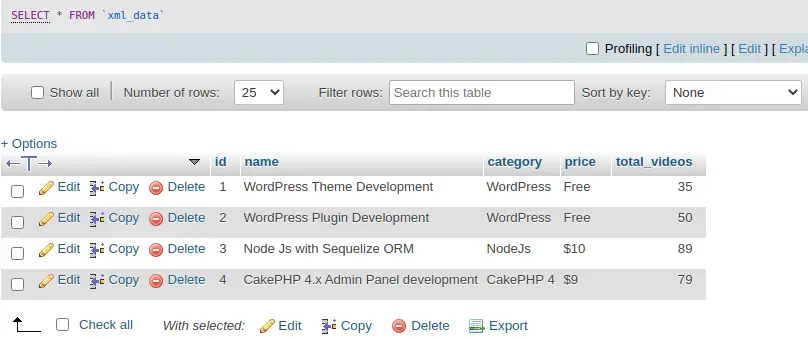
Once data will be uploaded, then database view will be like this –
We hope this article helped you to learn about i.e Laravel 10 Upload and Save XML File Data in Database in a very detailed way.
If you liked this article, then please subscribe to our YouTube Channel for PHP & it’s framework, WordPress, Node Js video tutorials. You can also find us on Twitter and Facebook.
Read more