Adding WhatsApp messaging to websites can really improve how users communicate. In Laravel 11, using Twilio’s powerful tools makes it easy for developers to send WhatsApp messages right from their apps.
This tutorial guides you through the whole process of sending WhatsApp messages in Laravel 11 with Twilio. It’s a great way for developers to add WhatsApp features to their apps, making communication more personal and automated.
Recognizing the importance of WhatsApp messaging in today’s apps is key to making communication better for users.
Read More: How To Generate Invoice PDF in Laravel 11 Example
In this example, we’ll use a package called “twilio/sdk” to send WhatsApp messages to users. Twilio gives you a WhatsApp API, letting you send messages and media to WhatsApp users in your app’s code.
Let’s get started.
Laravel Installation
Open terminal and run this command to create a laravel project.
composer create-project laravel/laravel myblogIt will create a project folder with name myblog inside your local system.
To start the development server of laravel –
php artisan serveURL: http://127.0.0.1:8000
Assuming laravel already installed inside your system.
Set up a Twilio Account
Create an account here

Next add Twilio Phone Number
Next you can get account SID, Token and Number
Copy all these details and paste into your .env file.
TWILIO_SID=your_twilio_account_sid
TWILIO_AUTH_TOKEN=your_twilio_auth_token
TWILIO_WHATSAPP_NUMBER=your_twilio_whatsapp_number
Installation of “twilio/sdk” Package
Open project terminal and run this command to install twilio sdk package,
composer require twilio/sdkCreate Message Controller
Open project terminal and run this command,
php artisan make:controller MessageControllerIt will create a controller class with name MessageController.php inside app/Http/Controllers folder.
Read More: Laravel 11 RESTful APIs with Sanctum Authentication
Open controller class and write this complete code into it,
<?php

namespace App\Http\Controllers;

use Illuminate\Http\Request;
use Illuminate\View\View;
use Twilio\Rest\Client;
use Exception;

class MessageController extends Controller
{
    public function index(): View
    {
        return view('whatsapp');
    }

    public function store(Request $request)
    {
        $twilioSid = env('TWILIO_SID');
        $twilioToken = env('TWILIO_AUTH_TOKEN');
        $twilioWhatsAppNumber = env('TWILIO_WHATSAPP_NUMBER');
        $recipientNumber = $request->phone;
        $message = $request->message;

        try {
            $twilio = new Client($twilioSid, $twilioToken);
            $twilio->messages->create(
                $recipientNumber,
                [
                    "from" => "whatsapp:+". $twilioWhatsAppNumber,
                    "body" => $message,
                ]
            );

            return back()->with(['success' => 'WhatsApp message sent successfully!']);
        } catch (Exception $e) {
            return back()->with(['error' => $e->getMessage()]);
        }
    }
}
Blade Template Setup
Create a file whatsapp.blade.php inside resources/views folder. Open file and write this complete code into it.
<!DOCTYPE html>
<html>

<head>
    <title>How Send WhatsApp Messages in Laravel 11 Using Twilio - Online Web Tutor</title>
    <meta charset="utf-8">
    <meta http-equiv="X-UA-Compatible" content="IE=edge">
    <meta name="viewport" content="width=device-width, initial-scale=1">
    <link href="https://cdn.jsdelivr.net/npm/bootstrap@5.0.2/dist/css/bootstrap.min.css" rel="stylesheet">
</head>

<body>
    <div class="container" style="margin-top: 10px;">

        <div class="row">
            <div class="col-md-9">

                <div class="card">
                    <div class="card-header">
                        <h4>How Send WhatsApp Messages in Laravel 11 Using Twilio - Online Web Tutor</h4>
                    </div>
                    <div class="card-body">
                        <form method="POST" action="{{ route('whatsapp.post') }}">

                            {{ csrf_field() }}

                            @if ($message = Session::get('success'))
                            <div class="alert alert-success alert-block">
                                <strong>{{ $message }}</strong>
                            </div>
                            @endif

                            @if ($message = Session::get('error'))
                            <div class="alert alert-danger alert-block">
                                <strong>{{ $message }}</strong>
                            </div>
                            @endif

                            <div class="mb-3">
                                <label class="form-label" for="inputName">Phone:</label>
                                <input type="text" name="phone" id="inputName"
                                    class="form-control @error('phone') is-invalid @enderror"
                                    placeholder="Phone Number">

                                @error('phone')
                                <span class="text-danger">{{ $message }}</span>
                                @enderror
                            </div>

                            <div class="mb-3">
                                <label class="form-label" for="inputName">Message:</label>
                                <textarea name="message" id="inputName"
                                    class="form-control @error('message') is-invalid @enderror"
                                    placeholder="Enter Message"></textarea>

                                @error('message')
                                <span class="text-danger">{{ $message }}</span>
                                @enderror
                            </div>

                            <div class="mb-3">
                                <button class="btn btn-success btn-submit">Send Message</button>
                            </div>
                        </form>
                    </div>
                </div>

            </div>
        </div>


    </div>
</body>

</html>
Add Route
Open routes/web.php and add this route into it,
//...
use App\Http\Controllers\MessageController;

//...
Route::get('whatsapp', [MessageController::class, 'index']);
Route::post('whatsapp', [MessageController::class, 'store'])->name('whatsapp.post');
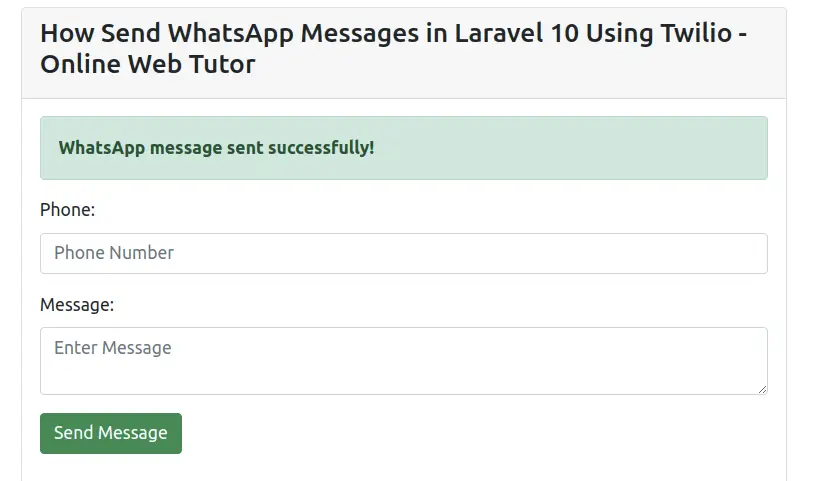
Application Testing
Run this command into project terminal to start development server,
php artisan serveURL: http://127.0.0.1:8000/whatsapp
That’s it.
We hope this article helped you to learn about How Send WhatsApp Messages in Laravel 11 Using Twilio in a very detailed way.
If you liked this article, then please subscribe to our YouTube Channel for PHP & it’s framework, WordPress, Node Js video tutorials. You can also find us on Twitter and Facebook.
Read more