
Creating a web scraper using Node.js and Express allows developers to extract data from websites efficiently. In this tutorial, we’ll explore the development process of a web scraper using Node.js and Express, enabling users to retrieve specific data from web pages.
In this tutorial, we’ll cover essential concepts including setting up a Node.js project, using libraries like <strong>axios</strong> or <strong>node-fetch</strong> for HTTP requests, utilizing libraries like <strong>cheerio</strong> or <strong>puppeteer</strong> for parsing HTML and extracting data, and implementing routes with Express to handle scraping requests.
Read More: Creating CRUD APIs with Node.js and Sequelize CLI
Let’s get started.
What is Web Page Scrapper?
A web page scraper, often referred to as a web scraper or web scraping tool. It is a program or script designed to extract data from websites. It automatically navigates through web pages, collects specific information, and then organizes and stores that data for various purposes.
Web scraping involves fetching and extracting data from web pages by analyzing the HTML structure of the web page. This process can involve accessing URLs, parsing HTML content, and extracting specific data points or elements like text, images, tables, links, or any other relevant information.
Here, we will create webpage scrapper which scraps Headings, Links, Anchors, Images, Meta, etc.
Steps To Create Webpage Scrapper with Node js and Express
Create an application folder with name webpage-scrap
>> “package.json” setup
Open project terminal and run this command,
npm init -yIt will create a file package.json file with all default values in it. If you open you will see as,
{
    "name": "scrapper",
    "version": "1.0.0",
    "description": "",
    "main": "index.js",
    "scripts": {
        "test": "echo \"Error: no test specified\" && exit 1"
    },
    "keywords": [],
    "author": "",
    "license": "ISC",
    "dependencies": {
        "axios": "^1.6.2",
        "cheerio": "^1.0.0-rc.12",
        "express": "^4.18.2",
        "nodemon": "^3.0.1"
    }
}
>> Main entry file “app.js” setup
Create app.js file into your application. Once you create, update package.json
<strong>"main": "app.js",</strong>>> Installation of Node Packages
Open project terminal and run this command to install following node packages,
npm axios cheerio express nodemonAbove command installs 4 node packages into your setup.
Usage of Node packages,
- The
<strong>axios</strong>package is used in the example code to make HTTP requests to fetch the HTML content of a web page. - Cheerio is a popular library used for web scraping in Node.js. It essentially provides a jQuery-like interface to traverse and manipulate the HTML and XML documents, making it easier to extract specific elements and data from web pages.
- express is the popular node js web application framework.
- nodemon package installed to listen application changes and restarts web server.
Read More: Create HTTP Web Server in Node js Using Express js
>> Code Setup to Scrap Webapge by URL
Open app.js and write this complete code into it,
const express = require("express");
const axios = require('axios');
const cheerio = require('cheerio');
const PORT = 8087;
const app = express();
// Scrap website
app.get("/scrap", (req, res) => {
// URL of the website you want to scrape
const url = 'YOUR_WEBPAGE_URL';
// Fetch the HTML content of the website
axios.get(url)
.then((response) => {
const html = response.data;
// Load the HTML into Cheerio
const $ = cheerio.load(html);
// Extract title
const title = $('title').text().trim();
// Extract meta tags
const metaTags = [];
$('meta').each((index, element) => {
const tag = {};
tag.name = $(element).attr('name') || $(element).attr('property') || $(element).attr('charset') || $(element).attr('http-equiv');
tag.content = $(element).attr('content');
metaTags.push(tag);
});
// Extract links
const links = [];
$('a').each((index, element) => {
const href = $(element).attr('href');
if (href) {
links.push(href);
}
});
// Extract script sources
const scripts = [];
$('script').each((index, element) => {
const src = $(element).attr('src');
if (src) {
scripts.push(src);
}
});
// Extract images
const images = [];
$('img').each((index, element) => {
const src = $(element).attr('src');
if (src) {
images.push(src);
}
});
// Initialize arrays for different headings
const h1Headings = [];
const h2Headings = [];
const h3Headings = [];
const h4Headings = [];
const h5Headings = [];
const h6Headings = [];
// Extract headings and push into respective arrays
$('h1, h2, h3, h4, h5, h6').each((index, element) => {
const text = $(element).text();
const tagName = $(element).prop('tagName').toLowerCase();
switch (tagName) {
case 'h1':
h1Headings.push(text);
break;
case 'h2':
h2Headings.push(text);
break;
case 'h3':
h3Headings.push(text);
break;
case 'h4':
h4Headings.push(text);
break;
case 'h5':
h5Headings.push(text);
break;
case 'h6':
h6Headings.push(text);
break;
default:
break;
}
});
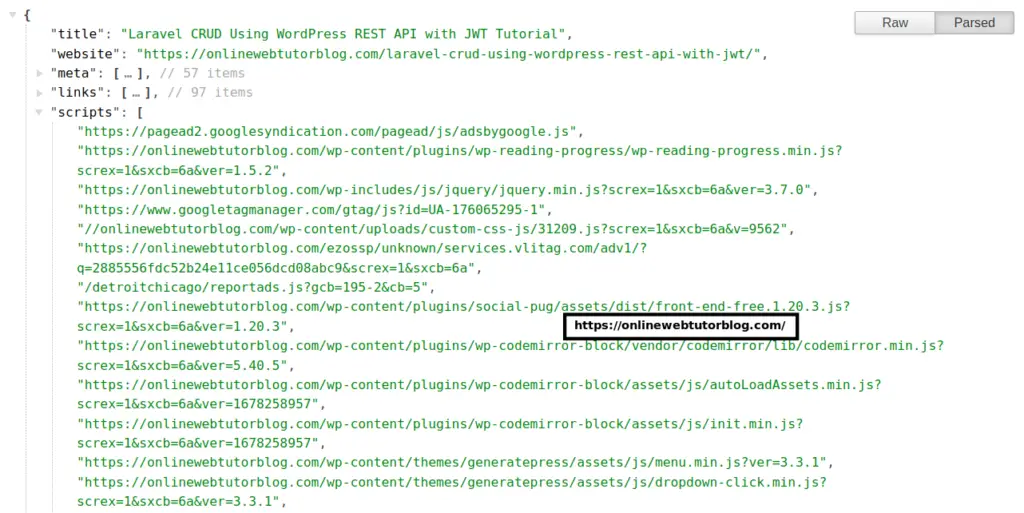
// Display extracted data
res.json({
title: title,
website: url,
meta: metaTags,
links: links,
scripts: scripts,
images: images,
headings: {
H1: h1Headings,
H2: h2Headings,
H3: h3Headings,
H4: h4Headings,
H5: h5Headings,
H6: h6Headings
}
});
})
.catch((error) => {
res.json({
website: url,
error: error
});
});
});
app.listen(PORT, () => {
console.log("Application started...");
});Read More: Nodejs Express REST APIs with JWT Authentication Tutorial
All Done!
Application Testing
Open project terminal and run this command,
npx nodemonAbove command will start development server
URL: http://localhost:8087/scrap
That’s it.
We hope this article helped you to learn about Create WebPage Scrapper Using Node js and Express Tutorial in a very detailed way.
If you liked this article, then please subscribe to our YouTube Channel for PHP & it’s framework, WordPress, Node Js video tutorials. You can also find us on Twitter and Facebook.
Read more