When we work with Forms in web application, we should consider the use cases of validations, security from robots, invalid scripts etc. Inside this article we will see a such security feature available in codeigniter 4 i.e Honeypot class.
Article gives you the explanation of CodeIgniter 4 Honeypot Tutorial. It’s a security feature to prevent forms invalid request from bots.
This will be very interesting to learn into a great depth. We will start from it’s configurations to its complete usage.
Learn More –
- Custom Helper in CodeIgniter 4
- DataTable Excel Data Export in CodeIgniter 4 Tutorial
- Encryption Service in CodeIgniter 4 Tutorial
- Export Data Into Excel Report In CodeIgniter 4 Tutorial
Let’s get started.
CodeIgniter 4 Installation
To create a CodeIgniter 4 setup run this given command into your shell or terminal. Please make sure composer should be installed.
composer create-project codeigniter4/appstarter codeigniter-4Assuming you have successfully installed application into your local system.
Environment (.env) Setup
When we install CodeIgniter 4, we will have env file at root. To use the environment variables means using variables at global scope we need to do env to .env
Either we can do via renaming file as simple as that. Also we can do by terminal command.
Open project in terminal
cp env .envAbove command will create a copy of env file to .env file. Now we are ready to use environment variables.
Enable Development Mode
CodeIgniter starts up in production mode by default. You need to make it in development mode to see any error if you are working with application.
Open .env file from root.
# CI_ENVIRONMENT = production

 // Do it to

CI_ENVIRONMENT = development
Now application is in development mode.
What is Honeypot in CodeIgniter?
Honeypot Class makes it possible to determine when Bot make request using form in Codeigniter 4 project.
The feature of this class can be enabled by ‘/app/Config/Filters.php‘ file of CodeIgniter 4 application. It attaches a hidden field in every form inside application automatically.
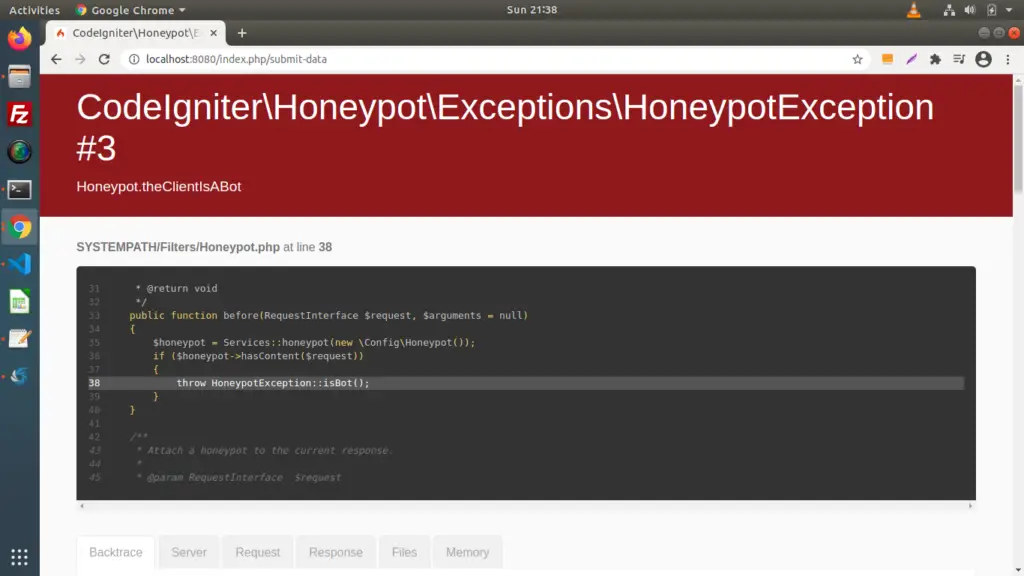
This hidden field is not visible to users but accessible to Bots. So when ever this field’s value is not empty then application throw ”HoneypotException” and crash the webpage to abort request made by Bot and prevents application from spam.
Honeypot Security Configuration
Go into project setup and open /app/Config/Honeypot.php. It will be a class file where we configure honeypot usage settings.
Open .env file, Initially we will see like this with # symbol. This # symbol indicates the code is currently not in use (commented).
#--------------------------------------------------------------------
# HONEYPOT
#--------------------------------------------------------------------

# honeypot.hidden = 'true'
# honeypot.label = 'Fill This Field'
# honeypot.name = 'honeypot'
# honeypot.template = '<label>{label}</label><input type="text" name="{name}" value=""/>'
# honeypot.container = '<div style="display:none">{template}</div>'
To use it in application, we need to remove # symbol.
The same settings we can find inside /app/Config/Honeypot.php
<?php

namespace Config;

use CodeIgniter\Config\BaseConfig;

class Honeypot extends BaseConfig
{
	/**
	 * Makes Honeypot visible or not to human
	 *
	 * @var boolean
	 */
	public $hidden = true;

	/**
	 * Honeypot Label Content
	 *
	 * @var string
	 */
	public $label = 'Fill This Field';

	/**
	 * Honeypot Field Name
	 *
	 * @var string
	 */
	public $name = 'honeypot';

	/**
	 * Honeypot HTML Template
	 *
	 * @var string
	 */
	public $template = '<label>{label}</label><input type="text" name="{name}" value=""/>';

	/**
	 * Honeypot container
	 *
	 * @var string
	 */
	public $container = '<div style="display:none">{template}</div>';
}
Enable Honeypot Feature in Application
To enable this security settings, we need to open Filters.php file /app/Config.
We can see we have two sections ($aliases, $globals) where honeypot is configured.
public $aliases = [
   'csrf' => CSRF::class,
    'toolbar' => DebugToolbar::class,
    'honeypot' => Honeypot::class,
];
This piece of code is only to load and give it a alias name to use Honeypot class (use CodeIgniter\Filters\Honeypot) over the application. It’s default class provided in CodeIgniter 4 application.
The main focus over enabling this feature. So to enable that, we need to update $globals variable. $globals variables is available globally to entire application.
public $globals = [
      'before' => [
          'honeypot',
         // 'csrf',
      ],
      'after' => [
         'toolbar',
         'honeypot',
      ],
];
We have removed comment from honeypot. Now, application is ready to use it.
Form Processing with Honeypot Template
Let’s assume we have a any form inside application. I am considering a simple form in which we have two input like for name and an email address.
<form action="<?= site_url('submit-data') ?>" method="post">
  <p>
     Name: <input type="text" name="name">
  </p>
  <p>
     Email: <input type="email" name="email">
  </p>
  <button type="submit">Submit</button>
</form>

Create a Route
Open Routes.php from /app/Config/Routes.php. Add this piece of code into it.
$routes->post("submit-data", function(){
     print_r($this->request->getVar());
});
Submitting form with Name & Email value

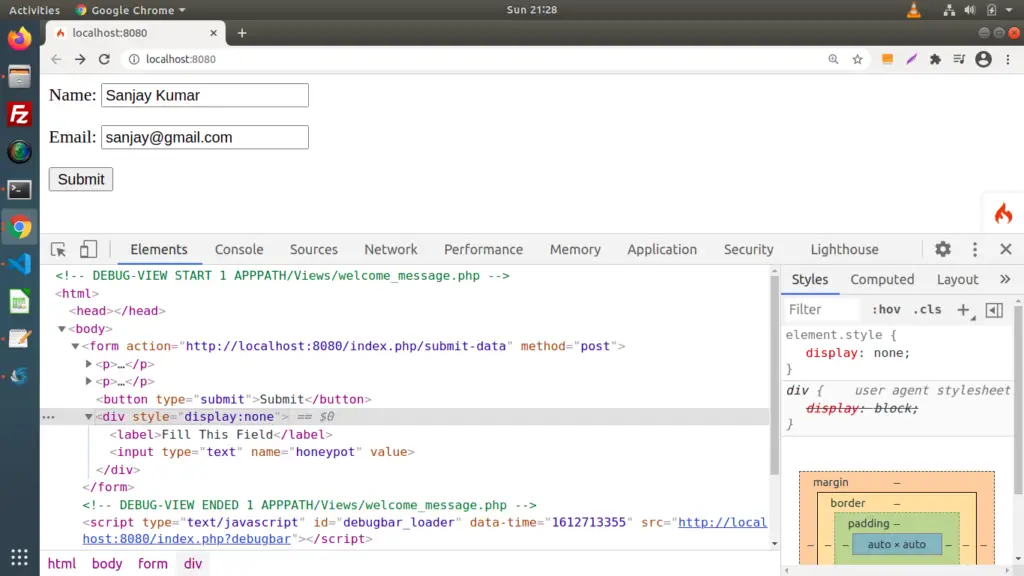
We can see we have a honeypot variable which haven’t defined inside HTML but we are accessing. It is because when we enable Honeypot security feature, it adds a hidden HTML tag for this input.

<div style="display:none">
  <label>Fill This Field</label>
  <input type="text" name="honeypot" value="">
</div>
How Form Protected From Bots?
When end users submit any form. Honeypot template variable, it will give always an empty value at server. Because it’s a hidden field which is not visible to end users and can’t be filled.
But when this form will be submitted by any bot then they process the this hidden field as well with a value. Bots reads code and process it to the server.
At server if we access any value inside input field with name honeypot it means form has been submitted by bot and then honeypot throws an exception and crashes request.

We hope this article helped you to learn CodeIgniter 4 Honeypot Tutorial | Security From Robots in a very detailed way.
If you liked this article, then please subscribe to our YouTube Channel for PHP & it’s framework, WordPress, Node Js video tutorials. You can also find us on Twitter and Facebook.
Read more